My Garage
My Account
Cart
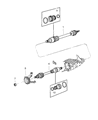
Genuine 2000 Chrysler Cirrus Axle Shaft
Car Axle Shaft- Select Vehicle by Model
- Select Vehicle by VIN
Select Vehicle by Model
orMake
Model
Year
Select Vehicle by VIN
For the most accurate results, select vehicle by your VIN (Vehicle Identification Number).
2 Axle Shafts found

 Product Specifications
- Other Name: Shaft-Axle Half
- Replaced by: 5017654AA
- Item Weight: 16.10 Pounds
- Item Dimensions: 4.6 x 4.8 x 30.7 inches
- Condition: New
- SKU: 4593449AA
- Warranty: This genuine part is guaranteed by Mopar's factory warranty.
 Product Specifications
- Other Name: Shaft-Axle Half
- Replaced by: 5017653AA
- Item Weight: 24.90 Pounds
- Item Dimensions: 55.8 x 11.0 x 6.8 inches
- Condition: New
- SKU: 4593448AA
- Warranty: This genuine part is guaranteed by Mopar's factory warranty.
2000 Chrysler Cirrus Axle Shaft
On our website, we proudly offer genuine 2000 Chrysler Cirrus Axle Shaft at the market's great competitive prices. We are confident that choosing brand new OEM 2000 Chrysler Cirrus Axle Shaft from our site will save you both trouble and money.
2000 Chrysler Cirrus Axle Shaft Parts Questions & Experts Answers
- Q: How to remove and install an Axle Shaft on 2000 Chrysler Cirrus?A: To remove the axle shaft, first disconnect the negative cable from the remote battery terminal. For models from 1995 to 1999, remove the cotter pin, lock, and spring washer from the hub nut, discarding the cotter pin as a new one will be needed for reassembly; the 2000 model does not have these components. Set the parking brake, place the transmission in gear or Park, and have an assistant apply the brakes firmly while loosening the axle shaft/hub nut with a large socket and breaker bar, ensuring not to remove it at this stage. Loosen the front wheel lug nuts, raise the vehicle securely on jackstands, and then remove the wheel and axle shaft/hub nut. Remove the front brake caliper and hang it from the upper control arm with wire, without needing to take off the brake pads. Although draining the transaxle lubricant before removing the axle shaft is not strictly necessary, it may be advisable if the vehicle is nearing the lubricant-change interval or is at an angle that could cause fluid to leak. Detach the lower control arm from the steering knuckle at the lower balljoint, angle the steering knuckle as needed, and remove the axle shaft from the hub, suspending the outer end with wire to avoid letting it hang from the inner CV joint. If the axle shaft is stuck, apply penetrating oil to the hub splines, install the hub nut a few turns, and gently strike the end of the axle shaft with a soft-faced hammer to break it loose, avoiding the use of a hammer directly on the axle shaft stub. If necessary, a two-jaw puller can be used to push the axle shaft from the wheel hub. Before removing the axle shaft from the transaxle, check for lubricant leakage around the axle shaft oil seal, replacing it if there is evidence of a leak. To detach the axle shaft, position a prybar against the inner tripod joint housing and carefully pry it out until the retaining snap-ring is disengaged from the transaxle side gear, supporting the axle shaft and pulling straight out on the tripod joint housing to avoid damaging the seal. If the vehicle needs to be moved while the axle shaft is removed, place a large bolt with washers through the hub and tighten the nut to prevent separation of the hub/wheel bearing assembly. For installation, clean the axle shaft splines and surrounding areas, install a new snap-ring on the inner axle shaft splines, and lubricate the oil seal and splines with the appropriate transmission lubricant. When inserting the axle shaft into the transaxle, hold it straight and push sharply to seat the snap-ring, then check its seating by attempting to pull the tripod joint housing out. Lubricate the outer splines with grease before installing the axle shaft into the hub/steering knuckle, then install the axle shaft/hub nut and tighten it securely without reaching the specified torque yet. Tighten the lower control arm balljoint nut and brake caliper guide pins to the specified torque, install the wheel and lug nuts, lower the vehicle, and finally, for models from 1995 to 1999, tighten the axle shaft/hub nut and secure it with the spring washer, lock washer, and new cotter pin, while for the 2000 model, a new axle shaft/hub nut should be used. Tighten the wheel lug nuts and check and add transaxle/differential lubricant as necessary.
Related 2000 Chrysler Cirrus Parts
 2000 Chrysler Cirrus Torque Converter
 2000 Chrysler Cirrus Wheel Bearing
 2000 Chrysler Cirrus Transmission Pan