My Garage
My Account
Cart
Genuine Chrysler 200 Crankshaft
Crank Shaft- Select Vehicle by Model
- Select Vehicle by VIN
Select Vehicle by Model
orMake
Model
Year
Select Vehicle by VIN
For the most accurate results, select vehicle by your VIN (Vehicle Identification Number).
7 Crankshafts found


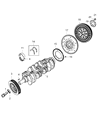

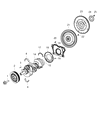

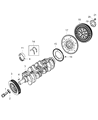


Chrysler 200 Crankshaft
The Chrysler 200 Crankshaft serves as the engine's core translator, turning each piston's up and down thrust into smooth rotation that ultimately spins the transmission and wheels. Positioned deep in the block of modern Chrysler engines, the Crankshaft carries offset throws where the connecting rods fasten, and as those throws sweep the axis, reciprocating force becomes twisting power without wasted motion. Across the life of the 200 line, two material styles appear, cast-iron units suited to everyday horsepower demands and tougher forged-steel versions reserved for higher output editions, the latter resisting flex and fatigue better under greater load. In earlier 200 production years, the Crankshaft was often cast, while later 200 performance trims gained the forged piece. Regardless of style, every Chrysler Crankshaft is machined to tight tolerances so, with clean oil and timely service, it should last the entire vehicle lifespan. Letting grit or low lubrication reach the journals invites scoring, extra clearance and knock, warning drivers to act fast. Keeping a Chrysler 200 on fresh oil preserves the Crankshaft and avoids costly failures.
Looking for affordable and high-quality auto parts? Then you have already arrived at the proper online shop. We offer all Chrysler 200 Crankshaft at great affordable prices. Moreover, all genuine Chrysler 200 Crankshaft come with a manufacturer's warranty. In the long run, you would realize you have saved a lot of trouble and money with OEM parts from here.
Chrysler 200 Crankshaft Parts Questions & Experts Answers
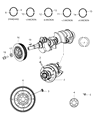
- Q: What are the steps involved in removing and reinstalling a crankshaft on Chrysler 200?A:To remove the crankshaft, one has to tow the engine out of the car and assuming that the following components have been removed; driveplate, crankshaft pulley, timing belt or chain, oil pan, oil pump body, oil filter, oil pump pick-up tube, windage tray and connecting rod/bosses. Before removing measure the crankshaft end play by placing the dial indicator on the crankshaft as shown below. Rotate the crankshaft to the rear and set the indicator to zero then turn it to the front to read the figure, depending on the engine type it should read between 0.003 to 0.010 inch (0.076 to 0.254 mm). In case, one has no dial indicator, feeler gauges can be applied to decent clearance measurement. On 2.4L engines, you will have to remove the bolts holding the ladder frame and detach this from the engine block. It is necessary to use new cap bolts to assemble the engine and the old bolts must be used for shaft oil clearance measurement. Gradually, relieve the primary bearing cap bolts and using a soft-faced hammer tap the cap lightly and then remove the cap gently. Take out the crankshaft if possible, with help, and replace the bedplate/main bearing caps with the arrow pointing forward. It is recommended that during installation the engine block and the crankshaft must be cleaned well and inspected too. The new target wheel has to be installed on 2.4L and on 3.6L engines, using a new bolt which must be tightened in turn. The engine block has to be positioned upside down, the main bearing caps have to be removed and the bearing surfaces have to be cleaned. Set new upper main bearing inserts and make sure the oil holes are in line; fit Thrust washers in the proper journals. Remove the old piston assembly; clean the crankshaft and put it horizontally; check the main bearings oil clearance with the help of Plastigage. Place main bearing caps without removing from the Plastigage and provide proper alignment and torque settings. If the clearance turns out to be marginal with respect to the specified limits it is recommended to investigate whether the bearing is restricted by dirt or oil and decide about replacement of bearing inserts. All Plastigage should be cleaned off just prior to final assembly, and the bearing surfaces and thrust faces should be coated lightly with oil. Reinstallation of crankshaft should be done; the bearing insert faces should be cleaned and treated with oil before fixture of the main bearing caps. After that, with the bolts tightened progressively in horn sequence, check crankshaft end-play again. Revolve the Crank Shaft with your hands and feel whether the Crank Shaft is binding anywhere in its operation. For 2.4L engines use RTV sealant on the engine block base prior to positioning of the ladder frame and doing the tightening of the bolts. Last of all, it is necessary to fit the new rear main oil seal assembly and the oil pump or the pick-up tube.


