My Garage
My Account
Cart
Genuine Chrysler 200 Heater Core
HVAC Heater Core- Select Vehicle by Model
- Select Vehicle by VIN
Select Vehicle by Model
orMake
Model
Year
Select Vehicle by VIN
For the most accurate results, select vehicle by your VIN (Vehicle Identification Number).
2 Heater Cores found


Chrysler 200 Heater Core
The Heater Core in Chrysler 200 cars is of significant importance in circulating warm air the car by using excess heat from the engine. Likening the core to a small radiator, this part is cooled with a water-antifreeze solution, the hot coolant from the engine, flowing through it. The vehicle's fan then directs the flow of air through the core in the vehicle thus warming the cabin air. Temperature control devices including valve and doors help control the circulation of the coolant around the core to ensure proper climate control. Furthermore, in conditioned vehicles, a heater core plays another role in evaporating cooler air, Which has been warmed up. Some of the signs that show that the heater core is faulty are clogging, leakage and corrosion; due to its location in the dashboard, an overhaul of the heater core entails dismantling the dashboard which is costly and time-consuming.
Looking for affordable and high-quality auto parts? Then you have already arrived at the proper online shop. We offer all Chrysler 200 Heater Core at great affordable prices. Moreover, all genuine Chrysler 200 Heater Core come with a manufacturer's warranty. In the long run, you would realize you have saved a lot of trouble and money with OEM parts from here.
Chrysler 200 Heater Core Parts Questions & Experts Answers
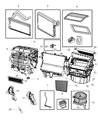
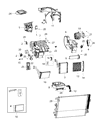
- Q: How to replace Heater Core on Chrysler 200?A:Removing interior trim requires the use of special upholstery removal tools used to pry apart fastening clips without damaging them. Be sure to use these tools when removing interior components. Have the system discharged and the refrigerant recovered by an air conditioning technician. Disconnect the negative battery cable from the remote ground terminal or battery. Drain the cooling system. On the driver's side of the firewall, remove the uppermost nut that holds the heat shield. Remove the two nuts holding the heat shield to studs on the dash panel. The heat shield can then be rotated and tilted to aid in removal. Remove the bolt securing the refrigerant lines to the air conditioning evaporator. Disconnect the lines and remove the seals. Place towels underneath the heater core tube fittings. Remove the clamps and disconnect the heater hoses from the heater core. Remove the bolts holding the heating/air conditioning housing to the instrument panel. Remove the front sill trim on both the passenger's and driver's sides. Remove the front seats. If equipped, loosen fasteners and remove the passenger side amplifier. Remove the B pillar trim panels and cowl trim panel on the driver's side. Remove the center console. Pull back the carpet to expose the rear seat ducts. Remove the instrument panel. On 2015 and later models, the heater core/HVAC housing is removed as an assembly with the instrument panel. Once removed, the heater core can be separated from the panel by simply disengaging the wiring harness and removing the four mounting fasteners. Disconnect the shift interlock cable connected to the floor duct and move aside. Remove the screws holding the left front floor duct to the heating/air conditioning housing and remove the duct. Remove the air conditioner condensation tube. Remove the fasteners holding the left and right rear distribution ducts. Disconnect the ducts from the heating and air conditioning housing. Remove the nut holding the heater/air conditioner housing to the passenger's side dash panel. Pull the heater/air conditioning unit rearward. Remove the heating/air conditioning housing through the passenger compartment. Place the heater/air conditioning housing on a work bench. Remove the foam seal from the connection tube flange holding the heater core outlets. Un-clip the fasteners securing the flange and remove the flange from the heating/air conditioning housing. Remove the fasteners securing the retaining brackets. Remove the heater core line retaining brackets. Carefully remove the heater core from the heater/air conditioning housing. Installation is the reverse of removal.

