My Garage
My Account
Cart
Genuine Chrysler 200 Intake Manifold
Engine Intake Manifold- Select Vehicle by Model
- Select Vehicle by VIN
Select Vehicle by Model
orMake
Model
Year
Select Vehicle by VIN
For the most accurate results, select vehicle by your VIN (Vehicle Identification Number).
12 Intake Manifolds found


Chrysler 200 Engine Intake Manifold
Part Number: 5184693AE$366.30 MSRP: $560.00You Save: $193.70 (35%)


Chrysler 200 Engine Intake Manifold
Part Number: 68240667AB$532.38 MSRP: $784.00You Save: $251.62 (33%)


Chrysler 200 Engine Intake Manifold
Part Number: 68240667AA$532.38 MSRP: $784.00You Save: $251.62 (33%)


Chrysler 200 Engine Intake Manifold Kit
Part Number: 5047441AN$368.22 MSRP: $539.00You Save: $170.78 (32%)


Chrysler 200 Engine Intake Manifold Kit
Part Number: 5047441AK$368.22 MSRP: $539.00You Save: $170.78 (32%)


Chrysler 200 Engine Intake Manifold Kit
Part Number: 4627937AF$153.41 MSRP: $227.00You Save: $73.59 (33%)

Chrysler 200 Engine Intake Manifold Kit
Part Number: 4627937AD$153.41 MSRP: $227.00You Save: $73.59 (33%)

Chrysler 200 Engine Intake Manifold Kit
Part Number: 5047441AM$368.22 MSRP: $539.00You Save: $170.78 (32%)


Chrysler 200 Engine Intake Manifold Kit
Part Number: 4627937AG$153.41 MSRP: $227.00You Save: $73.59 (33%)
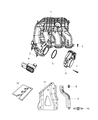
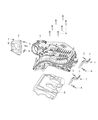
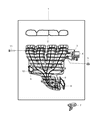
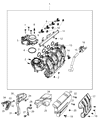
Chrysler 200 Intake Manifold
The Intake Manifold of Chrysler 200 vehicles is extremely important as it is responsible for delivering the air or air/fuel mixture to the specific cylinder or a set of cylinders affecting the performance of the engine and the power produced by it. This is done through the use of different designs in vehicle constructions such as the conventional cast iron or aluminium constructions and the more advanced forms of composite plastic materials recognised for improved fuel efficiency and effective regulation of air temperatures in the combustion process. In recent Chrysler 200 models, manufacturers have integrated variable length intake manifolds, (VLIM) and these control the dimensional length within the intake tract and provide optimal air flow, torque and fuel efficiency. These developments primarily key the Intake Manifold with the Chrysler 200 besides using the sensors that monitor temperature and airflow guarantee that the car's performance is enhanced despite its configuration.
Looking for affordable and high-quality auto parts? Then you have already arrived at the proper online shop. We offer all Chrysler 200 Intake Manifold at great affordable prices. Moreover, all genuine Chrysler 200 Intake Manifold come with a manufacturer's warranty. In the long run, you would realize you have saved a lot of trouble and money with OEM parts from here.
Chrysler 200 Intake Manifold Parts Questions & Experts Answers
- Q: How to replace the intake manifolds in 2.7L V6 engine on Chrysler 200?A:Before replacing the upper intake manifold, turn off the fuel pump and remove the negative terminal from the remote ground system. Release and label the vacuum hoses and connectors at the upper intake manifold and throttle body and ETC wiring harness, then remove the air intake duct and air filter housing. Then, further remove the EGR pipe and the upper intake manifold support brackets and then loosen the manifold bolts in the reverse sequence that you tightened them; consequently, you can then take off the manifold and the foam insulator pad. The sealing surfaces and gaskets should be clean and inspected with a view of replacing the bad ones while retaining the serviceable ones. Place and secure the upper intake manifold to the lower intake manifold with the help of bolts, and turn them in the correct order. With regard to the lower intake manifold, at least initially, remove the upper intake manifold; label and disconnect any other hoses that may be in the way. Disconnect fuel rail and injectors, unbolt lower intake manifold as far as possible and then come off in turn, do not use forceful pressure between the manifold and the heads to check the gasket sealing surfaces. Ensure that the sealing surfaces' and gasket condition is okay and replace those that are badly affected. Place the lower intake manifold over the engine and make sure there are proper mating surfaces with the gaskets, install the fuel rail and the injectors. For clearance, leave the fuel rail retaining bolts to be half tightened to facilitate alignment, while tighten all the remaining lower intake manifold bolts in several passes in the sequence recommended above. Lastly, engage the engine turn it on and look for any fuel, vacuum, and coolant leaks.

