My Garage
My Account
Cart
Genuine Chrysler 300 Control Arm
Suspension Arm- Select Vehicle by Model
- Select Vehicle by VIN
Select Vehicle by Model
orMake
Model
Year
Select Vehicle by VIN
For the most accurate results, select vehicle by your VIN (Vehicle Identification Number).
34 Control Arms found


Chrysler 300 Front Lower Control Arm
Part Number: 68079723AB$211.50 MSRP: $317.00You Save: $105.50 (34%)


Chrysler 300 Front Upper Control Arm
Part Number: 68045130AE$257.57 MSRP: $390.00You Save: $132.43 (34%)


Chrysler 300 Front Lower Control Arm
Part Number: 68002123AC$218.43 MSRP: $329.00You Save: $110.57 (34%)
Chrysler 300 Front Upper Control Arm
Part Number: 68045131AE$211.50 MSRP: $317.00You Save: $105.50 (34%)

Chrysler 300 Front Lower Control Arm
Part Number: 5168282AB$545.60 MSRP: $833.00You Save: $287.40 (35%)


Chrysler 300 Drivestar Front Lower Control Arms
Part Number: 5168389AA$216.00 MSRP: $324.00You Save: $108.00 (34%)
Chrysler 300 Front Lower Control Arm
Part Number: 5168283AB$545.60 MSRP: $833.00You Save: $287.40 (35%)


Chrysler 300 Front Lower Control Arm
Part Number: 5168389AB$216.00 MSRP: $324.00You Save: $108.00 (34%)


Chrysler 300 Suspension Control Arm Front
Part Number: 68079723AA$211.50 MSRP: $317.00You Save: $105.50 (34%)


Chrysler 300 Front Upper Control Arm
Part Number: 4895668AB$401.50 MSRP: $615.00You Save: $213.50 (35%)


Chrysler 300 Front Upper Control Arm
Part Number: 4895669AB$401.50 MSRP: $615.00You Save: $213.50 (35%)


Chrysler 300 Suspension Control Arm
Part Number: 4895668AA$401.50 MSRP: $615.00You Save: $213.50 (35%)

Chrysler 300 Front Upper Control Arm
Part Number: 68045130AC$257.57 MSRP: $390.00You Save: $132.43 (34%)Chrysler 300 Front Upper Control Arm
Part Number: 68045131AC$211.50 MSRP: $317.00You Save: $105.50 (34%)
Chrysler 300 Suspension Control Arm
Part Number: 68045131AA$256.45 MSRP: $388.00You Save: $131.55 (34%)

| Page 1 of 2 |Next >
1-20 of 34 Results
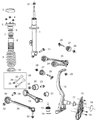
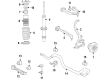
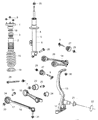
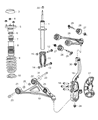
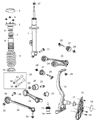
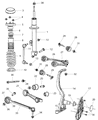
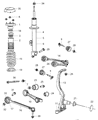
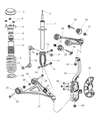
Chrysler 300 Control Arm
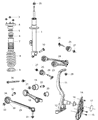
Chrysler 300 Control Arm is a component in the vehicles whose main role is to interconnect the front wheel assemblies and the frame so as to enable the suspension system. As seen from the figure, it prevents the lateral movement of the wheels while enabling the vertical movement, which is important in dealing with road surface profile. Normally, the Chrysler 300 has less control arms, they can sometimes act as uppers as well, these use bushings and ball joints to move freely. Through the years of production of the Chrysler 300 several styles of control arms have been used in its production, the simplest one is the A-arm and the most complex of all the wishbone. The A-arm simply links the chassis and the wheel hub to it using one pivot while the wishbone provided more control since it has two inboard bearings to allow for more mobility. The design difference affecs the manner in which the automobile moves and its stability and some of the modern MacPherson strut suspensions uses track control arms to handle the suspension loads.
Looking for affordable and high-quality auto parts? Then you have already arrived at the proper online shop. We offer all Chrysler 300 Control Arm at great affordable prices. Moreover, all genuine Chrysler 300 Control Arm come with a manufacturer's warranty. In the long run, you would realize you have saved a lot of trouble and money with OEM parts from here.
Chrysler 300 Control Arm Parts Questions & Experts Answers
- Q: How to Remove and Install an Upper Control Arm on Chrysler 300?A:A special tool is needed to separate the balljoint from the Steering Knuckle, which can be found at most auto parts stores. To remove the right upper control arm, move the engine compartment fuse and relay box aside by releasing the tabs and lifting it off its mounting brackets. For the left upper control arm, move the coolant expansion tank aside. Remove the upper fasteners for the Shock Absorber to allow for access to the control arm fasteners. Remove the upper control arm mounting nuts from within the engine compartment. Loosen the wheel lug nuts, raise the front of the vehicle, and support it securely on jackstands. Remove the wheel. Remove the ABS wheel speed sensor harness from the frame bracket. Loosen the nut on the upper balljoint stud and disconnect the balljoint from the steering knuckle using a balljoint removal tool. Secure the steering knuckle aside and move the shock absorber outward. Remove the control arm mounting flag bolts and pull the upper arm from its frame brackets. To install, use a new balljoint stud nut and tighten all fasteners. Raise the lower control arm with a floor jack to simulate normal ride height before tightening the upper control arm mounting nuts at the shock tower. Install the wheel and lug nuts, lower the vehicle, and tighten the lug nuts. Finally, have the front end alignment checked and adjusted if necessary.

Related Chrysler 300 Parts
 Chrysler 300 Coil Spring Insulator
 Chrysler 300 Shift Cable
 Chrysler 300 Ball Joint
 Chrysler 300 Axle Beam
 Chrysler 300 Front Cross-Member
 Chrysler 300 Bump Stop
 Chrysler 300 Control Arm Bushing
 Chrysler 300 Leaf Spring Bushing
 Chrysler 300 Rear Crossmember
Browse by Year
2023 Control Arm 2022 Control Arm 2021 Control Arm 2020 Control Arm 2019 Control Arm 2018 Control Arm 2017 Control Arm 2016 Control Arm 2015 Control Arm 2014 Control Arm 2013 Control Arm 2012 Control Arm 2011 Control Arm 2010 Control Arm 2009 Control Arm 2008 Control Arm 2007 Control Arm 2006 Control Arm 2005 Control Arm