My Garage
My Account
Cart
Genuine Chrysler Cirrus Alternator
Generator- Select Vehicle by Model
- Select Vehicle by VIN
Select Vehicle by Model
orMake
Model
Year
Select Vehicle by VIN
For the most accurate results, select vehicle by your VIN (Vehicle Identification Number).
13 Alternators found


Chrysler Cirrus Alternator
The Chrysler Cirrus automobiles mainly have an alternator which is used mainly to supply electrical energy to recharge the battery and activate other electrical equipment when the vehicle is in motion. This alternator works through generating electrical energy through mechanical energy from the engine through a rotating magnetic field within a stationary stator, that produces AC which is then converted to DC. In the course of using Chrysler Cirrus, it is possible to have used alternators with different styles and output currents to support other electrical parts that may be installed in the car. The major differences can be divided into two, which are the type of excitation systems, whether it is through permanent magnets or field coils, and the voltage regulation, which has change from being manually controlled to being incorporated in to the Powertrain Control Module (PCM) of the newer models. Altogether, it is possible to state that the alternator is one of the most significant parts of the electrical system of the Chrysler Cirrus.
Looking for affordable and high-quality auto parts? Then you have already arrived at the proper online shop. We offer all Chrysler Cirrus Alternator at great affordable prices. Moreover, all genuine Chrysler Cirrus Alternator come with a manufacturer's warranty. In the long run, you would realize you have saved a lot of trouble and money with OEM parts from here.
Chrysler Cirrus Alternator Parts Questions & Experts Answers
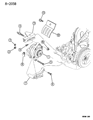
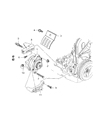
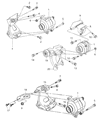
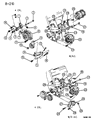
- Q: What steps should be followed when replacing an alternator on Chrysler Cirrus?A:When replacing the alternator, bring the old unit to ensure the new or rebuilt one matches in appearance, terminal configuration, and identification numbers. Many new or rebuilt alternators may not come with a pulley, so check the shop's policy on transferring pulleys from the old unit. For four-cylinder engines, start by disconnecting the negative Battery Cable, then for models from 1995 to 1997 with 2.4L engines equipped with anti-lock brakes, disconnect the electrical connector and remove the two lower plate mounting bolts for the Controller Anti-lock Brakes. Next, remove the engine coolant reservoir, disconnect the electrical connector and B+ cable from the alternator, loosen the drivebelt adjustment bolts and nut, and detach the drivebelt. Remove the pivot bolt and spacer, support the alternator while removing the T-bolt, adjustment nut, and bolt, then maneuver the alternator out of the engine compartment, taking care with air conditioning lines if applicable. Installation follows the reverse order, adjusting the drivebelt tension afterward and checking the charging voltage for proper operation. For V6 engines, the process begins similarly with the negative battery cable disconnection, followed by disconnecting the electrical connector and B+ cable from the alternator, removing the drivebelt, and loosening the upper and lower mounting bolts. After removing the lower mounting bolt and spacer, support the alternator while removing the bolts securing the upper bracket to the cylinder head, then remove the bracket and the alternator. The installation is again the reverse of removal, with adjustments to the drivebelt tension and a check of the charging voltage to ensure proper functionality.

