My Garage
My Account
Cart
Genuine Chrysler Cirrus CV Boot
Axle Boot- Select Vehicle by Model
- Select Vehicle by VIN
Select Vehicle by Model
orMake
Model
Year
Select Vehicle by VIN
For the most accurate results, select vehicle by your VIN (Vehicle Identification Number).
6 CV Boots found


Chrysler Cirrus CV Boot
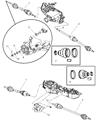
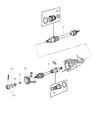
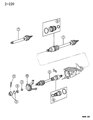
Chrysler Cirrus has CV Boot of the car located in the Constant Velocity joints, which is an important part aimed at shielding the latter. This flexible rubber or plastic boot contains the proper amount of grease for the CV joints as well as enclose the joint punting to avoid any accumulation of dirt within it. Many Chrysler Cirrus use several kinds of CV joints, Rzeppa joints for outer ends of the Cirrus, while tripod or double offset joints are used in the inner ends. The outer joints are for hinges in extreme angles while the inboard joints allow for changes in shaft lengths with suspension movement. It is important for the CV Boot to be checked on a regular basis since, if there is a tear, or crack, it may affect the CV on the car thus causing its malfunctioning.
Looking for affordable and high-quality auto parts? Then you have already arrived at the proper online shop. We offer all Chrysler Cirrus CV Boot at great affordable prices. Moreover, all genuine Chrysler Cirrus CV Boot come with a manufacturer's warranty. In the long run, you would realize you have saved a lot of trouble and money with OEM parts from here.
Chrysler Cirrus CV Boot Parts Questions & Experts Answers
- Q: How to Effectively Inspect and Prevent Damage to CV Boots and Drive Axle Joints on Chrysler Cirrus?A:If the CV Boots are damaged, letting grease out and water in, serious, not to mention costly, damage can occur to the CV joints. The boots should be inspected very carefully at the recommended intervals or anytime the vehicle is raised. Raise the front of the vehicle and support it securely on jackstands. Place the transaxle in Neutral. While rotating the wheels, inspect the four CV Boots (two on each drive axle) very carefully for cracks, tears, holes, deteriorated rubber, and loose or missing clamps. Check each CV Boot inner and outer for cracks or leaking grease. If the boots are dirty, wipe them clean before beginning the inspection. If damage or deterioration is evident, replace the boots and check the CV joints for damage. Place the transaxle in Park or in-gear as applicable and lower the vehicle.
