My Garage
My Account
Cart
Genuine Chrysler PT Cruiser Flywheel
Clutch Flywheel- Select Vehicle by Model
- Select Vehicle by VIN
Select Vehicle by Model
orMake
Model
Year
Select Vehicle by VIN
For the most accurate results, select vehicle by your VIN (Vehicle Identification Number).
6 Flywheels found


Chrysler PT Cruiser Flywheel
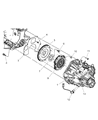
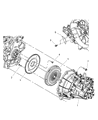
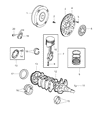
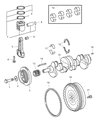
The Chrysler PT Cruiser Flywheel stores engine energy, smooths power pulses, engages the starter, and gives the clutch a solid friction surface. Bolted to the crankshaft, the Flywheel's heavy mass evens out the stop and start combustion strokes so a PT Cruiser feels steady while accelerating. When the ignition key turns, the starter gear meshes with the Flywheel ring gear to spin the crank, letting fuel and air be drawn in until the motor fires. Once running, the clutch disc grips the Flywheel face, transferring torque toward the transmission every time the driver releases the pedal. Inside each PT Cruiser variant, Chrysler also ensured ring gear durability but wear still occurs over time. Over the years Chrysler offered two styles, a traditional solid design and a dual mass Flywheel that sandwiches springs between primary and secondary plates to absorb vibration and quiet the cabin. Solid units can often be resurfaced if scored, while many DMFs must be replaced once internal dampers rattle or the surface warps, giving Chrysler PT Cruiser owners clear service differences.
Looking for affordable and high-quality auto parts? Then you have already arrived at the proper online shop. We offer all Chrysler PT Cruiser Flywheel at great affordable prices. Moreover, all genuine Chrysler PT Cruiser Flywheel come with a manufacturer's warranty. In the long run, you would realize you have saved a lot of trouble and money with OEM parts from here.
Chrysler PT Cruiser Flywheel Parts Questions & Experts Answers
- Q: How to remove and reinstall the Flywheel on Chrysler PT Cruiser?A:To remove the transaxle assembly, first raise the vehicle and support it securely on jackstands. If equipped with a manual transaxle, take out the pressure plate and clutch disc, using this opportunity to check or replace the clutch components and pilot bearing. Before removing the flywheel/driveplate, mark its position relative to the crankshaft to ensure correct alignment during reinstallation. Next, remove the bolts securing the flywheel/driveplate to the crankshaft; a tool to hold it in place can be found at most auto parts stores, or a screwdriver can be wedged in the ring gear teeth to prevent movement. Carefully take off the flywheel/driveplate, supporting it while removing the last bolt, and clean it to eliminate grease and oil. Inspect the mating surfaces of the flywheel/driveplate and crankshaft, replacing the crankshaft rear main seal if it is leaking before reinstalling. For installation, position the flywheel/driveplate against the crankshaft, aligning the match marks, and apply thread locking compound to the bolt threads before tightening them while holding the flywheel/driveplate in place. The rest of the installation follows the reverse order of removal.
