My Garage
My Account
Cart
Genuine Chrysler Town & Country Coil Springs
Strut Spring- Select Vehicle by Model
- Select Vehicle by VIN
Select Vehicle by Model
orMake
Model
Year
Select Vehicle by VIN
For the most accurate results, select vehicle by your VIN (Vehicle Identification Number).
238 Coil Springs found


Chrysler Town & Country Rear Coil Spring
Part Number: 4877934AD$104.85 MSRP: $158.00You Save: $53.15 (34%)


Chrysler Town & Country Front Coil Springs
Part Number: 5006731AB$85.84 MSRP: $128.00You Save: $42.16 (33%)


Chrysler Town & Country Rear Coil Spring
Part Number: 4877934AB$70.76 MSRP: $158.00You Save: $87.24 (56%)

Chrysler Town & Country Front Coil Spring
Part Number: 68136917AB$132.75 MSRP: $199.00You Save: $66.25 (34%)

Chrysler Town & Country Front Coil Spring Right Front
Part Number: 4670569AA$57.35 MSRP: $125.00You Save: $67.65 (55%)


Chrysler Town & Country Front Coil Spring
Part Number: 4670575AA$114.75 MSRP: $172.00You Save: $57.25 (34%)


Chrysler Town & Country Front Coil Spring
Part Number: 4670573AA$114.75 MSRP: $173.00You Save: $58.25 (34%)


Chrysler Town & Country Rear Coil Spring
Part Number: 4877943AD$98.49 MSRP: $149.00You Save: $50.51 (34%)


Chrysler Town & Country Rear Coil Spring
Part Number: 4877944AD$100.58 MSRP: $152.00You Save: $51.42 (34%)


Chrysler Town & Country Rear Coil Spring
Part Number: 4670588AA$115.88 MSRP: $174.00You Save: $58.12 (34%)
Chrysler Town & Country Rear Coil Spring
Part Number: 5151313AA$86.24 MSRP: $131.00You Save: $44.76 (35%)
Chrysler Town & Country Rear Coil Spring
Part Number: 4670588AB$115.88 MSRP: $174.00You Save: $58.12 (34%)Chrysler Town & Country Front Coil Spring Right Front
Part Number: 68136916AB$135.00 MSRP: $202.00You Save: $67.00 (34%)Chrysler Town & Country Rear Coil Spring
Part Number: 68142534AA$85.50 MSRP: $129.00You Save: $43.50 (34%)Chrysler Town & Country Front Coil Spring Right Front
Part Number: 68136907AB$74.81 MSRP: $111.00You Save: $36.19 (33%)Chrysler Town & Country Rear Coil Spring
Part Number: 4670599AA$86.23 MSRP: $129.00You Save: $42.77 (34%)Chrysler Town & Country Front Coil Spring Right Front
Part Number: 4670572AA$108.23 MSRP: $162.00You Save: $53.77 (34%)Chrysler Town & Country Front Coil Spring Right Front
Part Number: 4670574AA$111.77 MSRP: $168.00You Save: $56.23 (34%)Chrysler Town & Country Rear Coil Spring
Part Number: 68142535AA$67.23 MSRP: $99.45You Save: $32.22 (33%)Chrysler Town & Country Front Coil Spring Right Front
Part Number: 68136913AB$135.36 MSRP: $202.00You Save: $66.64 (33%)
| Page 1 of 12 |Next >
1-20 of 238 Results
Chrysler Town & Country Coil Springs
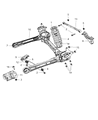
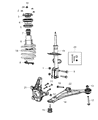
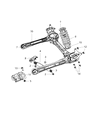
Chrysler Town & Country vehicles operate coil springs as primary components of its suspension sub-system that plays pivotal roles in supporting the weight of the vehicle besides balancing abnormal pressures form irregular surfaces. These coil springs are essential in regulating the vehicles' height and quality so as to avoid problems like sagg, bottoming out 'and uneven tire wear. Coil springs can only be replaced and help to bring back the functionality of the wheel and grant proper alignment. Linear rate, progressive and dual rate springs have at some time been used in Chrysler Town & Country throughout the years. Manufactured springs come in two types: The linear rate springs have a rate of stiffness that remains constant and Fixed springs or progressive springs come with a smoother ride but have stiffer rates at the higher loads. Double adjustable springs come with two rates to increase the performances in different situations. Also, standard gas monotube adjustable coil springs are as well available for optional choice to fit according to the height of the wheel and tire width.
Looking for affordable and high-quality auto parts? Then you have already arrived at the proper online shop. We offer all Chrysler Town & Country Coil Springs at great affordable prices. Moreover, all genuine Chrysler Town & Country Coil Springs come with a manufacturer's warranty. In the long run, you would realize you have saved a lot of trouble and money with OEM parts from here.
Chrysler Town & Country Coil Springs Parts Questions & Experts Answers
- Q: How to disassemble and reassemble the Coil Springs and Shock Absorber on the strut and spring assembly of a Chrysler Town & Country?A:You'll need a spring compressor for this procedure. Spring compressors are available on a daily rental basis at most auto parts stores or equipment rental yards. If the struts or coil springs exhibit signs of wear, explore all options before beginning any work. The strut body is not serviceable and must be replaced if a problem develops. However, complete strut assemblies may be available on an exchange basis, which eliminates much time and work. Whichever route you choose to take, check on the cost and availability of parts before disassembling your vehicle. To disassemble, remove the strut and spring assembly. Mount the strut clevis bracket portion of the strut assembly in a vise and mark the components for reassembly. Install the spring compressor on the spring and compress it sufficiently to relieve all pressure from the upper mount. While holding the damper shaft from turning, loosen the shaft nut with a socket. Remove the nut and upper mount. Inspect the pivot bearing for smooth operation. Carefully lift the compressed spring from the assembly. Remove the dust boot from the damper shaft. Slide the rubber bumper off the damper shaft. Check the lower spring isolator for cracking and hardness; replace it if necessary. To reassemble, extend the damper rod to its full length and install the rubber bumper. Install the dust boot onto the damper. Carefully place the coil spring onto the damper, aligning it with the reference marks made during disassembly. Install the upper spring isolator and seat onto the damper shaft, again noting reference marks. Install the upper mount to the damper shaft, noting its alignment. Install the nut on the damper shaft and tighten it. Loosen the coil spring compressor until the top coil is properly seated against the upper spring seat and upper mount. Relieve all tension from the spring compressor and remove the tool from the coil spring. Finally, install the strut/spring assembly.

Related Chrysler Town & Country Parts
 Chrysler Town & Country Leaf Spring
 Chrysler Town & Country Coil Spring Insulator
 Chrysler Town & Country Front Cross-Member
 Chrysler Town & Country Leaf Spring Bushing
 Chrysler Town & Country Bump Stop
Browse by Year
2016 Coil Springs 2015 Coil Springs 2014 Coil Springs 2013 Coil Springs 2012 Coil Springs 2011 Coil Springs 2010 Coil Springs 2009 Coil Springs 2008 Coil Springs 2007 Coil Springs 2006 Coil Springs 2005 Coil Springs 2004 Coil Springs 2003 Coil Springs 2002 Coil Springs 2001 Coil Springs 2000 Coil Springs 1999 Coil Springs 1998 Coil Springs 1997 Coil Springs 1996 Coil Springs 1995 Coil Springs 1994 Coil Springs 1993 Coil Springs 1992 Coil Springs 1991 Coil Springs 1990 Coil Springs