My Garage
My Account
Cart
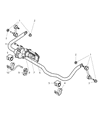
Genuine Dodge Ram 2500 Sway Bar Kit
Stabilizer Sway Bar Set- Select Vehicle by Model
- Select Vehicle by VIN
Select Vehicle by Model
orMake
Model
Year
Select Vehicle by VIN
For the most accurate results, select vehicle by your VIN (Vehicle Identification Number).
15 Sway Bar Kits found


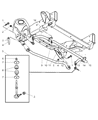


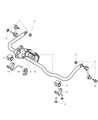
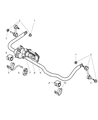


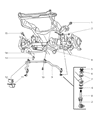


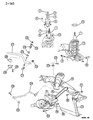


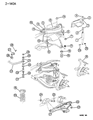


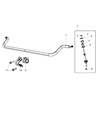


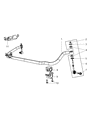


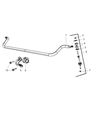
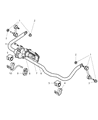

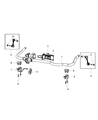

Dodge Ram 2500 Sway Bar Kit
The Sway Bar Kit in Dodge Ram 2500 vehicles plays the critical part in managing the pressure exerted by the vehicle's body to sway over the tires during cornering and over an irregular surface. This 'Anti-Roll Bar' links opposite wheels through a torsion spring providing an enhanced roll stiffness without changing the vertical spring rate. As such, the Sway Bar Kit opposes torsion, making adjustment of wheels to similar heights ensures that the lateral tilt decreases and therefore increases traction. Years of production of the Dodge Ram 2500 include Sway Bar Kit several that are there in the current models of Model include adjustable and active that enhance changeable stiffness for better handling. The conventional Sway Bar Kits do the job but subsequent models may include better technologies that allow real time adjustment of the bar for better stability and ride comfort. In totality, the Sway Bar Kit play a great role in handling the movements and balancing of the Dodge Ram 2500 for it to offer a smooth ride.
Looking for affordable and high-quality auto parts? Then you have already arrived at the proper online shop. We offer all Dodge Ram 2500 Sway Bar Kit at great affordable prices. Moreover, all genuine Dodge Ram 2500 Sway Bar Kit come with a manufacturer's warranty. In the long run, you would realize you have saved a lot of trouble and money with OEM parts from here.
Dodge Ram 2500 Sway Bar Kit Parts Questions & Experts Answers
- Q: What is the Best Way to replace a Sway Bar Kit on Dodge Ram 2500?A:To begin, raise the vehicle and securely support it on jackstands. Next, remove the nuts from the link bolts and take out the link bolts, ensuring to hold the link with a wrench while unscrewing the sway bar kit link nut. Remember to keep the parts for the left and right sides separate. For conventional units, remove the sway bar kit bracket bolts and the brackets. For disconnecting-type front sway bar kits, disconnect the wiring harness from the disconnection unit, then unbolt the unit and the support brackets. Note that the disconnection unit is a part of the sway bar kit and cannot be replaced separately. If replacing the whole unit, it will need to be programmed to the vehicle by a dealer or qualified shop with a scan tool. Proceed by removing the sway bar kit and the rubber bushings from it. Take the time to inspect all rubber bushings for wear and damage, replacing any that are cracked, torn, or deteriorated. Finally, installation is the reverse of removal, ensuring to tighten all fasteners and the wheel lug nuts.

Related Dodge Ram 2500 Parts
 Dodge Ram 2500 Steering Wheel
 Dodge Ram 2500 Steering Column
 Dodge Ram 2500 Sway Bar Link
 Dodge Ram 2500 Sway Bar Bushing
 Dodge Ram 2500 Sway Bar Bracket
Browse by Year
2010 Sway Bar Kit 2009 Sway Bar Kit 2008 Sway Bar Kit 2007 Sway Bar Kit 2006 Sway Bar Kit 2005 Sway Bar Kit 2004 Sway Bar Kit 2003 Sway Bar Kit 2002 Sway Bar Kit 2001 Sway Bar Kit 2000 Sway Bar Kit 1999 Sway Bar Kit 1998 Sway Bar Kit 1997 Sway Bar Kit 1996 Sway Bar Kit 1995 Sway Bar Kit 1994 Sway Bar Kit