My Garage
My Account
Cart
Genuine Jeep Grand Cherokee Door Handle
Inside Door Handle- Select Vehicle by Model
- Select Vehicle by VIN
Select Vehicle by Model
orMake
Model
Year
Select Vehicle by VIN
For the most accurate results, select vehicle by your VIN (Vehicle Identification Number).
699 Door Handles found


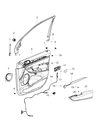
Jeep Grand Cherokee Door Interior Handle
Part Number: 68079302AB$159.75 MSRP: $239.00You Save: $79.25 (34%)


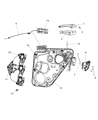
Jeep Grand Cherokee Handle Exterior Door
Part Number: 55113686AG$144.00 MSRP: $216.00You Save: $72.00 (34%)


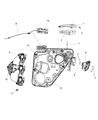
Jeep Grand Cherokee Exterior Door Handle
Part Number: 4589881AH$118.13 MSRP: $175.00You Save: $56.87 (33%)


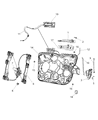
Jeep Grand Cherokee Handle Exterior Door
Part Number: 68078959AC$100.39 MSRP: $208.00You Save: $107.61 (52%)


Jeep Grand Cherokee Door Interior Handle
Part Number: 68079302AA$159.75 MSRP: $239.00You Save: $79.25 (34%)


Jeep Grand Cherokee Handle Exterior Door
Part Number: 55113686AE$144.00 MSRP: $216.00You Save: $72.00 (34%)


Jeep Grand Cherokee Exterior Door Handle
Part Number: 4589881AL$118.13 MSRP: $175.00You Save: $56.87 (33%)


Jeep Grand Cherokee Handle Exterior Door
Part Number: 1QA21GW7AH$129.38 MSRP: $193.00You Save: $63.62 (33%)


Jeep Grand Cherokee Handle Exterior Door
Part Number: 55113686AD$144.00 MSRP: $216.00You Save: $72.00 (34%)


Jeep Grand Cherokee Handle Exterior Door
Part Number: 68078959AB$100.39 MSRP: $208.00You Save: $107.61 (52%)


Jeep Grand Cherokee Handle Exterior Door
Part Number: 4589881AK$118.13 MSRP: $175.00You Save: $56.87 (33%)Jeep Grand Cherokee Exterior Door Handle
Part Number: 68078959AE$100.39 MSRP: $208.00You Save: $107.61 (52%)Jeep Grand Cherokee Handle Exterior Door
Part Number: 1SP27LAUAC$105.26 MSRP: $218.00You Save: $112.74 (52%)Jeep Grand Cherokee Handle Exterior Door
Part Number: 1QA21KXJAJ$91.58 MSRP: $191.00You Save: $99.42 (53%)Jeep Grand Cherokee Handle Exterior Door
Part Number: 1MW30LAUAE$72.65 MSRP: $153.00You Save: $80.35 (53%)

Jeep Grand Cherokee Exterior Door Handle
Part Number: 1MW30JRMAE$72.65 MSRP: $153.00You Save: $80.35 (53%)
Jeep Grand Cherokee Handle Exterior Door
Part Number: 4589881AJ$118.13 MSRP: $175.00You Save: $56.87 (33%)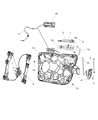
Jeep Grand Cherokee Front Door Exterior Handle
Part Number: 4589881AF$118.13 MSRP: $175.00You Save: $56.87 (33%)

Jeep Grand Cherokee Exterior Door Handle
Part Number: 1HP711DAAB$79.86 MSRP: $132.00You Save: $52.14 (40%)
Jeep Grand Cherokee Exterior Door Handle
Part Number: 1HP711DAAA$79.86 MSRP: $132.00You Save: $52.14 (40%)
| Page 1 of 35 |Next >
1-20 of 699 Results
Jeep Grand Cherokee Door Handle
The Interior Door Handle of Jeep Grand Cherokee vehicles Is so important in a way that It enables the occupants to evade the car easily. This small lever works by unlatching the door from the hook, which is the same as the handle that is found on the doors' exterior for unlocking them. Eventually, the bezel of the Jeep Grand Cherokee's Interior Door Handle may deteriorate thus losing its finishing after being often used, mostly the driver's side handle. Jeep Grand Cherokee has been fitted with Interior Door Handles of different styles over these years though the difference in the models is not explained. Regardless of the style, the primary mechanism remains consistent: which provides easy ease to the exposure of the vehicles interior. Occasionally, the design and manufacturing of some parts may lead to some drawbacks and this is especially true with the door latch assembly since it affects the operation of the door locking mechanism thereby inconveniences users of Jeep Grand Cherokee.
Looking for affordable and high-quality auto parts? Then you have already arrived at the proper online shop. We offer all Jeep Grand Cherokee Door Handle at great affordable prices. Moreover, all genuine Jeep Grand Cherokee Door Handle come with a manufacturer's warranty. In the long run, you would realize you have saved a lot of trouble and money with OEM parts from here.
Jeep Grand Cherokee Door Handle Parts Questions & Experts Answers
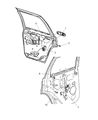
- Q: How to replace the Door Handle, Door Latch Assembly, and Door Lock Cylinder on the Jeep Grand Cherokee?A:Here is a simple procedure required to replace the latch; fully open the window, dismantle the door trim panel and the watershield. For 2011 and later models, also take out the door module. After that, you have to unscrew the fasteners at the rear glass run channel and shift the channel aside to provide additional working space. Swivel the plastic retaining clips away from the rods, unlock the latch links and remove the electric connector. The three mounting screws which are usually of impact-type screwdriver can be unscrewed and pull out the latch from the door. Put the new latch in the correct place, put back the link rods and electrical connector and finally tighten the screws. The installation process is the exact opposite of the removal process which has already been described. For the lock cylinder, take off the outside door handle, remove the link between the handle and the lock, if the lock has a mounting screw then that must be unscrewed and the lock cylinder need to be pulled out of the door handle and the procedure of reassemble is reverse of above. To remove the outside handle, alternate the door trim panel, disconnect the link rods from the handle outside and then unscrew the mounting nuts and delicately, unscrew the handle from the door. To regain the use of the handle, place it accordingly, fit the link and finally tighten the nuts well. To dismantle the front door module for the model produced in 2011 and earlier, it is necessary to first remove the front door window glass, secondly open the access panel to take out the handle linkage and the lock linkage of the latch. Further, change the position of the latch mounting and also the fastener of the inside door handle. Pull the connectors disconnected from the electrical circuit as well as remove the harness connections, then unlock the three retaining clips which has to be adjusted clockwise and remove the door module retaining screws.

Related Jeep Grand Cherokee Parts
 Jeep Grand Cherokee Lift Support
 Jeep Grand Cherokee Armrest
 Jeep Grand Cherokee Door Check
 Jeep Grand Cherokee Door Hinge
 Jeep Grand Cherokee Door Jamb Switch
 Jeep Grand Cherokee Door Latch Cable
 Jeep Grand Cherokee Door Lock
Browse by Year
2025 Door Handle 2024 Door Handle 2023 Door Handle 2022 Door Handle 2021 Door Handle 2020 Door Handle 2019 Door Handle 2018 Door Handle 2017 Door Handle 2016 Door Handle 2015 Door Handle 2014 Door Handle 2013 Door Handle 2012 Door Handle 2011 Door Handle 2010 Door Handle 2009 Door Handle 2008 Door Handle 2007 Door Handle 2006 Door Handle 2005 Door Handle 2004 Door Handle 2003 Door Handle 2002 Door Handle 2001 Door Handle 2000 Door Handle 1999 Door Handle 1998 Door Handle 1997 Door Handle 1996 Door Handle 1995 Door Handle 1994 Door Handle