My Garage
My Account
Cart
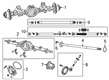
Genuine Ram 3500 Axle Shaft
Car Axle Shaft- Select Vehicle by Model
- Select Vehicle by VIN
Select Vehicle by Model
orMake
Model
Year
Select Vehicle by VIN
For the most accurate results, select vehicle by your VIN (Vehicle Identification Number).
32 Axle Shafts found


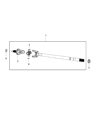
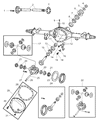
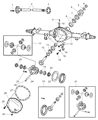
Ram 3500 Axle Shaft (Front Right)
Part Number: 68216196AA$556.60 MSRP: $844.00You Save: $287.40 (35%)


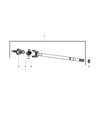


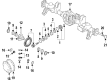
Ram 3500 Axle Intermediate Shaft
Part Number: 68216988AA$344.30 MSRP: $528.00You Save: $183.70 (35%)


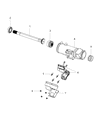
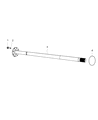
Ram 3500 Axle Intermediate Shaft
Part Number: 68216988AB$344.30 MSRP: $528.00You Save: $183.70 (35%)


| Page 1 of 2 |Next >
1-20 of 32 Results
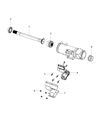
Ram 3500 Axle Shaft
Ram 3500 Axle Shaft in the connection system of the car ensures that the power produced from the differential is transmitted to the wheels so that the wheels can rotate separately so that there is better gripping on the ground during cornering. Ram 3500 models employ solid axle, which incorporates mechanical components like the differential as well as the axle shaft into a live axle suspension system, one thing about using solid axle is that it gives models a superior support and transmitting of torque. The Ram 3500 has gone through the constant change of different kinds of axle shafts such as the full-floating axle shafts and semi-floating axle shafts. Full-floating axles transfer loads through the axle housing, whilst the semi-floating axles loads are supported directly on the axle pins. These differences affect the degree of wear and tear and carrying capacity especially when the latter is fully utilized. Essential, because worn fittings such as axle bearings, seals or CV joints produce noise, vibration and threatening to fail, All of which point to the fact that the Axle Shaft is a very significant part of the Ram 3500.
Looking for affordable and high-quality auto parts? Then you have already arrived at the proper online shop. We offer all Ram 3500 Axle Shaft at great affordable prices. Moreover, all genuine Ram 3500 Axle Shaft come with a manufacturer's warranty. In the long run, you would realize you have saved a lot of trouble and money with OEM parts from here.
Ram 3500 Axle Shaft Parts Questions & Experts Answers
- Q: How to remove the axle shaft on Ram 3500?A:To remove the Axle Shaft, start by loosening the wheel lug nuts, then raise and securely support the vehicle with jack stands, and remove the wheel(s). Next, remove the caliper and brake disc, and disconnect the ABS sensor, securing the sensor and wire harness aside. Proceed to remove the Axle Shaft/hub nut, using a pry bar between two wheel studs to prevent the hub from turning while loosening the nut. Support the lower control arm with a floor jack, slightly raising it to relieve the spring force on the upper control arm. Remove the shock absorber lower mounting bolt and the upper control arm ball joint nut, allowing you to separate the control arm from the steering knuckle. Utilizing a pry bar or slide hammer with a CV joint adapter, carefully pry the inner CV joint assembly from the front differential, ensuring not to damage the differential. Suspend the Axle Shaft with wire to prevent damage to the outer CV joint. Proceed to pull the steering knuckle out and away from the outer CV joint, using necessary tapping or pulling methods if the Axle Shaft is stuck. Once the Axle Shaft is free from the hub splines, pull out the hub/knuckle assembly, remove the support wire, and guide the Axle Shaft out from under the vehicle. For installation, reverse the removal steps, ensuring proper cleaning of splines and sealing surfaces, as well as applying grease to the inner tripod CV joint. When installing the Axle Shaft, push it in sharply to seat the set-ring on the splines of the inner CV joint and verify its proper seating. Tighten the Axle Shaft/hub nut and wheel lug nuts to specified torques and use a new upper ball joint-to-steering knuckle nut. Tighten the upper ball joint nut to the recommended torque.
")


