Additional information needed to verify part fitment
My Vehicle: 2015 Ram 1500
Change VehicleThe vehicle options this part fits:
- Fitting Vehicle Options: 41 - SEDAN/QUAD CAB SWB, 6 - Lt. Duty DODGE 4WD, 61 - REG CAB 6.5 FT BOX, 62 - REG CAB 8 FT BOX, 91 - CREW CAB W.B.2, 98 - CREW CAB W.B.9
Mopar 68146594AA Cv Intermediate Shaft Front
2012-2020 Ram 1500 68146594AA
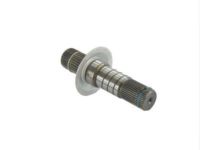


- Part DescriptionShaft-Axle Intermediate
- PositionFront
- Replaced By68146594AB
- ManufacturerMopar
2015 Ram 1500
The vehicle options this part fits:
- Fitting Vehicle Options: 41 - SEDAN/QUAD CAB SWB, 6 - Lt. Duty DODGE 4WD, 61 - REG CAB 6.5 FT BOX, 62 - REG CAB 8 FT BOX, 91 - CREW CAB W.B.2, 98 - CREW CAB W.B.9
$81.92 MSRP: $123.00 1
You Save: $41.08 (34%)
Product Specifications
| Brand | Genuine Mopar |
| Manufacturer Part Number | 68146594AA |
| Part Description | Shaft-Axle Intermediate |
| Item Dimensions | 12.1 x 9.7 x 6.6 inches |
| Item Weight | 3.40 Pounds |
| Position | Front |
| Condition | New |
| Fitment Type | Direct Replacement |
| Manufacturer | Mopar |
| SKU | 68146594AA |
| Warranty | This genuine Mopar part is guaranteed by Mopar's factory warranty. |
| Shipping & Return | Shipping Policy Return Policy |
Warning: California’s Proposition 65
Customer Questions & Answers
- Q:Does this part fit my vehicle? Posted by MoparPartsGiant Specialist
- A:You can Select Your Vehicle to check if 68146594AA fits your vehicle.Posted by MoparPartsGiant Specialist
- Q:How to remove and install front axle assembly on 4WD Dodge Ram 1500 and Ram 1500? Posted by Customer
- A:Loosen the front wheel lug nuts and raise the front of the vehicle using jack stands. Detach the vent tube from the axle and seal it. Remove the drive axles and disconnect the driveshaft from the differential pinion flange. Remove the skid plate and suspension cross member. Disconnect the wiring from the stabilizer bar disconnect device. Support the axle assembly with a floor jack under the differential. Remove any remaining interfering wiring harness clips. Remove the axle assembly pinion mounting bolts and lower the jack to roll the axle assembly from under the vehicle. Installation is the reverse of removal. For solid axle, loosen the front wheel lug nuts and raise the vehicle using jack stands. Remove the front wheels and brake calipers and discs. Disconnect the vent hose and brake hose bracket. Mark the driveshaft and disconnect it from the differential pinion flange. Disconnect the stabilizer bar links and shock absorbers from the axle brackets. Disconnect the tie-rod and drag link from the steering knuckle. Support the axle assembly with two floor jacks. Disconnect the track bar and vibration damper from the axle bracket. Mark the alignment cams and remove the control arms from the axle bracket. Lower the jacks and remove the axle from under the vehicle. Installation is the reverse of removal. Tighten all bolts to the torque.Posted by MoparPartsGiant Specialist
- Q:How to remove and replace front axleshaft and Wheel Hub? Posted by Customer
- A:If you're removing the axleshaft to replace the axleshaft seal or bearing, it's recommended to have the job done by a dealer service department or a qualified independent garage as replacing the seal or the bearing requires special tools. Start by loosening the wheel lug nuts, raising the vehicle and supporting it securely on jack stands, then remove the wheel. Next, remove the brake caliper and support it out of the way with wire, then remove the brake disc. On light-duty axles, remove the cotter pin and axle hub nut, while on heavy-duty models, bend the nut's collar out of the slot in the axle. Proceed to remove the hub-to-knuckle bolts and the hub bearing from the steering knuckle and axle-shaft. If the axleshaft splines stick in the hub, a two-jaw puller may be required to push the axle out. Carefully pull the axleshaft from the axle housing. On heavy-duty models, there is a large shim on the outer end of the axleshaft that must be retained. If the U-joint is worn, it can be replaced. For installation, clean the axleshaft and apply a thin film of wheel bearing grease to the shaft splines, seal contact surface and hub bore. Install the axleshaft, engaging the splines with the differential side gears, being careful not to damage the axle shaft oil seals. Install the hub bearing, the hub bearing-to-steering knuckle bolts and tighten them to the torque. Install the axleshaft washer and nut, tighten the nut to the torque, line-up the nut with the next cotter pin hole and install a new cotter pin. Install the brake disc and caliper, then install the wheel and hand tighten the wheel lug nuts. Remove the jack stands, lower the vehicle and tighten the wheel lug nuts to the torque.Posted by MoparPartsGiant Specialist
- Q:How do you remove the drive axle? Posted by Customer
- A:To remove the Axle Shaft, start by loosening the wheel lug nuts, then raise and securely support the vehicle with jack stands, and remove the wheel(s). Next, remove the caliper and brake disc, and disconnect the ABS sensor, securing the sensor and wire harness aside. Proceed to remove the Axle Shaft/hub nut, using a pry bar between two wheel studs to prevent the hub from turning while loosening the nut. Support the lower control arm with a floor jack, slightly raising it to relieve the spring force on the upper control arm. Remove the shock absorber lower mounting bolt and the upper control arm ball joint nut, allowing you to separate the control arm from the steering knuckle. Utilizing a pry bar or slide hammer with a CV joint adapter, carefully pry the inner CV joint assembly from the front differential, ensuring not to damage the differential. Suspend the Axle Shaft with wire to prevent damage to the outer CV joint. Proceed to pull the steering knuckle out and away from the outer CV joint, using necessary tapping or pulling methods if the Axle Shaft is stuck. Once the Axle Shaft is free from the hub splines, pull out the hub/knuckle assembly, remove the support wire, and guide the Axle Shaft out from under the vehicle. For installation, reverse the removal steps, ensuring proper cleaning of splines and sealing surfaces, as well as applying grease to the inner tripod CV joint. When installing the Axle Shaft, push it in sharply to seat the set-ring on the splines of the inner CV joint and verify its proper seating. Tighten the Axle Shaft/hub nut and wheel lug nuts to specified torques and use a new upper ball joint-to-steering knuckle nut. Tighten the upper ball joint nut to the recommended torque.Posted by MoparPartsGiant Specialist
- Q:How to remove and install rear axleshaft on Ram 1500 and Dodge Ram 1500? Posted by Customer
- A:The axleshaft is typically removed when the bearing is worn or the seal is leaking. To check the bearing, raise the vehicle, support it securely on jack stands, and remove the wheel and brake drum. Try to move the axle flange up and down to determine if bearing wear is excessive. Additionally, check for differential lubricant leaking out from below the axleshaft, as this indicates a leaking seal. To remove the axleshaft, remove the cover from the differential carrier and allow the lubricant to drain. Remove the lock bolt from the differential pinion mate shaft and remove the shaft. Push in the outer end of the axleshaft and remove the C-lock from the inner end. Withdraw the axleshaft, being careful not to damage the oil seal. Installation is the reverse of removal, ensuring to use a new cover gasket and tightening the cover bolts to the specified torque. Refill the axle with the correct lubricant. For a full-floating axleshaft, loosen the rear wheel lug nuts, raise the rear of the vehicle, and support it securely on jack stands. Remove the wheel and axleshaft flange bolts. Pull out the axleshaft and clean the flange mating surface. Inspect and replace the hub and bearing seals and bearings if necessary. Slip a new gasket over the end of the axleshaft and slide it into the axle housing. Apply RTV sealant to the gasket mating surface of the hub and place the new gasket in position. Push the axleshaft into the axle housing until the splines are fully engaged with the differential. Install the flange bolts and tighten them to the specified torque. If the wheel was removed, install it and the lug nuts, then lower the vehicle and tighten the lug nuts to the specified torque.Posted by MoparPartsGiant Specialist
- Q:What is the rear axle assembly and its different types? Posted by Customer
- A:The rear axle assembly consists of a straight, hollow housing enclosing a differential assembly and axleshafts. These assemblies support the vehicle's sprung weight components through leaf springs attached between the axle housings and the vehicle's frame rails. There are two different rear axle assemblies: light-duty axles area semi-floating design, in which the axle supports the weight of the vehicle on the axleshaft in addition to transmitting driving forces to the rear wheels. Heavy-duty models use a full-floating axle. A full floating axle-shaft doesn't carry any of the vehicle's weight; this is supported on the axle housing itself by roller bearings. Full-floating axles can be identified by the large hub projecting from the center of the wheel. The axle flange is secured by bolts on the end of the hub. Due to the need for special tools and equipment, it is recommended that operations on these models be limited to those described. Where repair or overhaul is required, remove the axle assembly and take it to a rebuilder, or exchange it for a new or reconditioned unit. Always make sure that an axle unit is exchanged for one of identical type and gear ratio.Posted by MoparPartsGiant Specialist
- Q:How to remove and install the rear axle on a Dodge Ram 1500 and Ram 1500? Posted by Customer
- A:Raise the rear of the vehicle and support it with jack stands placed under the frame rails. Remove the rear wheels. Disconnect the driveshaft from the rear axle. For leaf spring models, disconnect the ABS sensor(s). Disconnect the parking brake cable from the parking brake lever. Unscrew the vent hose fitting to detach the brake line junction block from the axle tube. Disconnect the brake lines from the clips and brackets on the axle housing. Remove the rear brake calipers. Tie the calipers up with wire to keep any stress off the flexible brake lines. Support the rear axle with a floor jack. If the rear differential is offset to one side, you'll have to use two jacks - one placed under each axle tube. Remove the lower mounting bolts securing the rear shocks to the axle. With the jack(s) supporting the axle, remove the nuts and U-bolts securing the axle to the springs. Lower the axle assembly and remove it from under the vehicle. For coil spring models, disconnect the wiring from the rear wheel speed sensors, then unbolt the sensors and remove them. Remove the mounting bolts from the rear brake calipers and hang them out of the way using wire. Take care to avoid putting tension on the brake hoses. Disconnect the vent hose from the axle tube. Disconnect the parking brake cables from the rear brake assemblies. Detach the parking brake cable clamps, then move the cable clear of the rear axle. Remove the bolts from the stabilizer bar clamps. Support the bar with wire. Support the center of the axle with a floor jack. Raise the axle enough to avoid fully extending the shock absorbers. Remove the bolts from the lower shock absorber mounts. Unbolt the track bar from the rear axle and secure it out of the way. Remove the bolts that secure the four control arms to the rear axle. Discard all suspension mounting bolts. They should be replaced with new ones. With the help of an assistant, slowly lower the rear axle until the coil springs can be removed. Fully lower the axle and remove it from under the vehicle. Installation is the reverse of removal. Tighten all fasteners to the torques. Tighten the caliper mounting bolts to the torque. If necessary, check and fill the axle with the specified lubricant.Posted by MoparPartsGiant Specialist
If you have any questions about this product, please don't hesitate to ask us. We will be happy to help you!
Why choose Mopar Parts Giant
- Dedicated Service
Your complete satisfaction is our #1 goal
- Lowest Prices
Best deals on genuine OE parts from dealerships
- Fast Delivery
Orders are processed and delivered promptly