My Garage
My Account
Cart
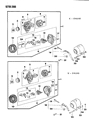
Genuine 1993 Dodge Colt Alternator
Generator- Select Vehicle by Model
- Select Vehicle by VIN
Select Vehicle by Model
orMake
Model
Year
Select Vehicle by VIN
For the most accurate results, select vehicle by your VIN (Vehicle Identification Number).
2 Alternators found

 Product Specifications
- Other Name: ALTERNATOR, (75A); Alternator
- Item Weight: 12.00 Pounds
- Item Dimensions: 8.1 x 6.5 x 6.5 inches
- Condition: New
- Fitment Type: Direct Replacement
- SKU: R189659M
- Warranty: This genuine part is guaranteed by Mopar's factory warranty.
- Product Specifications
- Other Name: ALTERNATOR, (75A); Alternator
- Item Weight: 11.60 Pounds
- Item Dimensions: 4.4 x 4.4 x 17.7 inches
- Condition: Remanufactured
- SKU: R114620M
- Warranty: This genuine part is guaranteed by Mopar's factory warranty.
1993 Dodge Colt Alternator
On our website, we proudly offer genuine 1993 Dodge Colt Alternator at the market's great competitive prices. We are confident that choosing brand new OEM 1993 Dodge Colt Alternator from our site will save you both trouble and money.
1993 Dodge Colt Alternator Parts Questions & Experts Answers
- Q: How to dismantle and reassemble an alternator on 1993 Dodge Colt?A: Disconnect the battery negative lead and the leads from the alternator, including the alternator lead, capacitor, and connecting plugs. Unscrew the adjuster link and pivot mounting bolts, disconnect the drive belt, and lift the alternator from its bracket on the engine. Clean away any external dirt and grease, then unscrew and remove the three tie bolts to pull off the drive end bracket with the rotor, taking care not to damage the stator if using a screwdriver. Hold the rotor stationary to unscrew the pulley retaining nut, then remove the pulley, fan spacer, and seal. Extract the rotor from the drive end bracket and remove the seal. Unsolder the rectifier from the stator coil leads quickly to avoid heat transfer, using pliers as a heat sink if necessary, and remove the stator from the rear end bracket. If only a brush or spring needs renewal, carefully prise up the brush holder and unsolder the brush pig tail, ensuring the B and L plates are only bent at their centers. For complete dismantling, remove the condenser from the B terminal, unsolder the plates B and L from the rectifier while avoiding heat transference, remove the mounting screw and B terminal bolt, and withdraw the voltage regulator and brush holder before removing the rectifier. With the alternator dismantled, check the rotor slip rings for discoloration or roughness, polishing them if needed, and replace any that have worn down below 1.2677 in (32.2 mm). Use a circuit tester to check for continuity between the field coil and slip ring; if there is no continuity, the coil has an open circuit and must be renewed. Check for continuity between the slip ring and rotor core; if continuity exists, the coil or slip ring is earthed and must be renewed. Next, check the stator for continuity between the leads of the stator core and between the stator coil leads and the stator core, renewing the stator if there is no continuity or if it is earthed. Test the heat sink for continuity between the positive side and the stator coil lead connecting terminal; if continuity exists in both directions, the diode is shorted and the rectifier must be renewed. Repeat this for the negative side of the sink. Test the diode trio using the circuit tester; if there is continuity or no continuity in both directions, the diode is defective. A worn brush can be identified by the wear limit line, with a new brush measuring 0.709 in (18.0 mm) in length, ensuring that the brushes move freely in their holders. After renewing all worn components, reassemble by reversing the dismantling process, ensuring seals are installed on either side of the front bearing and holding the brushes up with wire while fitting the rotor. If refitting the original alternator, reverse the removal process and adjust the belt tension; for a new unit, offer the alternator to its mounting bracket, insert the pivot bolt, and connect the adjuster link. Slip the drive belt over the pulleys, push the alternator towards the timing belt end of the engine, and check the gap between the lug on the drive end bracket and the mounting bracket, inserting a suitable spacer washer if the clearance exceeds 0.008 in (0.2 mm). Adjust the alternator position for correct belt tension and tighten the mounting and adjuster link bolts to the specified torque before reconnecting the alternator leads at the plug and reconnecting the battery.
Related 1993 Dodge Colt Parts
 1993 Dodge Colt Starter Brush
 1993 Dodge Colt Starter Drive Gear
 1993 Dodge Colt Alternator Bearing
 1993 Dodge Colt Armature
 1993 Dodge Colt Starter Motor
 1993 Dodge Colt Starter Solenoid