My Garage
My Account
Cart
Genuine Chrysler Cirrus Clutch Cable
Clutch Cable Wire- Select Vehicle by Model
- Select Vehicle by VIN
Select Vehicle by Model
orMake
Model
Year
Select Vehicle by VIN
For the most accurate results, select vehicle by your VIN (Vehicle Identification Number).
2 Clutch Cables found


Chrysler Cirrus Clutch Cable
Clutch cable is commonly found in Chrysler Cirrus vehicles where it has responsibility of ensuring the easy engagement of the engine with the vehicles' transmission system. The Clutch Cable as it controls the slippage between these components enables the driver to shift gear, stop and maneuver the vehicle at slow speed. The Clutch Cable however may undergo some level of pulling out along the life cycle of the vehicle and should therefore be replaced in order to ensure optimum functionality of the clutch system. Chrysler Cirrus Clutch Cable should be properly maintained to enhance the flow of power between the clutch and the transmission so as to enhance the delivery of power on the vehicle. Therefore Chrysler Cirrus Clutch Cable requires constant maintenance to ensure that the vehicle stays for a long time with good performance.
Looking for affordable and high-quality auto parts? Then you have already arrived at the proper online shop. We offer all Chrysler Cirrus Clutch Cable at great affordable prices. Moreover, all genuine Chrysler Cirrus Clutch Cable come with a manufacturer's warranty. In the long run, you would realize you have saved a lot of trouble and money with OEM parts from here.
Chrysler Cirrus Clutch Cable Parts Questions & Experts Answers
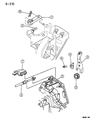
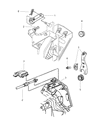
- Q: How to remove and install the clutch cable on Chrysler Cirrus?A:To release the clutch cable you need to, raise the bonnet, cover the area around the left wheel with a blanket. Subsequently, remove the air cleaner assembly and the clutch cable inspection cover from the bell housing. Slightly release the tension on the clutch cable housing to separate it from the corresponding slot of the bellhousing; detach it from the release lever. Inside the vehicle, gently press the clutch pedal so as to reach the up-stop/spacer of the clutch cable, slightly unscrew the clip that keeps the clutch cable end in position on the clutch pedal pivot pin and using thin screw driver, remove the up-stop/spacer from the clutch cable end and the clutch pedal pin. Do not exert force on the clutch cable while removing it from the dash panel so as not to damage the self-adjuster. And at the engine compartment, you can try this: hold the grommet and turn in both ways for its removal from the firewall and clutch bracket; to do it more efficiently use a screwdriver. For installation, use petroleum jelly to lubricate the clutch cable grommet, then, pass the self-adjusting through the firewall into the clutch bracket while the grommet is well seated. Inside the vehicle place the cylindrical part of the grommet over the opening in the firewall and clutch bracket and make sure that the self-adjuster fits tightly. Slip the up-stop/spacer over the clutch cable end and the clutch pedal pivot pin and then fit the retaining clip. In the engine compartment, the clutch cable end should be pulled to make it rigid and the cable housing is pressed towards the firewall with less than 25 lbs pressure required to enable the adjuster work. Attach the cable to the release lever so that the cupped washer seats, move the clutch cable housing backward and install it into the bellhousing and finally put back the clutch cable inspection cover into the bellhousing.

