My Garage
My Account
Cart
Genuine Chrysler Cirrus Clutch Fork
Release Fork- Select Vehicle by Model
- Select Vehicle by VIN
Select Vehicle by Model
orMake
Model
Year
Select Vehicle by VIN
For the most accurate results, select vehicle by your VIN (Vehicle Identification Number).
1 Clutch Fork found


Chrysler Cirrus Clutch Fork
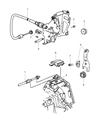
The Chrysler Cirrus Clutch Fork translates the pressure applied to the pedal into the movement of the release bearing, thus disengaging the clutch and allowing the gears to switch without grinding. Fitted inside the bell housing, this Clutch Fork acts like a lever that receives push from a hydraulic slave cylinder on later models. Earlier models use a simple cable. The earlier versions with front drive were provided with a self-adjusting cable since it suited the compact engine bay. Later versions were fitted with hydraulic master and slave units which allow for smoother action, automatic wear compensation, and fewer external adjustments. No matter which design is employed, the Clutch Fork pivots around a fixed point and immediately presses the bearing against the pressure plate fingers upon the driver's pedal depression. Cable units require periodic length checks when the wire meets the fork, while hydraulic layouts mainly endure seal leaks or air which can soften pedal feel. A cracked or worn Clutch Fork can mimic bad bearings, causing noise, heavy pedal effort, or missed shifts in any Chrysler Cirrus drivetrain. Routine checks keep Chrysler Cirrus reliable, and replacing the Clutch Fork saves labor on Chrysler Cirrus.
Looking for affordable and high-quality auto parts? Then you have already arrived at the proper online shop. We offer all Chrysler Cirrus Clutch Fork at great affordable prices. Moreover, all genuine Chrysler Cirrus Clutch Fork come with a manufacturer's warranty. In the long run, you would realize you have saved a lot of trouble and money with OEM parts from here.
Chrysler Cirrus Clutch Fork Parts Questions & Experts Answers
- Q: How to remove and install Clutch Fork and Release Bearing on Chrysler Cirrus?A:Before removing the modular clutch assembly, the negative battery cable should be disconnected from the ground stud on the left shock tower and when handling the modular clutch assembly care must be taken to avoid dirtying the friction surfaces. While working on the transaxle, position the clutch fork and bearing at right angle to the input shaft, hold the clutch fork at both sides of the pivot ball socket and pull it to remove from the pivot stud without the use of screw driver that may cause the spring clips to be damaged. To dismantle, slide the bearing and the clutch fork off the bearing sleeve, and then take the fork out from the bearing but carefully such that the retention tabs are not destroyed. To test a bearing, grasp the outer race with your hand and turn the inner race applying pressure: the rotary motion should be smooth and noiseless, and if the bearing feels rough or noisy - it has to be replaced. Remove the bearing from the shaft and clean it with a cloth, do not immerse it in any solvent and check it for damages, signs of wears and cracks. Inspect the clutch fork for cracks or distortion and the pivot ball spring clips for damage, and replace them if required. Remove any debris from pivot ball and pocket at the end of the clutch fork: check for signs of wear. During installation, care should be taken not to lubricate the Teflon-coated pivot stud ball or its pocket: the clutch fork ends, the inner diameter of the bearing and the input shaft need to be lightly coated with hi-temperature grease. Snap the small pegs on the bearing over the fork arms before inserting this into the clutch fork before inserting the bearing and fork into the input shaft sleeve before snapping in the fork into its corresponding slot on the pivot ball of the modular clutch assembly.

