My Garage
My Account
Cart
Genuine Chrysler Cirrus Fuel Filter
Gas Filter- Select Vehicle by Model
- Select Vehicle by VIN
Select Vehicle by Model
orMake
Model
Year
Select Vehicle by VIN
For the most accurate results, select vehicle by your VIN (Vehicle Identification Number).
4 Fuel Filters found


Chrysler Cirrus Fuel Filter
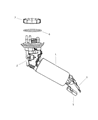
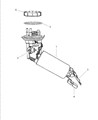
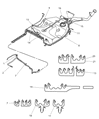
Owners of Chrysler Cirrus automobiles should kindarilly recognize the importance of the Fuel Filter as it performs the protective role of preventing contaminants - dirt, rust and water - getting into the engine. This process of filtration is crucial especially for enhancing efficiency of the engines as well as protecting parts of the fuel systems such as the fuel pump and injector. Chrysler Cirrus cars come with different kinds of Fuel Filters which include, in-line filters and canister filters and can either have a replaceable cartridge type or spin-on type. While in-line filters are usually located between the fuel tank and the engine, the canister filters may provide for the additional systems, for instance, the water-draining system for the diesel engines. It is therefore necessary to regularly service the Fuel Filter and replace it as early as when it is recommended for the purposes of delivering clean fuel hence increasing the Chrysler Cirrus engine's durability and performance.
Looking for affordable and high-quality auto parts? Then you have already arrived at the proper online shop. We offer all Chrysler Cirrus Fuel Filter at great affordable prices. Moreover, all genuine Chrysler Cirrus Fuel Filter come with a manufacturer's warranty. In the long run, you would realize you have saved a lot of trouble and money with OEM parts from here.
Chrysler Cirrus Fuel Filter Parts Questions & Experts Answers
- Q: How is the in-line fuel filter removed and reinstalled on Chrysler Cirrus?A:The in-line fuel filter is located at the frame above the rear part of the Fuel Tank at the feeder neck and is fastened on the rear side of the fuel tank above the rear suspension transverse member. At this start off, unscrew the fuel tank filler cap to depressurize and then proceed with a fuel pressure relief process. Loosen the negative battery cable from the ground stud on the left shock tower. On the inside of the trunk shine a light, fold back the trunk mat over to where the left shock tower, remove the fuel pump wiring harness 4-pin connector. Hook a piece of string on the fuel pump wiring harness so that this will be easy to pull out later, then install the grommet on the floorpan and pass the wiring and connector through the hole. Lift the vehicle and install it on jackstands safely; place an approved gasoline container beneath the fuel tank drain vent, if there is one; use a funnel if required to avoid leakage. After draining the fuel screw back and tighten the drain plug. Chock the wheels of the fuel tank and raise the fuel tank using a floor jack while placing a piece of wood between the jack head and fuel tank. Take off the driver side fuel tank strap and unbolt the passenger side strap to position the filler neck slightly over the rear suspension crossmember to afford jack weight of the tank. Remove the quick-connect fuel line fittings linking the fuel filter to the fuel system and unscrew the fuel filter and take it out of its installation. In this case, the removal is reversed, the fuel line quick-connect fittings are assembled tightly, the fuel tank strap bolts are tightened and, at last, the system must be pressurized in order to check if there are any leaks.

Related Chrysler Cirrus Parts
 Chrysler Cirrus Oil Filter
 Chrysler Cirrus Air Filter
 Chrysler Cirrus Throttle Cable
 Chrysler Cirrus Wiper Arm
 Chrysler Cirrus Ignition Coil
 Chrysler Cirrus Wiper Blade
 Chrysler Cirrus Ignition Switch
 Chrysler Cirrus Throttle Body
 Chrysler Cirrus Timing Belt
 Chrysler Cirrus Fuel Pump
 Chrysler Cirrus Fuel Tank