My Garage
My Account
Cart
Genuine Chrysler Cirrus Hood Latch
Engine Hood Latch- Select Vehicle by Model
- Select Vehicle by VIN
Select Vehicle by Model
orMake
Model
Year
Select Vehicle by VIN
For the most accurate results, select vehicle by your VIN (Vehicle Identification Number).
1 Hood Latch found


Chrysler Cirrus Hood Latch
The function of the Hood Latch in Chrysler Cirrus cars is important in preventing the hood from opening during the operation of the vehicle lest causing an accident. This component is located just below the front part of the hood so parts such as the engine, the radiator and the battery are shielded. Chrysler Cirrus automobiles incorporate a particular process concerning both the Hood Latch with the aim of keeping the hood closed during use. Although the quoted information did not highlight differences in types/os styles of the Hood Latch on Cirrus vehicles, the key argument stays with the capability of the Hood Latch component in protecting the crucial parts of the vehicle. In general, the Chrysler Cirrus Hood Latch is an essential part of the car's operations and protection features.
Looking for affordable and high-quality auto parts? Then you have already arrived at the proper online shop. We offer all Chrysler Cirrus Hood Latch at great affordable prices. Moreover, all genuine Chrysler Cirrus Hood Latch come with a manufacturer's warranty. In the long run, you would realize you have saved a lot of trouble and money with OEM parts from here.
Chrysler Cirrus Hood Latch Parts Questions & Experts Answers
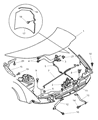
- Q: How to remove and install the hood cable and hood latch on the Chrysler Cirrus?A:To remove the latch, open the Hood and support it with the prop rod, then scribe alignment marks around the hood latch assembly for easier installation later. Remove the nuts to detach the latch assembly from the radiator support and disconnect the release cable by sliding the cable housing from the key-hole slot in the hood latch and separating it from the assembly. For installation, align the hood latch assembly with the previously made marks on the radiator support and tighten the nuts, checking the operation of the hood latch and readjusting as necessary. To remove the cable, disconnect it from the hood latch, detach it from the clips on the radiator support, and remove the left front kick panel inside the vehicle to access the hood release handle bolts. Remove the bolts securing the hood release handle/cable assembly to the cowl panel, then locate and disengage the push-in retainer and cable grommet from the firewall. Attach a piece of heavy string or flexible wire to the engine compartment end of the cable and pull it through the firewall into the vehicle, disconnecting the string or wire from the old cable. For installation, connect the string or wire to the new cable and carefully pull it through the firewall into the engine compartment, completing the remaining steps in reverse order of removal.

Related Chrysler Cirrus Parts
 Chrysler Cirrus Hood Hinge
 Chrysler Cirrus Air Deflector
 Chrysler Cirrus Grille
 Chrysler Cirrus Hood