My Garage
My Account
Cart
Genuine Chrysler Laser Automatic Transmission Filter
AT Filter- Select Vehicle by Model
- Select Vehicle by VIN
Select Vehicle by Model
orMake
Model
Year
Select Vehicle by VIN
For the most accurate results, select vehicle by your VIN (Vehicle Identification Number).
4 Automatic Transmission Filters found


Chrysler Laser Filter-Transmission Regulator Valve
Part Number: 3878313$3.09 MSRP: $4.55You Save: $1.46 (33%)


Chrysler Laser Automatic Transmission Filter
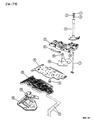
The Automatic Transmission Filter that is pre installed in Chrysler Laser helps a lot in the health of the transmission system. One of its basic purposes is to act as a filter that masks any impurities in the transmission fluid so these do not clog the various orifices and impact the motion of the parts. This filtration is critical to the health of the transmission function and its long-term efficiency. Over the years Chrysler Laser vehicles have employed a variety of Automatic Transmission Filters, internal types located behind the transmission fluid pan and external spin-on/cartridge types. Internal filters are generally easy to change as they are located within the magazine body but this depends on the magazine design since some of them call for a lot of disassembly for filter change. On the other hand, when filters are external, changes are more often accompanied by a better quality of the filterage. There is also the performance Automatic Transmission Filter variety which includes better filtration ability and higher rate of flow that as a result provide better fuel economy and lower emissions. Overall, it could be said that the Automatic Transmission Filter play a significant role in the normal functioning of Chrysler Laser cars.
Looking for affordable and high-quality auto parts? Then you have already arrived at the proper online shop. We offer all Chrysler Laser Automatic Transmission Filter at great affordable prices. Moreover, all genuine Chrysler Laser Automatic Transmission Filter come with a manufacturer's warranty. In the long run, you would realize you have saved a lot of trouble and money with OEM parts from here.
Chrysler Laser Automatic Transmission Filter Parts Questions & Experts Answers
- Q: Is it necessary to change the automatic transmission filter and fluid, clean the magnet, and adjust the bands at recommended intervals on Chrysler Laser?A:The automatic transaxle fluid and filter should be changed, the magnet cleaned, and the bands adjusted at the recommended intervals. Begin by raising the vehicle and securely supporting it on jackstands. Place a container under the transaxle oil pan, loosen the pan bolts, and completely remove those across the rear of the pan. Tap the corner of the pan with a soft-face hammer to break the seal and allow the fluid to drain into the container, while the remaining bolts prevent the pan from falling. After draining, remove the remaining bolts and lower the pan. Next, remove the filter screws and detach the filter, which may require a Torx bit. Adjust the bands before proceeding with the fluid change. Install the new gasket and filter, ensuring the gasket is in place before attaching the filter, and tighten the screws. Carefully remove all traces of old gasket sealant from the oil pan and transaxle body without damaging the sealing surfaces. Clean the magnet in the pan with a clean, lint-free cloth; for 1984 models, remove the differential cover to access and clean the magnet. Apply a 1/8-inch bead of RTV-type sealant to the oil pan gasket surface, position it on the transaxle, and install the bolts, tightening them to the specified torque in a criss-cross pattern, working up to the final torque in three or four steps. For 1984 models, reinstall the magnet in the differential cover, apply sealant around the contact surface, and follow the same installation procedure. Lower the vehicle and add four quarts of the specified fluid to the transaxle. Start the engine and let it idle for at least one minute, moving the shift lever through each position and ending in Park or Neutral, while checking for fluid leakage around the oil pan and differential cover. Add more fluid until the level is 1/8-inch below the Add mark on the dipstick, then drive the vehicle until the fluid is hot and recheck the level. Ensure the dipstick is seated completely to prevent dirt from entering the transaxle.
