My Garage
My Account
Cart
Genuine Chrysler Town & Country Brake Booster
Brake Power Booster- Select Vehicle by Model
- Select Vehicle by VIN
Select Vehicle by Model
orMake
Model
Year
Select Vehicle by VIN
For the most accurate results, select vehicle by your VIN (Vehicle Identification Number).
21 Brake Boosters found


Chrysler Town & Country Power Brake Booster
Part Number: 68043800AA$398.20 MSRP: $610.00You Save: $211.80 (35%)

Chrysler Town & Country Power Brake Booster
Part Number: 4581494AE$375.10 MSRP: $569.00You Save: $193.90 (35%)


Chrysler Town & Country Power Brake Booster
Part Number: 4581494AA$375.10 MSRP: $569.00You Save: $193.90 (35%)

Chrysler Town & Country Power Brake Booster
Part Number: 4581494AF$375.10 MSRP: $569.00You Save: $193.90 (35%)


Chrysler Town & Country Power Brake Booster
Part Number: 68064801AA$262.03 MSRP: $392.00You Save: $129.97 (34%)


Chrysler Town & Country Power Brake Booster
Part Number: 4721802AC$292.13 MSRP: $442.00You Save: $149.87 (34%)


Chrysler Town & Country Power Brake Booster
Part Number: 68064801AE$262.03 MSRP: $392.00You Save: $129.97 (34%)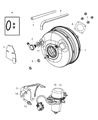
Chrysler Town & Country Power Brake Booster
Part Number: 4581494AD$375.10 MSRP: $569.00You Save: $193.90 (35%)Chrysler Town & Country Power Brake Booster
Part Number: 4581658AA$276.52 MSRP: $418.00You Save: $141.48 (34%)Chrysler Town & Country Power Brake Booster
Part Number: 4581658AE$276.52 MSRP: $418.00You Save: $141.48 (34%)Chrysler Town & Country Power Brake Booster
Part Number: 4581658AD$276.52 MSRP: $418.00You Save: $141.48 (34%)
Chrysler Town & Country Power Brake Booster
Part Number: 68064801AB$262.03 MSRP: $392.00You Save: $129.97 (34%)Chrysler Town & Country Power Brake Booster
Part Number: 4721802AB$292.13 MSRP: $442.00You Save: $149.87 (34%)Chrysler Town & Country Power Brake Booster
Part Number: 68064801AD$262.03 MSRP: $392.00You Save: $129.97 (34%)


| Page 1 of 2 |Next >
1-20 of 21 Results
Chrysler Town & Country Brake Booster
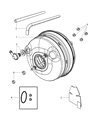
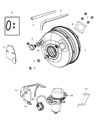
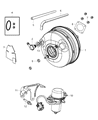
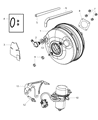
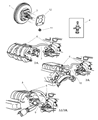
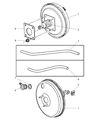
In Chrysler Town & Country vehicles the Brake Booster is very important in increasing braking potency and lessening with the amount of effort a driver has to apply when using the brakes. This component functions predominantly on vacuum operated through a mechanism which increases the pressure exerted on the brake pedal and relays it on to the master cylinder thus ease on the braking system. Some of the Chrysler Town & Country models key brake components have been the vacuum-operated and hydraulic brake boosters. As have been observed vacuum boosters are generally used but they may sometimes fail while hydraulic boosters use fluid pressure to assist. Design of these boosters can be also different, the boosters can be one or two diaphragm boosters and with different diameters due to the performance.
Looking for affordable and high-quality auto parts? Then you have already arrived at the proper online shop. We offer all Chrysler Town & Country Brake Booster at great affordable prices. Moreover, all genuine Chrysler Town & Country Brake Booster come with a manufacturer's warranty. In the long run, you would realize you have saved a lot of trouble and money with OEM parts from here.
Chrysler Town & Country Brake Booster Parts Questions & Experts Answers
- Q: How to remove and install Brake Booster on Chrysler Town & Country?A:To perform an operating check on the brake system, start by depressing the pedal and starting the engine; a slight pedal depression is normal. Depress the brake pedal multiple times with the engine running and ensure there's no change in pedal reserve distance. For an airtightness check, start the engine and turn it off after a minute or two, then depress the brake pedal slowly. If the pedal initially goes down farther but gradually rises with subsequent depressions, the booster is airtight. Additionally, depress the brake pedal while the engine is running, then stop the engine while holding the pedal down; if there's no change in pedal reserve travel after 30 seconds, the booster is airtight. As for removal, the power brake booster unit doesn't require special maintenance and should never be disassembled; if an issue arises, it must be replaced. To start, remove vacuum from the booster by pumping the pedal with the engine off until it feels firm. Then, remove the battery and battery tray, and if applicable, detach the cruise control servo unit bracket. Remove the wiper motor and linkage assembly, and clean the area where the master cylinder attaches to the booster. Detach the master cylinder from the booster while keeping it supported and disconnect the vacuum hose from the check valve on the outside of the booster. Remove the knee bolster from the driver's side of the instrument panel. Under the dash, disconnect the brake pedal pushrod and replace the retaining clip for safety. Remove the nuts securing the booster to the firewall, and from the engine compartment, withdraw the booster unit. To install the booster, position it on the firewall and tighten the retaining nuts. Reconnect the brake pedal to the booster pushrod with a new retainer clip, and perform the remaining installation steps in reverse, ensuring a new vacuum seal is installed on the master cylinder before reattaching it to the booster. Finally, test the brake system's operation carefully before normal vehicle operation.

Related Chrysler Town & Country Parts
 Chrysler Town & Country Brake Line
 Chrysler Town & Country Brake Master Cylinder
 Chrysler Town & Country Brake Disc
 Chrysler Town & Country Brake Light Switch
 Chrysler Town & Country Brake Bleeder Screw
 Chrysler Town & Country Brake Caliper Bracket
 Chrysler Town & Country Brake Fluid Level Sensor
 Chrysler Town & Country Brake Proportioning Valve
Browse by Year
2016 Brake Booster 2015 Brake Booster 2014 Brake Booster 2013 Brake Booster 2012 Brake Booster 2011 Brake Booster 2010 Brake Booster 2009 Brake Booster 2007 Brake Booster 2006 Brake Booster 2005 Brake Booster 2004 Brake Booster 2003 Brake Booster 2002 Brake Booster 2001 Brake Booster 2000 Brake Booster 1999 Brake Booster 1998 Brake Booster 1997 Brake Booster 1996 Brake Booster