My Garage
My Account
Cart
Genuine Dodge Avenger Flywheel
Clutch Flywheel- Select Vehicle by Model
- Select Vehicle by VIN
Select Vehicle by Model
orMake
Model
Year
Select Vehicle by VIN
For the most accurate results, select vehicle by your VIN (Vehicle Identification Number).
3 Flywheels found


Dodge Avenger Flywheel
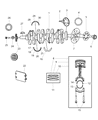
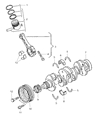
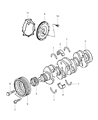
The Dodge Avenger Flywheel smooths engine pulses by banking rotational energy, giving the car steady power and sure starts. The Flywheel is connected to the crankshaft and spins with each combustion event in an engine. The ring gear of the Flywheel engages the starter to crank the engine. In every Dodge Avenger, the Flywheel also anchors the clutch pressure plate so torque feeds cleanly into the gearbox. Over the years, Dodge offered two Flywheel styles in the Avenger line. The in-service solid steel disc can, within tight limits, be resurfaced when clutch wear leaves grooves or heat spots. Later dual mass units add a second disc separated by springs that soak up vibration and quiet the drivetrain, but their complex cores cannot be machined and must be swapped out if the damper loosens or if runout exceeds spec. Whether solid or dual mass, heat from repeated clutch action or chipped ring gear teeth remains the chief reason Dodge Avenger owners eventually need a fresh Flywheel.
Looking for affordable and high-quality auto parts? Then you have already arrived at the proper online shop. We offer all Dodge Avenger Flywheel at great affordable prices. Moreover, all genuine Dodge Avenger Flywheel come with a manufacturer's warranty. In the long run, you would realize you have saved a lot of trouble and money with OEM parts from here.
Dodge Avenger Flywheel Parts Questions & Experts Answers
- Q: How Does the Flywheel Impact the Removal and Installation of a Driveplate in a Four-Cylinder Engine on Dodge Avenger?A:To remove the transaxle assembly, first raise the vehicle and support it securely on jackstands. Before removal, mark the position of the driveplate to the crankshaft to ensure correct alignment during reinstallation. Next, remove the bolts that secure the driveplate to the crankshaft, using an appropriate tool to hold the driveplate; if such a tool is unavailable, a screwdriver can be wedged in the ring gear teeth to jam the driveplate. After removing the driveplate, clean and inspect the mating surfaces of the driveplate and crankshaft, replacing the crankshaft rear main seal if it is leaking. For installation, position the driveplate against the crankshaft, aligning the previously applied match marks, and apply thread locking compound to the bolt threads before tightening them while holding the driveplate in place. The remainder of the installation follows the reverse order of removal.
