My Garage
My Account
Cart
Genuine Dodge Caravan Wiper Motor
Windshield Wiper Motor- Select Vehicle by Model
- Select Vehicle by VIN
Select Vehicle by Model
orMake
Model
Year
Select Vehicle by VIN
For the most accurate results, select vehicle by your VIN (Vehicle Identification Number).
14 Wiper Motors found


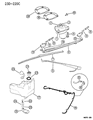
Dodge Caravan Motor Kit-Windshield WIPER
Part Number: 5114534AA$278.75 MSRP: $418.00You Save: $139.25 (34%)


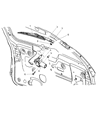
Dodge Caravan Liftgate Wiper Motor
Part Number: 4857931AA$210.38 MSRP: $315.00You Save: $104.62 (34%)


Dodge Caravan Liftgate Wiper Motor
Part Number: 4857931AC$210.38 MSRP: $315.00You Save: $104.62 (34%)

Dodge Caravan Liftgate Wiper Motor
Part Number: 4857931AB$210.38 MSRP: $315.00You Save: $104.62 (34%)
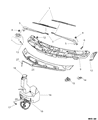

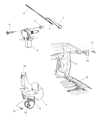

Dodge Caravan Motor Windshield Wiper
Part Number: R4673013$266.21 MSRP: $397.00You Save: $130.79 (33%)


Dodge Caravan Wiper Motor
The Wiper Motor is mainly used on Dodge Caravan vehicles as a wiper to remove rain or other stuffs on the wind shield to enhance visibility. This electrical motor works with different speed which makes the driver to get the desired wiping speed of the windshield depending on the weather condition. Dodge Caravan Wiper Motors may be bought either brand new or refurnished. New Wiper Motors are bought from the manufacturer while remanufactured ones have been used before but have been reconditioned for purposes of meeting the contemporary market standards. Thus, there is a variation in the options that guarantees Dodge Caravan owners an opportunity to pick the optimal on the wiper maintenance aspect while at the same time be certain the wipers in question would function optimally.
Looking for affordable and high-quality auto parts? Then you have already arrived at the proper online shop. We offer all Dodge Caravan Wiper Motor at great affordable prices. Moreover, all genuine Dodge Caravan Wiper Motor come with a manufacturer's warranty. In the long run, you would realize you have saved a lot of trouble and money with OEM parts from here.
Dodge Caravan Wiper Motor Parts Questions & Experts Answers
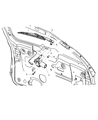
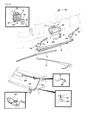
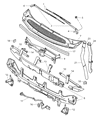
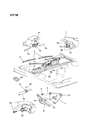
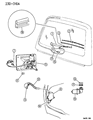
- Q: How to begin the front wiper motor assembly process on Dodge Caravan?A:To begin the front wiper motor assembly process, pry off the protective caps over the wiper arm nuts to access each retaining nut, then remove the nuts that attach the wiper arms to their splined shafts. Mark the position of each wiper arm in relation to its shaft before removing the arms; if they are difficult to detach, use a small two-jaw puller. Next, remove the cowl cover, release the lock on the wiper module electrical connector, and disconnect it from the wiper motor by pushing the lock up and depressing the release tab. Disconnect the windshield washer hose from the coupling outside the wiper assembly, ensuring to inspect the condition of both hoses and the plastic coupling. Disconnect the drain tubes from the pipes on the bottom of the wiper assembly by twisting a screwdriver between the ratcheting teeth to spread the clamp apart. Remove the nuts that attach the wiper assembly support brackets to the welded studs on the upper edge of the firewall, followed by the bolts that attach the wiper assembly to the firewall. Lift the wiper assembly off the welded studs and place it on a clean workbench. Detach the wiper links from the wiper motor crank arm without removing the crank arm from the motor, then disconnect the electrical connector from the wiper motor. Remove the nuts that attach the two middle support brackets to the front edge of the windshield wiper motor assembly, swing the support brackets out of the way, and remove the motor mounting bolts to detach the windshield wiper motor. For the rear wiper motor, remove the cap covering the wiper arm retaining nut, then remove the nut and mark the position of the wiper arm in relation to the wiper motor shaft before detaching it. Remove the liftgate trim panel, disconnect the electrical connector from the rear wiper motor by depressing the release tabs, and remove the rear wiper motor mounting bolts to detach the motor. Installation is the reverse of removal for both the front and rear wiper motors.

Related Dodge Caravan Parts
 Dodge Caravan Wiper Arm
 Dodge Caravan Washer Pump
 Dodge Caravan Wiper Blade
 Dodge Caravan Windshield Washer Nozzle
 Dodge Caravan Wiper Pivot
Browse by Year
2007 Wiper Motor 2006 Wiper Motor 2005 Wiper Motor 2004 Wiper Motor 2003 Wiper Motor 2002 Wiper Motor 2001 Wiper Motor 2000 Wiper Motor 1999 Wiper Motor 1998 Wiper Motor 1997 Wiper Motor 1996 Wiper Motor 1995 Wiper Motor 1994 Wiper Motor 1993 Wiper Motor 1992 Wiper Motor 1991 Wiper Motor 1990 Wiper Motor 1989 Wiper Motor 1988 Wiper Motor 1987 Wiper Motor 1986 Wiper Motor 1985 Wiper Motor