My Garage
My Account
Cart
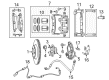
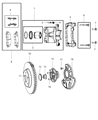
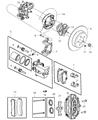
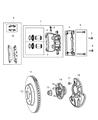
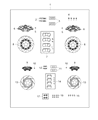
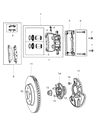
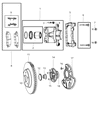
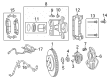
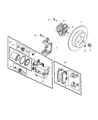
Genuine Dodge Challenger Brake Disc
Disc Rotor- Select Vehicle by Model
- Select Vehicle by VIN
Select Vehicle by Model
orMake
Model
Year
Select Vehicle by VIN
For the most accurate results, select vehicle by your VIN (Vehicle Identification Number).
47 Brake Discs found


Dodge Challenger Front Disc Brake Rotor
Part Number: 2AMV9196AG$85.84 MSRP: $128.00You Save: $42.16 (33%)


Dodge Challenger Rear Brake Rotor
Part Number: 2AMV9209AG$120.38 MSRP: $142.00You Save: $21.62 (16%)


Dodge Challenger Front Brake Rotor
Part Number: 5154118AD$129.38 MSRP: $192.00You Save: $62.62 (33%)

Dodge Challenger Front Brake Rotor
Part Number: 68184587AB$932.80 MSRP: $1415.00You Save: $482.20 (35%)


Dodge Challenger Front Brake Rotor
Part Number: 4779196AG$102.49 MSRP: $152.00You Save: $49.51 (33%)


Dodge Challenger Front Brake Rotor
Part Number: 4779197AG$129.38 MSRP: $192.00You Save: $62.62 (33%)

Dodge Challenger Front Brake Rotor
Part Number: 4779197AE$129.38 MSRP: $192.00You Save: $62.62 (33%)


Dodge Challenger Front Brake Rotor
Part Number: 4779196AE$102.49 MSRP: $152.00You Save: $49.51 (33%)


Dodge Challenger Front Brake Rotor
Part Number: 4779196AF$102.49 MSRP: $152.00You Save: $49.51 (33%)


| Page 1 of 3 |Next >
1-20 of 47 Results
Dodge Challenger Brake Disc
The Brake Disc is used in Dodge Challenger cars to act as an operational component of the braking system to stop the car or reduce its speed by dissipating the energy in form of heat. These rotors, which are normally manufactured from gray iron, are bolted to the wheel hub and along with brake pads create the required amount of friction. Through the years, Dodge Challenger models have used several kinds of Brake Discs such as drilled, slotted and even, two-piece Brake Discs. Drilled and slotted rotors are efficient in cooling and removing the water since it has more contact with the air and it also comes with the downside of wearing out the pads. Further, two-piece rotors result to good weight and heat handling abilities since the 'splitting' of the rotor improves the viability of the center and friction ring, it expands when heat builds up. This component called the Brake Disc, needsconstant check and servicing to avoid distortion, cracking, and rusting to enable the Dodge challenger to have a good braking system.
Looking for affordable and high-quality auto parts? Then you have already arrived at the proper online shop. We offer all Dodge Challenger Brake Disc at great affordable prices. Moreover, all genuine Dodge Challenger Brake Disc come with a manufacturer's warranty. In the long run, you would realize you have saved a lot of trouble and money with OEM parts from here.
Dodge Challenger Brake Disc Parts Questions & Experts Answers
- Q: How to remove and install Brake Disc on Dodge Challenger?A:For disc refinishing the manufacturer recommends getting a brake on vehicle lathe, but it is not required; service that seems to require the repair facility to have got specialized tool and the vehicle. First, it is advised to turn the wheel lug nut slightly anticlockwise, lift the car and then place it on the jackstands before detaching the wheel. After that, liberate the Brake Caliper, but do not detach the brake hose; instead, use wire to suspend the hose away from the wheel so no stress is placed on the hose. To be fitted back into position, the lug nuts must be installed with their threads facing down so as to press the disc onto the hub conventionally, spacer washers may be used to make up the required gap. Look at the disc surface to the extent of score marks, crackline and other damages, check that minute scratch marks are nothing out of the normal or usual while deep score mark or crack line may require refinishing or even change of disc. In checking the disc runout, place a dial indicator 1/2 inch away from the outer edge of the disc; if the reading is more that 0.003 of an inch, you should look for pulsation that may mean refinishing, replacement or some distortion in the disc. See that the disc is not machined below the specified minimum refinish thickness and this can be done with a micrometer. For removal, on non-SRT models, unbolt the caliper mounting bracket, align a mark on the disc for reassembly and unbolt the disc, though in the process ensuring that any part that got locked is "released". Before fitting the brake disc use a clean cloth to clean the hub flange and the inner side of the brake disc. Insert back the caliper mounting bracket and fasten the applying bolts for the caliper mount; turn the brake pads back and reposition the caliper. Last, fit the wheel, drop the vehicle and torque the lug nuts before stepping on the brake pedal which will bring the pads to knock the disc gently, check the brake operation before the regular use.

Related Dodge Challenger Parts
 Dodge Challenger Brake Line
 Dodge Challenger ABS Control Module
 Dodge Challenger Parking Brake Cable
 Dodge Challenger Speed Sensor
 Dodge Challenger Brake Pad
 Dodge Challenger Brake Master Cylinder
 Dodge Challenger Brake Bleeder Screw
 Dodge Challenger Brake Caliper Bracket
 Dodge Challenger Parking Brake Shoe