My Garage
My Account
Cart
Genuine Dodge Colt Window Regulator
Electric Power Window Regulator- Select Vehicle by Model
- Select Vehicle by VIN
Select Vehicle by Model
orMake
Model
Year
Select Vehicle by VIN
For the most accurate results, select vehicle by your VIN (Vehicle Identification Number).
10 Window Regulators found


Dodge Colt Window Regulator
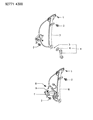
The Window Regulator in the Dodge Colt automobiles works in a basic capacity of either raising or lowering of the Window hence benefiting the users. These regulators can either be motorized, where they are turned on and off using an electric motor or can be manual, where they have to be cranked up using a handle The above aspects can be summarized by using the following points: Different models of Dodge Colt have come with different Window Regulators designs, the scissor type and the cable type of design. The main difference worth making here lies in the way that the two categories work, scissor types utilize a folding arm arrangement while the cable types utilize a cable system, for the movement of the window. In any case, all regulators are manufactured compatible with the superior specifications in order to provide the original factory fitted look and feel. Replacing damaged Window Regulators in a Dodge Colt helps to order the mechanism of the window which makes driving more comfortable.
Looking for affordable and high-quality auto parts? Then you have already arrived at the proper online shop. We offer all Dodge Colt Window Regulator at great affordable prices. Moreover, all genuine Dodge Colt Window Regulator come with a manufacturer's warranty. In the long run, you would realize you have saved a lot of trouble and money with OEM parts from here.
Dodge Colt Window Regulator Parts Questions & Experts Answers
- Q: How to remove and refit the door interior trim panel and window regulator on Dodge Colt?A:To begin, remove the armrest from the door interior trim panel by unscrewing two screws. Next, use a wire with a small hook to extract the securing clip behind the window regulator handle and then remove the handle. After that, extract the screw from the door lock interior remote control handle and take off the cover plate. Insert a flat blade or your fingers between the trim panel and the door to pull out the panel securing clips. Carefully peel away the self-adhesive waterproof sheet and, at the base of the window opening, prise out the inner weatherstrip. Temporarily refit the window regulator handle and lower the glass fully, then remove the screws holding the glass holder to the regulator arm. Prise out the outer weatherstrip with a screwdriver, pull the door glass upward, and remove it from the door cavity by turning it. Extract the roller guide and regulator mounting screws to withdraw the complete regulator assembly from the lower aperture in the door interior panel, and renew the regulator if it is worn. If fitting a new glass, attach the holder to its bottom edge accordingly, and grease the regulator before refitting. The refitting process is the reverse of removal, ensuring that if the clip on the inner weatherstrip has separated from the trim panel, it is turned through 90° with a screwdriver to reconnect it. For smooth operation of the window regulator and glass, three points of adjustment are available: the roller guide mounting screws, the glass holder to regulator arm screws, and the front and rear glass slide channel screws. Release the screws and adjust the components until the glass moves up and down smoothly without judder or misalignment. When refitting the regulator handle, fit the clip into the handle and then firmly bang the handle onto the splined spindle of the regulator.


