My Garage
My Account
Cart
Genuine Dodge Dakota Engine Mount
Engine Motor Mount- Select Vehicle by Model
- Select Vehicle by VIN
Select Vehicle by Model
orMake
Model
Year
Select Vehicle by VIN
For the most accurate results, select vehicle by your VIN (Vehicle Identification Number).
51 Engine Mounts found


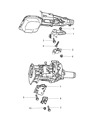
Dodge Dakota Engine Mount Insulator
Part Number: 52855715AA$186.54 MSRP: $299.00You Save: $112.46 (38%)


| Page 1 of 3 |Next >
1-20 of 51 Results
Dodge Dakota Engine Mount
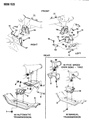
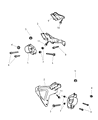
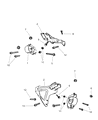
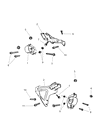
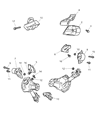
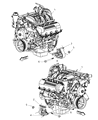
The Engine Mount in Dodge Dakota vehicles serves two primary functions: It reduces noises and vibrations produced by the operation of the engine and firmly settles the engine inside the framework of the car. Such positioning is viable to ensure safety in vehicle operation and to avoid cases where vehicle parts are destroyed. The Engine Mounts used in Dodge Dakota models have ranged from the conventional rubber mounts, hydraulic fluid filled Engine Mounts and the recent high tech electronic active Engine Mounts. The earlier types of mounts are metallic having rubber providing spacing while the hydraulic types help damp excitation more. The most elaborate types alter their stiffness according to the RPM with an aim of supporting the engine and minimizing vibration. Dodge Dakota Engine Mounts are known to fail over time and this is mostly attributed to the aspects of age, heat and exposure to fluids and as results, one may experience sponginess or separation. These mounts must be kept in good condition by periodic examination since unusual noise and vibration are signs that these mounts should be changed.
Looking for affordable and high-quality auto parts? Then you have already arrived at the proper online shop. We offer all Dodge Dakota Engine Mount at great affordable prices. Moreover, all genuine Dodge Dakota Engine Mount come with a manufacturer's warranty. In the long run, you would realize you have saved a lot of trouble and money with OEM parts from here.
Dodge Dakota Engine Mount Parts Questions & Experts Answers
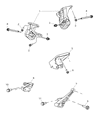
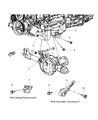
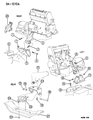
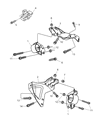
- Q: How to Check and Replace Engine Mounts in 3.7L V6 and 4.7L V8 Engines on Dodge Dakota?A:There are three powertrain mounts on the vehicles, left and right engine mounts attached to the engine block and frame, and a rear mount attached to the transmission and frame. Engine mounts seldom require attention, but broken or deteriorated mounts should be replaced immediately to prevent damage or wear on the drive line components. To check the mounts, raise the engine slightly to remove the weight from them, then check for relative movement between the inner and outer portions of the mount using a large screwdriver or prybar. If movement is noted, lower the engine and tighten the mount fasteners. Inspect the mounts for cracked, hardened rubber or separation from the metal casing, indicating a need for replacement, and apply rubber preservative to slow deterioration. For replacement, disconnect the cable from the negative terminal of the battery, remove the engine cooling fan and shroud, and raise the front of the vehicle securely on jackstands. Support the engine with a lifting device from above, ensuring not to connect it to the intake manifold, and raise the engine just enough to relieve the weight from the mounts. For 2WD models, remove the engine mount-to-frame support bracket through-bolt, the mount-to-engine block bolts, and then the mount and heat shield if equipped. Place the heat shield and new mount in position, install and tighten the mount-to-engine block bolts. For 4WD models, support the front axle with a floor jack and jackstands, remove the engine skid plate, front crossmember, and bolts supporting the engine mount to the front axle, then remove the engine mount-to-frame support bracket through-bolt and engine support bracket bolt and nuts. Install the new engine mount onto the engine support bracket and tighten the bolts securely. After installing the engine mounts onto the engine, lower the engine while guiding the engine mount and through-bolt into the frame support bracket, then install and tighten the through-bolt nut securely. The remainder of the installation follows the reverse order of removal, after which the engine hoist and jackstands can be removed, and the vehicle lowered.

Related Dodge Dakota Parts
 Dodge Dakota Exhaust Manifold
 Dodge Dakota Exhaust Manifold Gasket
 Dodge Dakota Engine Mount Bracket
 Dodge Dakota Exhaust Clamp
 Dodge Dakota Exhaust Hanger
 Dodge Dakota Exhaust Heat Shield
 Dodge Dakota Exhaust Manifold Clamp
 Dodge Dakota Exhaust Nut
 Dodge Dakota Engine Cooling Fan
Browse by Year
2011 Engine Mount 2010 Engine Mount 2009 Engine Mount 2008 Engine Mount 2007 Engine Mount 2006 Engine Mount 2005 Engine Mount 2004 Engine Mount 2003 Engine Mount 2002 Engine Mount 2001 Engine Mount 2000 Engine Mount 1999 Engine Mount 1998 Engine Mount 1997 Engine Mount 1996 Engine Mount 1995 Engine Mount 1994 Engine Mount 1993 Engine Mount 1992 Engine Mount 1991 Engine Mount 1990 Engine Mount 1989 Engine Mount 1988 Engine Mount 1987 Engine Mount