My Garage
My Account
Cart
Genuine Dodge Dakota Fog Light Bulb
Fog Lamp Bulb- Select Vehicle by Model
- Select Vehicle by VIN
Select Vehicle by Model
orMake
Model
Year
Select Vehicle by VIN
For the most accurate results, select vehicle by your VIN (Vehicle Identification Number).
3 Fog Light Bulbs found


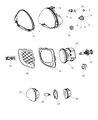


Dodge Dakota Fog Light Bulb
Fog Light Bulbs are used mostly in Dodge Dakota vehicles to provide better visibility particularly when there is fog, heavy rainfall or snow. These bulbs are installed low at the vehicle where they emit a wide beam that has its direction inclined downwards to reduce glare and enhance the visibility on the road. The years of manufacturing have had Fog Light Bulbs installed in Dodge Dakota in both the standard Halogen variety and also in selected better alternatives. While the basic Halogen bulbs are said to be sufficient to generate suitable amount of light, the enhanced Halogen bulbs can be as much as 50 percent shinier and are available in numerous temperature of the color spectrum ranging from yellow to ultra-white. Furthermore, LED Fog Light Bulbs come with several benefits such as higher reliability due to the longer lifespan per bulb, lower energy consummation and it is resistant to vibration thereby suitable for rough road driving. Fog Light Bulbs need replacement after some time to ensure that there is maximum safety and visibility especially during Foggy weather.
Looking for affordable and high-quality auto parts? Then you have already arrived at the proper online shop. We offer all Dodge Dakota Fog Light Bulb at great affordable prices. Moreover, all genuine Dodge Dakota Fog Light Bulb come with a manufacturer's warranty. In the long run, you would realize you have saved a lot of trouble and money with OEM parts from here.
Dodge Dakota Fog Light Bulb Parts Questions & Experts Answers
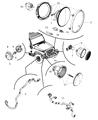
- Q: How to replace the Fog Light Bulb and other light bulbs on Dodge Dakota?A:To replace they front park/turn signal/sidemarker light bulbs one has to turn on the engine and the wheels to make space or remove the wheel by loosing the nuts then raising the car. Inside the wheel housing you would see an access panel, you would seize the electrical connector and pull it off by unlocking the lock first, then you would rotate counter clockwise the bulb socket. Twist the bulb clockwise and anti-clockwise and then replace it with a new one by inserting it into the socket until it fits in properly in an opposite manner as used during removal. For fog light bulbs, the electrical connector can be released by pulling the locking tab, the socket should then be unscrewed anticlockwise and the bulb should be pulled out and the same process should be reversed when replacing a bulb. To change the center high mounted brake light bulb, the housing has to be unscrewed and the electrical connector disconnected, then the bulb socket has to be rotated and pulled out together with the bulb, after which a new one has to be inserted by pushing it in until it clicks back in place. The rear taillight assembly have four bulbs; to change it one has to open the liftgate then remove the push pin fasteners, then disconnect the electrical connector, and finally remove the bulb socket plate by unscrewing it, the desired bulb can then be pulled out and for installation, a new one is inserted by pushing it up to the desired position. For the license plate light bulb, unscrew the two small screws to come out the housing, then rotate the socket one turn clockwise to remove it, then the bulb can be removed by pulling it straight up and the new one has to be inserted in the same manner until it engages into the socket. For interior lights the switch housing should be carefully unclipped, electrical connectors shall be disconnected, lens shall be removed, the bulb has to be gently pulled down and a new one has to be inserted by fixing it in the appropriate terminals while reversing the procedure. Replacement of vanity light bulbs involves usually detaching the lens from the visor, then using pliers to extract the bulb and put in a new one in the same manner till it fits properly. For the dome light, pry down the left side of the lens and carefully pull out the bulb in a straight down motion, to replace it, place the new bulb in an up-direction until it clicked into position in the reverse procedure. For replacing the illumination bulbs of front and rear heater/air conditioning control assembly, first remove these assemblies, then unscrew the bulb holders anti-clockwise and the bulbs can be replaced by fixing new ones in similar fashion by turning these holders clockwise. The housing has to be removed and the cover plate unscrewed in order to reach the bulb which is located in the instrument panel center bezel; to replace, pull the bulb out straight then push in a new one until you hear a click in reverse order. Last but not least for the glove box light bulb, the way to replace it involves pulling down the glove box and taking out the light bulb, after which the new one is fitted into the socket and pushed back to the required extent.


