My Garage
My Account
Cart
Genuine Dodge Dakota Oil Pump
Oil Fluid Pump- Select Vehicle by Model
- Select Vehicle by VIN
Select Vehicle by Model
orMake
Model
Year
Select Vehicle by VIN
For the most accurate results, select vehicle by your VIN (Vehicle Identification Number).
12 Oil Pumps found


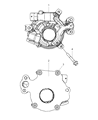


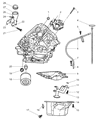


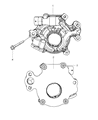


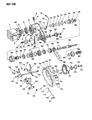


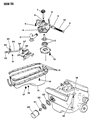


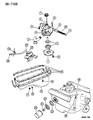


Dodge Dakota Oil Pump
Dodge Dakota Vehicles Oil Pump serves a very important function of circulating oil under pressure for the proper functioning of the internal combustion engine. It is circulating through bearings, pistons, and other other critical parts of the car's engine while it also also works as hydraulic fluid for small actuators. It is generally mechanical oil pumps, operated by the crankshaft or the camshaft used in Dodge Dakota known for it remarkable reliability. Years of Dodge Dakota might have various kind of oil pumps like gear type, trochoid type and vane type of oil pump. Some of its main employs include sucking oil from the sump, cleaning it and circulating it within the engine while ensuring it has an appropriately desirable pressure of 10 psi for every 1000 RPM. The other factor that has been identified to be critical to the well-being of the Dodge Dakota is that of service regularity, this includes the changing of oil and filter as this helps in avoiding system blockages as well as to facilitate the performance of the engine.
Looking for affordable and high-quality auto parts? Then you have already arrived at the proper online shop. We offer all Dodge Dakota Oil Pump at great affordable prices. Moreover, all genuine Dodge Dakota Oil Pump come with a manufacturer's warranty. In the long run, you would realize you have saved a lot of trouble and money with OEM parts from here.
Dodge Dakota Oil Pump Parts Questions & Experts Answers
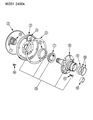
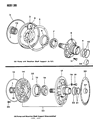
- Q: How to remove and install Oil Pump in 3.7L V6 and 4.7L V8 engine on Dodge Dakota?A:This procedure involves complete removal of Timing Chains and sprockets and to begin, the oil pan, wind age tray and the pick-up tube should be removed. Last, undo the primary timing chain tensioner and oil pump bolts and then the tensioner itself. Subsequently, remove all the remaining bolts of the oil pump and then, carefully taping on the oil pump housing off the crankshaft flats in order for the oil pump to be removed from the context of the engine. For example, to perform an inspection of the oil pump, twist the cover and quickly lift it up to remove it, next have all the components cleaned with a solvent and examine for wear or damage. Watch out that the oil pressure relief valve and spring are part of the oil pump housing; pull it out and the oil pump is shot and you'll have to put in an all new assembly. Use a straightedge, feeler gauge, and micrometer to make measurements of cover flatnes, outer rotor diameter and thickness, inner rotor thickness, outer rotor- body distance, inner rotor-to-outer rotor tip distance, and side clearances. It should be noted that, if any of the mentioned measures exceeds certain parameters, the oil pump assembly should be replaced. To prepare the oil pump, apply petroleum jelly into the cavities present around the rotor and bolt the pump in place ensuring all nuts are tightened to the recommended torque. For installation, slide the flats of the clutch rotor into the crankshaft flats and then fit the oil pump into place against the block. Lastly, snap the primary timing chain tensioner over the oil pump, put the pump-to-block bolts back in and tighten the oil pump and primary timing chain tensioner bolts to the required torque in steps from step two.

Related Dodge Dakota Parts
 Dodge Dakota Oil Filter
 Dodge Dakota Rod Bearing
 Dodge Dakota Oil Pressure Switch
 Dodge Dakota Drain Plug
 Dodge Dakota Oil Pan
 Dodge Dakota Crankshaft Pulley
 Dodge Dakota Dipstick
 Dodge Dakota Piston Ring Set
 Dodge Dakota Dipstick Tube
 Dodge Dakota Crankshaft Thrust Washer Set
 Dodge Dakota Drain Plug Washer
 Dodge Dakota Oil Cooler
Browse by Year
2011 Oil Pump 2010 Oil Pump 2009 Oil Pump 2008 Oil Pump 2007 Oil Pump 2006 Oil Pump 2005 Oil Pump 2004 Oil Pump 2003 Oil Pump 2002 Oil Pump 2001 Oil Pump 2000 Oil Pump 1999 Oil Pump 1998 Oil Pump 1997 Oil Pump 1996 Oil Pump 1995 Oil Pump 1994 Oil Pump 1993 Oil Pump 1992 Oil Pump 1991 Oil Pump 1990 Oil Pump 1989 Oil Pump 1988 Oil Pump 1987 Oil Pump