My Garage
My Account
Cart
Genuine Dodge Durango Axle Shaft
Car Axle Shaft- Select Vehicle by Model
- Select Vehicle by VIN
Select Vehicle by Model
orMake
Model
Year
Select Vehicle by VIN
For the most accurate results, select vehicle by your VIN (Vehicle Identification Number).
76 Axle Shafts found


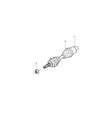
Dodge Durango Axle Shaft Assembly Replaces
Part Number: 52114390AB$601.65 MSRP: $915.00You Save: $313.35 (35%)


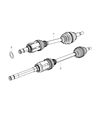


Dodge Durango Axle Half Shaft Left
Part Number: 4578885AC$375.05 MSRP: $571.00You Save: $195.95 (35%)


Dodge Durango Axle Shaft Assembly
Part Number: 4578884AC$444.78 MSRP: $708.00You Save: $263.22 (38%)

Dodge Durango Axle Half Shaft Left
Part Number: 68193661AB$329.98 MSRP: $497.00You Save: $167.02 (34%)


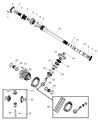
Dodge Durango Axle Intermediate Shaft
Part Number: 52069887AE$175.50 MSRP: $259.00You Save: $83.50 (33%)


| Page 1 of 4 |Next >
1-20 of 76 Results
Dodge Durango Axle Shaft
The Axle Shaft is important in the Dodge Durango cars whereby it connects the differential to the drive wheels and helps in tractive effort or torque distribution besides bearing the weight of the car. Made usually of rigid material such as steel, these axle shafts are designed to rotate in a different plane with the aim of increasing tractive force during cornering. Different models of Dodge Durango have employed several types of axles, the live axles that transfer the torque and bear the weight and the split axles that offers suspension to enhance comfort of the riders. The type of axle used in a car also determines the cars handling and carrying capacity and advanced types like full-floating axles are more useful where the car will be used for heavy-duty work. Summing up, the Axle Shaft plays an important role in the Durango performance as well as stability, thus providing a proper driving experience.
Looking for affordable and high-quality auto parts? Then you have already arrived at the proper online shop. We offer all Dodge Durango Axle Shaft at great affordable prices. Moreover, all genuine Dodge Durango Axle Shaft come with a manufacturer's warranty. In the long run, you would realize you have saved a lot of trouble and money with OEM parts from here.
Dodge Durango Axle Shaft Parts Questions & Experts Answers
- Q: How to remove the axle shaft assembly on Dodge Durango?A:After jacking up the back of the car, use jackstands under its frame rails to support it. Then take off the back wheels. Disconnect three parts: the driveshaft from the rear axle, the ABS sensor, and the parking brake cable from the parking brake lever. Unscrew the metal fitting from the brake line junction block, then detach the brake line fasteners from the axle housing and pull off the rear brake calipers. Tie the calipers together with wire, designed to handle flexible brake line pressure. Prop up the rear axle with a floor jack, and when the rear differential is off-center, use two jacks. You must take out the three bolts connecting the rear shocks to the axle's lower frame on Durango vehicles. Additionally, you need to remove the Watts link bellcrank bolt and the stabilizer bar clamp bolts. When working on a Durango, take apart the upper control arms from the axle bracket, then lower the whole axle and remove the coil springs, followed by the lower control arms from the axle brackets, and finally lower the axle again and unload it off the vehicle. To install, redo all suspension screws and ensure they're tight, before bringing the car back down. Remember to tighten the brake caliper mounts and check to see if the axle needs lube added. On 4WD models, lift the front of the car, put jackstands underneath, then take off the front wheels and driveaxles. Unscrew the bolts from the cross member, remove it, disconnect the Drive Shaft from the differential pinion, hang up the drive shaft out of the way, and undo the vent tube from the differential cover. Support the axle beneath the differential by placing a floor jack underneath, then take out the fasteners that connect the axle assembly to the engine's left mounting point and the pinion nose bracket. The last axle assembly mounting bolts stay in place at the engine's right mounting location. Use the jack to lower itself very carefully and take the axle assembly out from under the vehicle. To install it, follow the same steps backward.

Related Dodge Durango Parts
 Dodge Durango Torque Converter
 Dodge Durango Wheel Bearing
 Dodge Durango Needle Bearing
 Dodge Durango Pinion Washer
 Dodge Durango Transmission Pan
Browse by Year
2025 Axle Shaft 2024 Axle Shaft 2023 Axle Shaft 2022 Axle Shaft 2021 Axle Shaft 2020 Axle Shaft 2019 Axle Shaft 2018 Axle Shaft 2017 Axle Shaft 2016 Axle Shaft 2015 Axle Shaft 2014 Axle Shaft 2013 Axle Shaft 2012 Axle Shaft 2011 Axle Shaft 2009 Axle Shaft 2008 Axle Shaft 2007 Axle Shaft 2006 Axle Shaft 2005 Axle Shaft 2004 Axle Shaft 2003 Axle Shaft 2002 Axle Shaft 2001 Axle Shaft 2000 Axle Shaft 1999 Axle Shaft 1998 Axle Shaft