My Garage
My Account
Cart
Genuine Dodge Durango Hood Latch
Engine Hood Latch- Select Vehicle by Model
- Select Vehicle by VIN
Select Vehicle by Model
orMake
Model
Year
Select Vehicle by VIN
For the most accurate results, select vehicle by your VIN (Vehicle Identification Number).
10 Hood Latches found


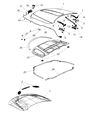


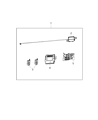


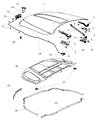


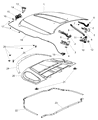


Dodge Durango Hood Latch
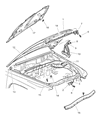
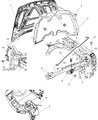
Hood Latch is an important component for protection of the vehicles such as Dodge Durango where it is incorporated to ensure that the bonnet is closed during operation to avoid sudden opening. This component is optimal fitted right under the front side of the hood so that important components such as the engine, water tank, and battery among others are safeguarded. Dodge Durango has employed different kinds of Hood Latch in the past years and different mechanisms of which has been employed enhance on safety and reliability. While specific differences between these types may not be detailed, the primary goal remains consistent: It is necessary in order to preserve the contour of the automotive hood and for the protection of important components of vehicles. Dodge Durango Hood Latch can be regarded as the exceptional example of the functionality and security features incorporated into vehicle design.
Looking for affordable and high-quality auto parts? Then you have already arrived at the proper online shop. We offer all Dodge Durango Hood Latch at great affordable prices. Moreover, all genuine Dodge Durango Hood Latch come with a manufacturer's warranty. In the long run, you would realize you have saved a lot of trouble and money with OEM parts from here.
Dodge Durango Hood Latch Parts Questions & Experts Answers
- Q: How to remove and install Hood Cable and Hood latch on Dodge Durango?A:Make a line around the latch for restoration purposes. After marking the spot, take out screws and bolts that hold the latch to the radiator support. Keep track of those bolts for accurate set up. Before removing the latch, you loosen its retaining bolts, adjust the position of the latch, and then retighten the bolts. Close and check the fit of the Hood before taking out the latch. Change the hood release cable connection at the back of the latch piece, and put everything back as you take it out, checking that the latch keeps the hood tightly closed and hood padding touches when you close it. Following hood latch removal, disconnect the cable, take off the radiator Grille and the left-light headlamp panel if needed. With a wire attached to the end of the engine compartment cable, pull the new cable toward you through the space. Remove the hood release handle from the instrument panel by cutting retaining clips, and pull the cable through by taking out the screws from underneath while detaching the grommet. Separate the wire from your old cable and join it to the stop of the freshly purchased cable, making sure the cable comes with a special tube item called a grommet. Run the new cable from the outside of the firewall to the engine bay, placing the grommet into the free port. Do the opposite of what you just did to put the new cable in place.

Related Dodge Durango Parts
 Dodge Durango Hood
 Dodge Durango Grille
 Dodge Durango Air Deflector
 Dodge Durango Hood Cable
 Dodge Durango Hood Hinge
Browse by Year
2025 Hood Latch 2024 Hood Latch 2023 Hood Latch 2022 Hood Latch 2021 Hood Latch 2020 Hood Latch 2019 Hood Latch 2018 Hood Latch 2017 Hood Latch 2016 Hood Latch 2015 Hood Latch 2014 Hood Latch 2013 Hood Latch 2012 Hood Latch 2011 Hood Latch 2009 Hood Latch 2008 Hood Latch 2007 Hood Latch 2006 Hood Latch 2005 Hood Latch 2004 Hood Latch 2003 Hood Latch 2002 Hood Latch 2001 Hood Latch 2000 Hood Latch 1999 Hood Latch 1998 Hood Latch