My Garage
My Account
Cart
Genuine Dodge Durango Piston
Engine Pistons- Select Vehicle by Model
- Select Vehicle by VIN
Select Vehicle by Model
orMake
Model
Year
Select Vehicle by VIN
For the most accurate results, select vehicle by your VIN (Vehicle Identification Number).
33 Pistons found


| Page 1 of 2 |Next >
1-20 of 33 Results
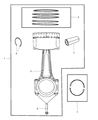
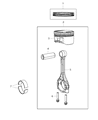
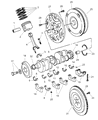
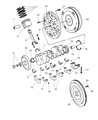
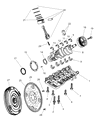
Dodge Durango Piston
The Piston incorporated in Dodge Durango vehicles is of great importance in transmitting engine combustion power to the energy required in propelling the car. This component is also known as piston and its main job is to translate the pressure of the expanding gases into movement of a crankshaft. Dodge Durango pistons are often made from aluminium alloys having the unique value of weight to power ratio, Some of the high performance ones uses forged or billet type of pistons. There has been the use of different kinds of pistons in different Dodge Durango models over the years, the use of trunk pistons for the petrol and diesel engines has been used as they work to support side forces and contain an oil ring. Also, racing pistons have been engineered to be light so as to be able to cope with the high RPM that is integral in racing. The design of these pistons has been done in such a careful manner to be able to get the premier performance and durability in the Dodge Durango series.
Looking for affordable and high-quality auto parts? Then you have already arrived at the proper online shop. We offer all Dodge Durango Piston at great affordable prices. Moreover, all genuine Dodge Durango Piston come with a manufacturer's warranty. In the long run, you would realize you have saved a lot of trouble and money with OEM parts from here.
Dodge Durango Piston Parts Questions & Experts Answers
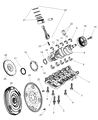
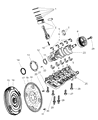
- Q: What steps must be taken before removing the piston and connecting rod assemblies, and how should the installation of new piston rings be performed on Dodge Durango?A:Before the piston and connecting rod assemblies could be pulled, the cylinder head and oil pan had to be dismantled. With the help of your fingernail, you should feel for any ridges at the upper end of ring travel-these must be flattened by a ridge reamer if present, otherwise the piston may break. After the removal of these ridges, position the engine in a manner that the Crankshaft is on the upper side. Measure the connecting rod bearing clearance with the feeler gauges, that should be within the given tolerance; if not, one will require new connecting rods. There is nothing as confusing connecting rods and their respective caps and therefore should be easily distinguishable, the connecting rod cap bolts should then be loosened gently. Pull the connecting rod cap/bearing to free the insert while it remains engaged and, through the top of the engine, pop the connecting rod/piston. Do this for the other cylinders, to avoid damaging the glands, screws and lids of the caps and the inserts. The state of the pistons and the connecting rods will have to be assessed for further working or replacement they are thus prepared. Prior to replacing worn out piston rings you should always measure ring end gaps, while checking the piston ring side clearance. Arrange and spread out the piston/connecting rod assemblies and new rings in such a way that during the process of installation, they can be matched. Put top ring to the first cylinder, align it with the walls and check the end clearance with the feeler gauges. If the gap is wrong then it can also be corrected but slowly and with great focus. First insert the oil control ring, implement the middle ring and finally, the top one, making sure they face the right way. Before installation, one needs to see that the cylinder walls are clean, that the edges should be chamfered and the crankshaft inserted. Check and replace the connecting rod and cap bearing inserts with the help of a rod loser and be sure that they have to be set with a small clearance without any oil between them. Space the piston ring gaps correctly to allow oil to fill the gap, apply oil on the piston and the ring and use the piston ring compressor for purposes of putting them in place. After the connecting rod is inserted into the small end of the piston, try to push the piston and connecting rod assembly into the cylinder bore and feel if there is some sort of resistance. As mentioned check the bearing oil clearance of the connecting rod using Plastigage, also verify size and condition of the bearing inserts. If the clearance is not as specified, there could be much more to this than just indicating the type of clearance that is required. Remove all crudded up Plastigage if any, coat the bearing faces with grease or assembly lube and fit back the rod cap along with the new bolts and torque them to their recommended settings. The same process should be repeated till all the assemblies are cleaned and placed in the correct orientation. Following installation perform the crankshaft rotating to reveal binding problems and again check the amount of endplay of the connecting rod as it should be within limits.

Related Dodge Durango Parts
 Dodge Durango Drive Shaft
 Dodge Durango Drive Belt
 Dodge Durango Harmonic Balancer
 Dodge Durango Engine Mount
 Dodge Durango Engine Cover
 Dodge Durango Drain Plug
 Dodge Durango EGR Valve Gasket
 Dodge Durango Drain Plug Washer
 Dodge Durango EGR Tube
 Dodge Durango Exhaust Seal Ring
 Dodge Durango Flywheel
 Dodge Durango Flywheel Ring Gear
Browse by Year
2025 Piston 2024 Piston 2023 Piston 2022 Piston 2021 Piston 2020 Piston 2019 Piston 2018 Piston 2017 Piston 2016 Piston 2015 Piston 2014 Piston 2013 Piston 2012 Piston 2011 Piston 2009 Piston 2008 Piston 2007 Piston 2006 Piston 2005 Piston 2004 Piston 2003 Piston 2002 Piston 2001 Piston 2000 Piston 1999 Piston 1998 Piston