My Garage
My Account
Cart
Genuine Dodge Grand Caravan Hood
Engine Hood- Select Vehicle by Model
- Select Vehicle by VIN
Select Vehicle by Model
orMake
Model
Year
Select Vehicle by VIN
For the most accurate results, select vehicle by your VIN (Vehicle Identification Number).
9 Hoods found


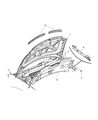

Dodge Grand Caravan Hood
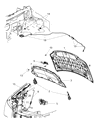
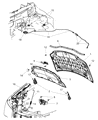
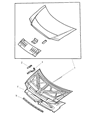
Dodge Grand Caravan Hood acts as a protective shield of the car that prevents rain, debris, and heat from reaching crucial engine parts while still allowing for easy opening for routine checks and fixes. Over the years, every Dodge minivan in the Grand Caravan family has incorporated a hinged cover. These designs combine protection and smooth airflow so the van can slice through the wind without spilling air and looking good on the road. Many Hood panels were made to be durable from stamped steel for everyday use; however, later editions of the Dodge people-carrier had lighter aluminum or fiberglass Hood options that reduce weight and enhance fuel economy. Every Grand Caravan Hood, regardless of its material, is engineered with crumple zones that fold on impact, guiding crash energy away from the occupants. When selecting a replacement Hood for your van, be sure to match the year for proper mounting hole configuration. Then, select a surface, either treat it in primer, allowing customization via paint, or a shiny gel-coat finish that comes pre-colored. The replacement will guarantee original fitment in a factory-like style synonymous with Dodge Grand Caravan.
Looking for affordable and high-quality auto parts? Then you have already arrived at the proper online shop. We offer all Dodge Grand Caravan Hood at great affordable prices. Moreover, all genuine Dodge Grand Caravan Hood come with a manufacturer's warranty. In the long run, you would realize you have saved a lot of trouble and money with OEM parts from here.
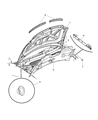
Dodge Grand Caravan Hood Parts Questions & Experts Answers
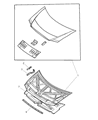
- Q: How should the hood be removed and installed safely and correctly on Dodge Grand Caravan?A:The hood is heavy and somewhat awkward to remove and install, so at least two people should perform this procedure. Begin by using blankets or pads to cover the cowl area of the body and the Fenders to protect the body and paint during the hood's removal. Scribe alignment marks around the bolt heads to ensure proper alignment during installation, using a permanent-type felt-tip marker or a marking pen to outline the hinge plate and bolt heads. Disconnect any cables or wire harnesses that may interfere with removal, and have an assistant support the weight of the hood while removing the hinge-to-hood bolts. Carefully lift off the hood, and for installation, follow the reverse process. For adjustment, fore-and-aft and side-to-side alignment of the hood can be achieved by moving it in relation to the hinge plate after loosening the bolts. Scribe or trace a line around the entire hinge plate to gauge movement, then loosen the bolts or nuts and adjust the hood into the correct alignment, tightening the hinge bolts or nuts afterward to check the alignment. Adjust the hood bumpers on the radiator support to ensure the hood is flush with the fenders when closed, and modify the hood height by screwing the bumpers in or out. The safety catch assembly on the hood can also be adjusted after loosening the bolts, and it is advisable to periodically lubricate the Hood Latch assembly and hinges with white lithium-base grease to prevent sticking and wear.


