My Garage
My Account
Cart
Genuine Dodge Neon Parking Brake Shoe
Emergency Parking Brake Shoe- Select Vehicle by Model
- Select Vehicle by VIN
Select Vehicle by Model
orMake
Model
Year
Select Vehicle by VIN
For the most accurate results, select vehicle by your VIN (Vehicle Identification Number).
2 Parking Brake Shoes found


Dodge Neon Parking Brake Shoe
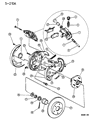
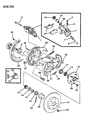
The Parking Brake Shoe found in Dodge Neon vehicles plays a very important duty in holding the wheels of the car especially when the car is parked. Its main purpose is to apply pressure having its brake lining rub against the drum wall so as to immobilize the wheels in case of application of the parking brake. Relating to the years, Dodge Neon models may have adopted Parking Brake Shoe of different fashion but particular changes are not elaborated. The mechanism of operation stays the same though, its basic foundation is the surety of applying force to stop wheel movement. It therefore becomes pertinent to understand the basics of the Parking Brake Shoe in order to ensure that the Dodge Neon remains safe and efficient.
Looking for affordable and high-quality auto parts? Then you have already arrived at the proper online shop. We offer all Dodge Neon Parking Brake Shoe at great affordable prices. Moreover, all genuine Dodge Neon Parking Brake Shoe come with a manufacturer's warranty. In the long run, you would realize you have saved a lot of trouble and money with OEM parts from here.
Dodge Neon Parking Brake Shoe Parts Questions & Experts Answers
- Q: Should parking brake shoes be replaced on both wheels simultaneously on Dodge Neon?A:It is imperative that parking brake shoes be changed a both wheels at the same time; never change shoes only on one wheel. The parking brake system should be checked often particularly when the vehicle is parked on an inclined plane through engaging the brake, shifting the gear to the neutral and then checking that the parking brake locks the vehicle again. It is, therefore, required that a visual inspection of the assembly be done every 24 months or any time a fault is suspected. Start with the removal of the rear wheel lug nuts, lifting of the vehicle up to the rear and placing it on jack-stands firmly. The parking brake must be released and the front wheels blocked and the rear wheels demounted. The rear calipers must be taken off while maintaining them by using a Bungee cord or heavy wire and without releasing the Brake Line. Then, first of all, it is necessary to remove the rear discs and the rear hub and bearing assemblies. The parking brake assembly should also be cleaned with brake system cleaner. When releasing the parking brake shoes, there are some general and specific steps for release of the hold-down clips and springs; one must closely look at the lining contact pattern to check for bending or improper adjustment. Treat the backing plate with the same solvent used to clean it and examine the drum also. Before installing the brake sparingly apply lubricant on the friction points on the brake backing plate, If the Parking Brake Cable was removed, it should be inserted into the actuator lever, Next put the new shoes in place as explained in the steps used for fitting of the hold-down clips and springs into place. You should set the distance across the friction faces of the shoes to six and three-quarters inches as you put the disc on the shoes and make sure they can barely turn as you turn the disc, then move the adjuster backwards and forwards until this is so. Last but not the least; place the caliper and do the same thing you did for the other rear wheel.


