My Garage
My Account
Cart
Genuine Dodge Ram 1500 CV Boot
Axle Boot- Select Vehicle by Model
- Select Vehicle by VIN
Select Vehicle by Model
orMake
Model
Year
Select Vehicle by VIN
For the most accurate results, select vehicle by your VIN (Vehicle Identification Number).
6 CV Boots found


Dodge Ram 1500 Half Shaft Boot Package
Part Number: 5170821AA$75.04 MSRP: $114.00You Save: $38.96 (35%)


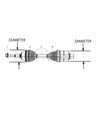


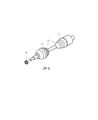
Dodge Ram 1500 CV Boot
The CV Boot of Dodge Ram 1500 vehicles is an essential part of each vehicle's system and is responsible for casing the Constant Velocity (CV) Joint that holds the key to power transfer from the transaxle to the wheels. As of two groups of CV Joints for the Ram 1500, fixed joints are on outboard end and the plunging joint is in the inboard side. The CV Boot is critical in ensuring that the CV Joint does not suffer any tear through locking the lubricant and protecting it from Environmental influences. The CV Boot requires to be checked frequently so as to avoid problems related to CV Joint as the boot might have developed the crack or even torn.
Looking for affordable and high-quality auto parts? Then you have already arrived at the proper online shop. We offer all Dodge Ram 1500 CV Boot at great affordable prices. Moreover, all genuine Dodge Ram 1500 CV Boot come with a manufacturer's warranty. In the long run, you would realize you have saved a lot of trouble and money with OEM parts from here.
Dodge Ram 1500 CV Boot Parts Questions & Experts Answers
- Q: How to disassemble and assemble CV joints and CV Boot on Dodge Ram 1500?A:When dealing with potentially worn CV joints, it's wise to consider alternatives before diving into an overhaul, particularly if wear is due to torn CV Boot. Check the availability and cost of replacement parts and complete rebuilt drive axles on an exchange basis before proceeding with the job. To disassemble the inner CV joint, securely mount the drive axle in a bench vise with wood blocks for protection and remove the boot retaining clamps, sliding the inner boot back. Then, pull off the inner CV joint housing from the shaft and tripod, remove the snap-ring from the shaft using snap-ring pliers, mark the shaft and tripod, and take off the tripod. Afterward, remove the boot, clean the housing and tripod with solvent, and thoroughly inspect them for wear or damage; if found, replace the entire joint. For assembly, apply CV joint grease to the tripod and interior of the housing, insert the shaft and tripod into the housing after positioning the boot correctly, and secure the boot clamps. To disassemble the outer CV joint, mount the axleshaft in a vise with wood blocks, remove the boot clamps and slide the boot back. Wipe away the grease and expand the snap-ring retaining the outer joint to the shaft with snap-ring pliers to remove the joint. After sliding off the boot from the drive axle, inspect the axle spline area for damage and corrosion, clean the outer CV joint bearing assembly, and mark the relative positions of the bearing cage, inner race, and housing. To disassemble the bearing assembly from the housing, tilt it vertically and align opposing cage windows between the ball grooves. Turn the inner race 90 degrees to the cage, align a spherical land with an elongated cage window, and raise the land into the window to separate the two components. Clean all parts with solvent and inspect for damage, corrosion, wear, or cracks; if unserviceable, replace the entire CV joint assembly with a new one. For assembly, apply a thin film of oil to all CV joint components and align the marks when installing the inner race in the cage and the assembly in the housing. Ensure the large counter bore of the inner race faces out, and fill the joint with grease through the splined hole while inserting wooden dowels to force the grease in. Slide the inner clamp and boot over the drive axle, place the CV joint housing in position, align the splines, and push it into place. Secure it by attempting to pull it from the shaft, ensure the boot is undistorted, and then tighten the clamps.
- Q: What should be checked Shock Absorber and CV boot on Dodge Ram 1500?A:The steering linkage and suspension components should be checked periodically. Worn or damaged suspension and steering linkage components can result in excessive and abnormal tire wear, poor ride quality and vehicle handling, and reduced fuel economy. To check the shock absorbers, park the vehicle on level ground, turn off the engine, and set the parking brake. Push down at one corner of the vehicle and release it, noting the movement of the body. It should stop moving and come to rest in a level position within one or two bounces. If the vehicle continues to move up-and-down or fails to return to its original position, a worn or weak shock absorber is likely the reason. Repeat this check at each of the three remaining corners of the vehicle. Raise the vehicle and support it securely on jack stands. Check the shock absorbers for evidence of fluid leakage. A light film of fluid is no cause for concern, but if leakage is noted, replace the shocks as a set. Also, check the shocks to ensure they are securely mounted and undamaged, and check the upper mounts for damage and wear. Moving on to the steering and suspension check, visually inspect the steering and suspension components for damage and distortion, including seals, boots, bushings, and leaks. Examine the bushings where the control arms meet the chassis. Clean the lower end of the steering knuckle and have an assistant grasp the lower edge of the tire and move the wheel in-and-out while checking for movement at the steering knuckle-to-control arm ball joint. If there is any movement, the suspension ball joint(s) must be replaced. Grasp each front tire at the front and rear edges, push in at the front, pull out at the rear, and feel for play in the steering system components. If any free play is noted, check the idler arm and the tie-rod ends for looseness. Finally, for 4WD models, check the CV Boot for tears, cracks, and loose clamps. If there is any evidence of cracks or leaking lubricant, they must be replaced.

