My Garage
My Account
Cart
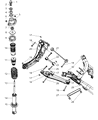
Genuine Jeep Compass Trailing Arm
Trailing Control Arm- Select Vehicle by Model
- Select Vehicle by VIN
Select Vehicle by Model
orMake
Model
Year
Select Vehicle by VIN
For the most accurate results, select vehicle by your VIN (Vehicle Identification Number).
12 Trailing Arms found


Jeep Compass Link-Trailing Rear Suspension
Part Number: 5272715AC$249.76 MSRP: $374.00You Save: $124.24 (34%)


Jeep Compass Link-Trailing Rear Suspension
Part Number: 5272714AC$136.13 MSRP: $202.00You Save: $65.87 (33%)


Jeep Compass Link-Trailing Rear Suspension
Part Number: 5105930AA$136.13 MSRP: $202.00You Save: $65.87 (33%)Jeep Compass Link-Trailing Rear Suspension
Part Number: 5105927AA$102.11 MSRP: $205.00You Save: $102.89 (51%)
Jeep Compass Trailing Arm
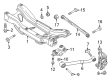
The Trailing Arm in Jeep Compass automobiles is a vital constituent of the trailing-link suspension systems, which ties the axle to the frame of the automobile. Its primary role is as an anti-sway bar because it helps reduce unessential movement of the axle so that it improves on stability and handling. In the current Jeep Compass model, the company uses the trailing-arm suspension which consists of two or three links together with the Panhard rod for lateral wheel location for optimum results on different types of roads. Also, the Jeep Compass uses semi trailing arm suspension in which each wheel hub is connected to a triangle shaped bar that can rotate in two ways only. This design enables it to be more flexible and to afford the rear suspension to move more freely on its own. In general, the systems of Trailing Arm anchored in Jeep Compass make expansion of comfort, as well as increase in available cargo space.
Looking for affordable and high-quality auto parts? Then you have already arrived at the proper online shop. We offer all Jeep Compass Trailing Arm at great affordable prices. Moreover, all genuine Jeep Compass Trailing Arm come with a manufacturer's warranty. In the long run, you would realize you have saved a lot of trouble and money with OEM parts from here.
Jeep Compass Trailing Arm Parts Questions & Experts Answers
- Q: How to remove and install a trailing arm on Jeep Compass?A:Loosen the wheel lug nuts, raise the vehicle and support it securely on jackstands. Remove the wheels. If you're working on an all-wheel drive model, have an assistant apply the brakes while you remove the driveaxle/hub nut. Remove the bolts that hold the brake hose to the trailing link and the bolt that holds the parking brake cable near the forward end of the trailing arm. Remove the brake line from the clip on the trailing link. Also remove the wheel speed sensor wire from the clips on the trailing arm. If your vehicle is equipped with rear disc brakes, remove the caliper and mounting bracket as an assembly. Hang it out of the way using wire, zip-ties, or equivalent. Do not allow the caliper to hang or over-extend the brake line; this can lead to brake failure. Remove the speed sensor routing screws and clips that attach it to the trailing link. If equipped with rear drum brakes, detach the parking brake cable from the parking brake lever on the trailing brake shoe. Remove the hairpin fastening the parking brake cable to the backing plate. Slide the parking brake cable out of the backing plate. Unbolt the toe link from the trailing link. Remove the bolts securing the trailing link to the upper and lower Control Arms. Remove the two bolts that attach the trailing link to the vehicle frame. Remove the trailing link. On all-wheel drive models, guide the driveaxle out of the hub, being careful not to pull out on the inner CV joint. Install the body side of the trailing link first and tighten the bolts. Installation is otherwise the reverse of removal. Tighten the control arm-to-trailing link bolt/nuts and the toe link bolt/nut. If you're working on an AWD model, tighten the driveaxle/hub nut. Install the wheel and lug nuts. Lower the vehicle and tighten the lug nuts.

Related Jeep Compass Parts
 Jeep Compass Ball Joint
 Jeep Compass Steering Wheel
 Jeep Compass Power Steering Pump
 Jeep Compass Steering Knuckle
 Jeep Compass Coil Spring Insulator
 Jeep Compass Control Arm
 Jeep Compass Wheel Bearing
 Jeep Compass Sway Bar Link
 Jeep Compass Sway Bar Bushing
 Jeep Compass Tie Rod End
 Jeep Compass Wheel Hub
 Jeep Compass Wheel Stud