My Garage
My Account
Cart
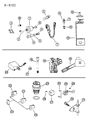
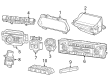
Genuine Jeep Grand Cherokee Headlight Switch
Headlamp Switch- Select Vehicle by Model
- Select Vehicle by VIN
Select Vehicle by Model
orMake
Model
Year
Select Vehicle by VIN
For the most accurate results, select vehicle by your VIN (Vehicle Identification Number).
54 Headlight Switches found


Jeep Grand Cherokee Headlamp Switch
Part Number: 68258718AB$66.66 MSRP: $99.00You Save: $32.34 (33%)


Jeep Grand Cherokee Multi function Switch
Part Number: 68041485AB$113.63 MSRP: $172.00You Save: $58.37 (34%)


Jeep Grand Cherokee Multi function Switch
Part Number: 5183947AB$113.63 MSRP: $172.00You Save: $58.37 (34%)


Jeep Grand Cherokee Headlamp Switch
Part Number: 68189156AA$66.66 MSRP: $99.00You Save: $32.34 (33%)


Jeep Grand Cherokee Multi function Switch
Part Number: 68015101AE$96.75 MSRP: $144.00You Save: $47.25 (33%)


Jeep Grand Cherokee Multi function Switch
Part Number: 68015101AC$96.75 MSRP: $144.00You Save: $47.25 (33%)

Jeep Grand Cherokee Headlamp Switch
Part Number: 68632914AA$67.16 MSRP: $99.70You Save: $32.54 (33%)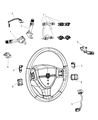
Jeep Grand Cherokee Multi function Switch
Part Number: 68041485AA$113.63 MSRP: $172.00You Save: $58.37 (34%)
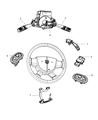
Jeep Grand Cherokee Multi function Switch
Part Number: 68015101AD$96.75 MSRP: $144.00You Save: $47.25 (33%)Jeep Grand Cherokee Multi function Switch
Part Number: 5183952AB$56.25 MSRP: $83.35You Save: $27.10 (33%)

Jeep Grand Cherokee Headlamp Switch
Part Number: 68258718AA$66.66 MSRP: $99.00You Save: $32.34 (33%)
Jeep Grand Cherokee Headlamp Switch
Part Number: 68142242AA$66.66 MSRP: $99.00You Save: $32.34 (33%)
Jeep Grand Cherokee Multi function Switch
Part Number: 5183952AD$56.25 MSRP: $83.35You Save: $27.10 (33%)Jeep Grand Cherokee Headlamp Switch
Part Number: 68632915AA$59.18 MSRP: $87.70You Save: $28.52 (33%)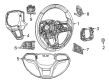
Jeep Grand Cherokee Headlamp Switch
Part Number: 68632907AA$54.11 MSRP: $77.45You Save: $23.34 (31%)Jeep Grand Cherokee Headlamp Switch
Part Number: 68632913AA$54.87 MSRP: $78.60You Save: $23.73 (31%)Jeep Grand Cherokee Headlamp Switch
Part Number: 68632906AA$57.78 MSRP: $82.75You Save: $24.97 (31%)
Jeep Grand Cherokee Multi function Switch
Part Number: 5143313AD$87.98 MSRP: $130.00You Save: $42.02 (33%)
| Page 1 of 3 |Next >
1-20 of 54 Results
Jeep Grand Cherokee Headlight Switch
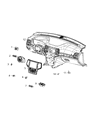
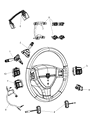
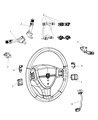
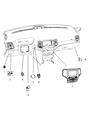
The Headlight Switch of Jeep Grand Cherokee is a driver-controlled switch that turns on the headlamps and chooses beam power. It is for changing visibility conditions on the road. In all Jeep Grand Cherokee generations, the Headlight Switch is directly connected to the lighting circuit, so a simple move or press makes an electrical connection that sends current to the low or high beams. It also allows a quick shut off when daylight returns. The dimming function built into each Headlight Switch allows for brightness adjustment so that the cabin provides clear feedback and does not blind oncoming traffic. For many years, the Grand Cherokee has applied a rotary style Headlight Switch mounted to the dash instead of steering column stalks like other models offered. This ensured ease of operation by simply twisting it on, further twisting it for high intensity, and pushing or pulling it for flash or momentary high beam. This trusted Jeep Headlight Switch component may be replaced with ease when worn to help keep the dependable safety advantage Grand Cherokee owners expect from their Jeep.
Looking for affordable and high-quality auto parts? Then you have already arrived at the proper online shop. We offer all Jeep Grand Cherokee Headlight Switch at great affordable prices. Moreover, all genuine Jeep Grand Cherokee Headlight Switch come with a manufacturer's warranty. In the long run, you would realize you have saved a lot of trouble and money with OEM parts from here.
Jeep Grand Cherokee Headlight Switch Parts Questions & Experts Answers
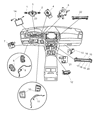
- Q: How to replace the multi-function and headlight switches on Jeep Grand Cherokee?A:To replace the multi-function switches, first disconnect the cable from the negative battery terminal and remove the steering column covers. Next, remove the screw securing the switch to the steering column, noting that 2011 and later models have only one multifunction switch on the left side. Slide the switch away from the clock-spring to disengage the tabs, disconnect the harness connector, and remove the switch, with installation being the reverse of removal. For the headlight switch, again disconnect the cable from the negative battery terminal. On 2010 and earlier Grand Cherokee models, the headlight switch is part of the multi-function switch; use a trim removal tool to carefully pry the headlight switch assembly out of the knee bolster panel, disconnect the electrical connector, and remove the switch, with installation being the reverse of removal. For Durango models, turn the dial on the headlight switch to the OFF or "O" position, push the dial inwards, and rotate it clockwise to engage the release pins, then continue rotating until it points to the ON position to release both pins. Pull the switch out of the mounting hole to access the harness, disconnect it, and remove the switch. Before installing, rotate the dial back to the OFF or "O" position to extend both retaining tabs, connect the electrical connector, and insert the headlight switch into the hole, pushing firmly until it snaps into place with an audible click, followed by reversing the removal steps for the remainder of the installation.

Related Jeep Grand Cherokee Parts
 Jeep Grand Cherokee Power Window Switch
 Jeep Grand Cherokee Brake Light Switch
 Jeep Grand Cherokee Oil Pressure Switch
 Jeep Grand Cherokee Dimmer Switch
 Jeep Grand Cherokee Mirror Switch
 Jeep Grand Cherokee Door Jamb Switch
 Jeep Grand Cherokee Seat Heater Switch
 Jeep Grand Cherokee Seat Switch
 Jeep Grand Cherokee Wiper Switch
 Jeep Grand Cherokee Back Up Light Switch
 Jeep Grand Cherokee Neutral Safety Switch
 Jeep Grand Cherokee Power Steering Pressure Switch
Browse by Year
2025 Headlight Switch 2024 Headlight Switch 2023 Headlight Switch 2022 Headlight Switch 2021 Headlight Switch 2020 Headlight Switch 2019 Headlight Switch 2018 Headlight Switch 2017 Headlight Switch 2016 Headlight Switch 2015 Headlight Switch 2014 Headlight Switch 2013 Headlight Switch 2012 Headlight Switch 2011 Headlight Switch 2010 Headlight Switch 2009 Headlight Switch 2008 Headlight Switch 2007 Headlight Switch 2006 Headlight Switch 2005 Headlight Switch 2004 Headlight Switch 2003 Headlight Switch 2002 Headlight Switch 2001 Headlight Switch 2000 Headlight Switch 1999 Headlight Switch 1998 Headlight Switch 1997 Headlight Switch 1996 Headlight Switch 1995 Headlight Switch 1994 Headlight Switch 1993 Headlight Switch