My Garage
My Account
Cart
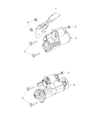
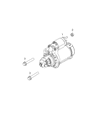
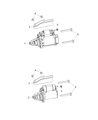
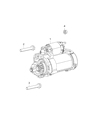
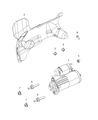
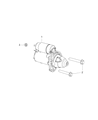
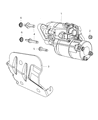
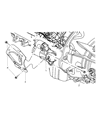
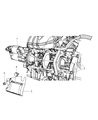
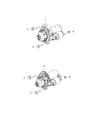
Genuine Jeep Grand Cherokee Starter Motor
Starter Ignition- Select Vehicle by Model
- Select Vehicle by VIN
Select Vehicle by Model
orMake
Model
Year
Select Vehicle by VIN
For the most accurate results, select vehicle by your VIN (Vehicle Identification Number).
45 Starter motors found


Jeep Grand Cherokee Engine Starter
Part Number: 56044734AA$144.07 MSRP: $315.00You Save: $170.93 (55%)


Jeep Grand Cherokee Starter Motor
Part Number: 68080460AB$293.33 MSRP: $659.00You Save: $365.67 (56%)


Jeep Grand Cherokee Engine Starter
Part Number: 68080460AA$293.33 MSRP: $659.00You Save: $365.67 (56%)


Jeep Grand Cherokee Engine Starter
Part Number: 56044736AC$281.44 MSRP: $419.00You Save: $137.56 (33%)


Jeep Grand Cherokee Engine Starter
Part Number: 68441792AA$213.60 MSRP: $315.00You Save: $101.40 (33%)


Jeep Grand Cherokee Engine Starter
Part Number: 56029780AD$385.48 MSRP: $582.00You Save: $196.52 (34%)


Jeep Grand Cherokee Starter Electrical, Charging And Starting
Part Number: 4801852AB$319.35 MSRP: $480.00You Save: $160.65 (34%)


Jeep Grand Cherokee Engine Starter
Part Number: R6029780AB$285.48 MSRP: $572.00You Save: $286.52 (51%)


Jeep Grand Cherokee Engine Starter
Part Number: 4896464AE$362.38 MSRP: $552.00You Save: $189.62 (35%)


Jeep Grand Cherokee Engine Starter Motor
Part Number: 56029780AB$385.48 MSRP: $582.00You Save: $196.52 (34%)


Jeep Grand Cherokee Starter Motor Compatible
Part Number: 56044736AB$281.44 MSRP: $419.00You Save: $137.56 (33%)

Jeep Grand Cherokee Starter Motor
Part Number: 5035322AA$597.78 MSRP: $909.00You Save: $311.22 (35%)


Jeep Grand Cherokee Engine Starter
Part Number: 68430861AA$111.83 MSRP: $164.00You Save: $52.17 (32%)
Jeep Grand Cherokee Engine Starter
Part Number: R6044735AC$97.92 MSRP: $199.00You Save: $101.08 (51%)Jeep Grand Cherokee Starter Motor
Part Number: R6044736AC$124.20 MSRP: $146.00You Save: $21.80 (15%)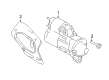

Jeep Grand Cherokee Starter Compatible
Part Number: 56044735AB$302.75 MSRP: $357.00You Save: $54.25 (16%)
Jeep Grand Cherokee Starter Replaces
Part Number: 4801694AC$319.35 MSRP: $480.00You Save: $160.65 (34%)
Jeep Grand Cherokee Engine Starter
Part Number: 56029667AC$465.78 MSRP: $708.00You Save: $242.22 (35%)


Jeep Grand Cherokee Starter Motor Reman
Part Number: R6044735AB$302.75 MSRP: $357.00You Save: $54.25 (16%)
| Page 1 of 3 |Next >
1-20 of 45 Results
Jeep Grand Cherokee Starter Motor
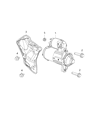
Jeep Grand Cherokee Starter Motor is one of the important parts of automobile which is used to convert electrical energy into mechanical energy to start the engine. It is energised by a solenoid which has it's connection with the battery, the armature rotates, while the field coils are mounted in the starter case. There are also various types of starters; for example Gear reduction starters offer a mesh between the starter drive and the engine's flywheel or clutch to start the car. The starting motor type may need to be upgraded in high-power engines, possibly ones made specially for the application as OE starting motors may not function well on high-compression motors. There are symptoms which would indicate that the starter is failing, such as clicking noises, no start, and hard cranking, in which the starter will need to be rebuilt or clean the cable clamps and terminals for efficiency. The principles of starter motors are well elaborated with the help of the information provided by the history of this invention that played an essential role in internal combustion engines that are used in the modern world, providing facilities in starting of the engines safely.
Looking for affordable and high-quality auto parts? Then you have already arrived at the proper online shop. We offer all Jeep Grand Cherokee Starter Motor at great affordable prices. Moreover, all genuine Jeep Grand Cherokee Starter Motor come with a manufacturer's warranty. In the long run, you would realize you have saved a lot of trouble and money with OEM parts from here.
Jeep Grand Cherokee Starter Motor Parts Questions & Experts Answers
- Q: How to Remove and Install a Starter Motor on a Jeep Grand Cherokee?A:Disconnect the cable from the negative terminal of the battery. Raise the vehicle and support it securely on jackstands. Remove the lower splash shield and skid plates, if equipped. On 4WD models with certain transmissions, there's a support bracket between the front axle and the side of the transmission that blocks access to the lower starter mounting bolt. If your vehicle has this support bracket, remove the two support bracket bolts at the transmission, then pry the support bracket aside enough to gain access to the lower starter mounting bolt. Additionally, on some 4WD models the driveshaft will have to be detached from the front differential companion flange for access to the starter mounting bolts. Remove the heat shield, if equipped, from the starter motor. Remove the nut that secures the battery cable to the terminal stud on the starter solenoid, disconnect the cable from the terminal stud and disconnect the electrical connector from the spade terminal on the solenoid. Remove the two starter mounting bolts. Move the starter motor toward the front of the vehicle until the nose of the starter pinion housing clears the transmission bellhousing, then lift the nose down and, if you haven't already done so, lower the starter until you can disconnect the electrical connector and remove the nut that secures the battery cable to the terminal stud on the starter solenoid. Once everything is disconnected, remove the starter. Caution: The starter motor is fairly heavy, so be sure to support it while removing it. Do NOT allow it to hang by the wiring harness. Installation is the reverse of removal. For Hemi engines, loosen the lug nuts on the left front wheel. Raise the vehicle and place it securely on jackstands. Remove the wheel. Remove the splash shield from the left front wheel housing. Remove the starter heat shield and fasteners, if equipped. On some 4WD models with certain transmissions, there's a support bracket between the front axle and the side of the transmission that blocks access to the lower starter mounting bolt. If your vehicle has this support bracket, remove the two support bracket bolts at the transmission, then pry the support bracket aside enough to gain access to the lower starter mounting bolt. Disconnect the battery cable and electrical connector from the terminals on the starter motor solenoid. Remove the two starter motor mounting bolts and remove the starter motor assembly. Installation is the reverse of removal.
- Q: How to Check If a Malfunction Occurs in the Starting Circuit and Starter Motor on Jeep Grand Cherokee?A:If a malfunction occurs in the starting circuit, check the Battery Cable clamps, battery cables, battery, starter motor wiring, and connections, starter motor mounting bolts, related fuses, ignition switch circuit, starter relay, and TR sensor. If the starter is receiving voltage but does not activate, remove and check the starter motor assembly on the bench. With the starter assembly mounted in a vise on the bench, install one jumper cable from the positive terminal of a test battery to the B+ terminal on the starter. Install another jumper cable from the negative terminal of the battery to the body of the starter. Install a starter switch and apply battery voltage to the solenoid S terminal and observe the solenoid plunger, shift lever, and overrunning clutch extend and rotate the pinion drive.


Related Jeep Grand Cherokee Parts
 Jeep Grand Cherokee Alternator
 Jeep Grand Cherokee Starter Solenoid
 Jeep Grand Cherokee Starter Brush
Browse by Year
2025 Starter Motor 2024 Starter Motor 2023 Starter Motor 2022 Starter Motor 2021 Starter Motor 2020 Starter Motor 2019 Starter Motor 2018 Starter Motor 2017 Starter Motor 2016 Starter Motor 2015 Starter Motor 2014 Starter Motor 2013 Starter Motor 2012 Starter Motor 2011 Starter Motor 2010 Starter Motor 2009 Starter Motor 2008 Starter Motor 2007 Starter Motor 2006 Starter Motor 2005 Starter Motor 2004 Starter Motor 2003 Starter Motor 2002 Starter Motor 2001 Starter Motor 2000 Starter Motor 1999 Starter Motor 1998 Starter Motor 1997 Starter Motor 1996 Starter Motor 1995 Starter Motor 1994 Starter Motor 1993 Starter Motor