My Garage
My Account
Cart
Genuine Jeep Liberty A/C Condenser
Air Conditioning Condenser- Select Vehicle by Model
- Select Vehicle by VIN
Select Vehicle by Model
orMake
Model
Year
Select Vehicle by VIN
For the most accurate results, select vehicle by your VIN (Vehicle Identification Number).
15 A/C Condensers found

Jeep Liberty Air Conditioning Condenser
Part Number: 68033230AB$307.06 MSRP: $490.00You Save: $182.94 (38%)
Jeep Liberty Air Conditioning Condenser
Part Number: 5183560AA$270.72 MSRP: $401.00You Save: $130.28 (33%)
Jeep Liberty Cooler-CONDENSER And Aux Toc
Part Number: 5143029AB$648.66 MSRP: $950.00You Save: $301.34 (32%)


Jeep Liberty A/C Condenser
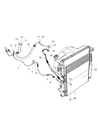
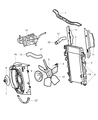
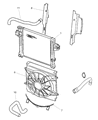
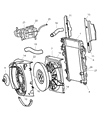
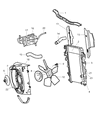
Due to its position and purpose, the A/C Condenser in Jeep Liberty auto serves as the heat exchanger to cool the gaseous refrigerant and condense it to liquid, before it is sent to the accumulator. Originally installed in front of the radiator, this part features a number of tubes that enable cooling. Here, the overview doesn't explain the difference in the types or Styles of the A/C Condensers being used in the different models of Jeep Liberty though the function remains the same as is; converting refrigerants. The efficiency of A/C Condenser plays the crucial role in keeping up the desired temperature in cabins and climate in a car.
Looking for affordable and high-quality auto parts? Then you have already arrived at the proper online shop. We offer all Jeep Liberty A/C Condenser at great affordable prices. Moreover, all genuine Jeep Liberty A/C Condenser come with a manufacturer's warranty. In the long run, you would realize you have saved a lot of trouble and money with OEM parts from here.
Jeep Liberty A/C Condenser Parts Questions & Experts Answers
- Q: How Should the A/C Condenser Be Replaced on Jeep Liberty?A:The accumulator should be replaced whenever the condenser is replaced. The condenser is a small Radiator-like component mounted in front of the radiator that cools the refrigerant. Have the air conditioning system discharged and recovered. Disconnect the cable from negative terminal of the battery. Unbolt and disconnect the refrigerant lines from the condenser. Plug the lines and fittings to prevent the entry of moisture and contaminants. For 2007 and earlier models, remove the radiator and condenser as a unit, then separate the condenser from the radiator. On vehicles equipped with an automatic transmission, remove the transmission cooler to radiator bolts and set the transmission cooler aside. Remove the mounting bolts from the condenser brackets. Lift the condenser straight up and out of the condenser brackets. Plug the open fittings to prevent entry of dirt and moisture. For 2008 and later models, on V6 models, remove the air filter housing and fan shroud. Remove the grille. Remove the air seal around the condenser. Disconnect and cap the transmission cooler line, if equipped. Disconnect the nut that secures the lines to the A/C condenser and cover the lines. Remove the mounting bolts from the right side of the radiator. Carefully lift the condenser up and unhook or disengage the condenser mounting brackets from the radiator. Remove the accumulator from the vehicle. If replacing the condenser, remove the accumulator from the condenser. For all models, if the original condenser will be reinstalled, store it with the line fittings on top to prevent oil from draining out. If a new condenser is being installed, pour 0.75 oz (22 ml) of refrigerant oil into it prior to installation. New R-134a compatible O-rings should be used in each fitting during reassembly. Reinstall the components in the reverse order of removal. Have the system evacuated, recharged and leak-tested by the shop that discharged it.


