Make sure this part fits

Mopar 4884870AB Chain-Balance Shaft

2007-2020 Mopar 4884870AB

Customer Questions & Expert Answers (6)
4884870AB Mopar Chain-Balance Shaft Product Photo 1 of 3
  • Part Description
    Chain Balance Shaft
  • Manufacturer
    Mopar
Make sure this part fits
$51.73 MSRP: $74.35
You Save: $22.62 (31%)
1
ADD TO CART
  • Related Parts
  • Specifications
  • Fitment
  • Q&A
  • Product Specifications

    BrandGenuine Mopar
    Manufacturer Part Number4884870AB
    Part DescriptionChain Balance Shaft
    Other NamesChain, Timing Chain
    Item Dimensions18.4 x 0.7 x 0.5 inches
    Item Weight0.70 Pounds
    ConditionNew
    Fitment TypeDirect Replacement
    ManufacturerMopar
    SKU4884870AB
    WarrantyThis genuine Mopar part is guaranteed by Mopar's factory warranty.
    Shipping & ReturnShipping Policy Return Policy
    Warning: California's Proposition 65
  • Vehicle Fitment

    Year Make Model Engine Important vehicle option details
    2011-2014 Chrysler 2004 Cyl 2.4LLimited Sedan, LX Convertible, LX Sedan, Touring Convertible, Touring Sedan
    2007-2010 Chrysler Sebring4 Cyl 2.4LLimited Convertible, Limited Sedan, LX Convertible, LX Sedan, Touring Sedan
    2007-2014 Dodge Avenger4 Cyl 2.4LExpress, Heat, LUX, Mainstreet, R/T FWD, SE, SXT
    2007-2012 Dodge Caliber4 Cyl 2.0L, 4 Cyl 2.4LExpress, Heat, Mainstreet, R/T AWD, R/T FWD, Rush, SE, SXT, SXT Plus, Uptown
    2009-2020 Dodge Journey4 Cyl 2.4LCrossroad FWD, Express FWD, SE FWD, SXT FWD
    2007-2017 Jeep Compass4 Cyl 2.0L, 4 Cyl 2.4LBase 4WD, Base FWD, Latitude 4WD, Latitude FWD, Limited 4WD, Limited FWD, Sport 4WD, Sport FWD
    2012-2017, 2009-2010, 2007 Jeep Patriot4 Cyl 2.0L, 4 Cyl 2.4LBase 4WD, Base FWD, Latitude 4WD, Latitude FWD, Limited 4WD, Limited FWD, Sport 4WD, Sport FWD
  • Customer Questions & Expert Answers

    Q:
    Is this part guaranteed to fit my truck ? Posted by MoparPartsGiant Specialist
    A:
    You can Select Your Vehicle to check if 4884870AB fits your vehicle.
    Posted by MoparPartsGiant Specialist
    Installation and Repair Tips
    Q:
    What special tools are necessary to complete the timing chain replacement procedure in 2.7L V6 engine on Chrysler Sebring? Posted by Customer
    A:
    This procedure requires special tools, to learn about the tools needed, it is advised that one read through the whole process until one gets the essentials then proceed with the work. Because of the extensive effort required to gain access to and replace the timing chain, it becomes practical also to inspect and replace the water pump if required at this point. Valve timing in the 2.7L engine is managed by three timing chains, with the primary timing chain looping round the crankshaft sprocket, water pump and two of the intake camshaft sprockets, while two secondary chains interlink the intake and exhaust camshafts. To pull the timing chain, you will have to disconnect the lead of battery, easing fuel pressure and also vacuuming out the coolant. Lift the front of the vehicle on jackstands, remove the right front wheel, and interior part of the fender liner, and loosen the clamp on the heater hose and withdrawal the heater supply pipe from the hose. Raise the vehicle and References the accessory drivebelts, crankshaft pulley and the power steering pump in position but without having to disconnect the fluid lines. After that, strip the upper intake manifold, the valve covers, and spark plugs, as well as ensure that the number one piston is on the compression stroke TDC. Disconnect the water outlet housing, place a piece of wood under the engine and take off the right engine mount. Remove timing chain cover to allow access to some of the bolts that have to be readjusted; it is advisable to mark or draw the position of some of the bolts to make reassembly much easier. Turn the engine until the crankshaft sprocket 's timing mark lines up with the oil pump housing mark and the colored portions of the chain coincide with the timing marks on the other camshaft and crankshaft sprockets. Take out the first timing chain tensioner and the two retention bolts of the primary camshaft sprockets with an important caution for the pressure of valve springs. Withdraw the primary sprockets out of the camshaft hubs; lower them down the cylinder head hole and take off the primary timing chain. The camshaft, water pump and crankshaft sprockets need to be visually checked for wear, any that appear worn will have to be replaced. If, due to wear, stretching, or for some other reason, a new timing chain is bought, count the links and match the colored links together with the old chain. The crankshaft sprocket should be located in such a manner that it aligns with the oil pump housing mark and the upper chain guides to be fitted. To be ready for the creation of the initial timing chain, the left camshaft should be lined together with the groove of the light colored links; afterwards, have the sprocket and chain assembly lowered down. Use a proper camshaft sprocket, vibration damper and timing chain and put the colored links on respective marks. Lower chain guide and tensioner arm assembly, removed oil from tensioner and reset before fitting. The final wrenching of adjustment should then be on the tensioner retaining plate bolts, and while the camshaft sprocket retaining bolts should also be put in place and aligned correctly. Turn the engine to relieve tension in the timing chain, align the timing marks and retract the primary timing chain tensioner. Remove the old sealant from the timing chain cover and apply new RTV sealant on the gasket and then fix the cover using bolts that should be tightened to the recommended torque. The rest of the remaining sequence of the installation is the reverse process of removal and the cooling system should be topped up after. Also for removing the crankshaft sprocket one may have to use a three jaw puller and propane torch or installation tool. In the case the primary timing chain is gone, you use a three-jaw puller to take off the crankshaft sprocket. For installation a sprocket installation tool is used or propane torch to heat the sprocket hub for better positioning over the crankshaft in such a manner that faces flat against the crankshaft , the depth of the crankshaft face to the End of crankshat face is measured to be in the measurement required.
    Posted by MoparPartsGiant Specialist
    Q:
    How to remove and install the Timing Chain and Timing Cover in the four-cylinder engine on a Dodge Avenger? Posted by Customer
    A:
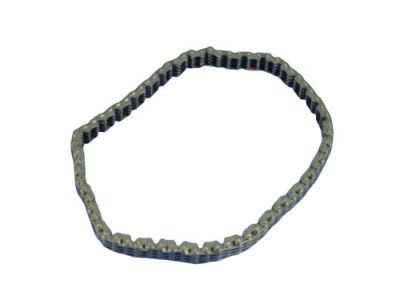
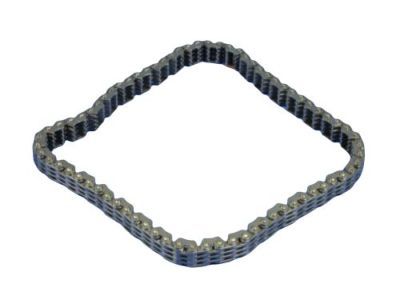
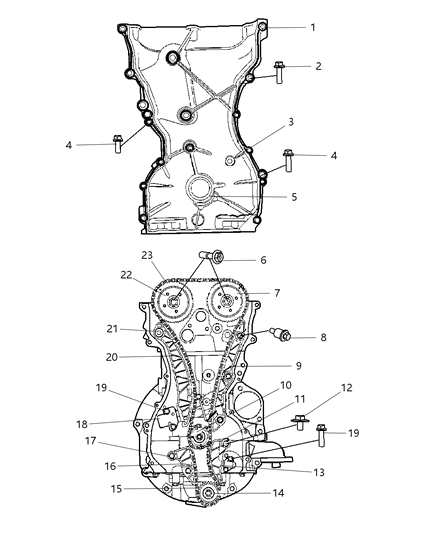
    Caution is advised as the timing system is complex, and mistakes can lead to severe engine damage; only highly experienced individuals should attempt this procedure, and consulting an expert is recommended if there is any uncertainty. Double-check all work to ensure correctness before starting the engine, and do not rotate the crankshaft or camshafts separately during this process to avoid valve damage. Several special tools are necessary, so ensure they are obtained beforehand. Begin by relieving fuel system pressure and disconnecting the negative battery cable, then loosen the lug nuts on the right front wheel, raise the vehicle, and support it securely. Drain the engine coolant and oil, remove the right-front wheel and drive-belt splash shield, and take off the engine cover. For 2015 and later models, also remove the intake tube and air filter housing, and position the coolant expansion tank aside. Remove the drivebelt, tensioner, and idler pulleys, then position the number one piston at Top Dead Center. For 2014 and earlier models, remove the power steering fluid reservoir without disconnecting the lines, and secure it out of the way. Remove the crankshaft pulley, ignition coils, and valve cover, taking care not to let the magnetic timing wheels come into contact with any magnets. Remove the water pump pulley and, for 2014 and earlier models, the air conditioning compressor and bracket. Remove specific oil pan bolts as instructed, support the engine, and remove the right-side engine mount and its bracket. Take out the timing cover mounting bolts, carefully pry the cover free, and clean off any RTV gasket material. If the engine has moved from TDC, temporarily install the crankshaft pulley bolt and align the timing marks. For 2014 and earlier models, align the timing chain plated links with the camshaft phaser timing marks, ensuring proper alignment of the phaser or sprocket marks with the plated links. Inspect the timing chain dampener for wear, clean the timing chain and sprockets, and replace them if necessary. Before starting the engine, rotate the crankshaft by hand to check for resistance. Remove old gasket material from all components, install the crankshaft sprocket and oil pump chain if removed, and ensure the keyway is at TDC. Coat the sprockets and chain with clean engine oil, align the chain with the camshaft sprockets, and install the camshaft sprocket. Hold the timing chain tensioner in place, install the chain guide and tensioner, and verify the alignment of all marks after rotating the engine. Apply RTV sealant to the timing cover sealing surfaces, install the cover, and tighten the bolts in a criss-cross pattern. Complete the installation by reversing the removal steps, adding oil and coolant, and starting the engine to check for leaks.
    Posted by MoparPartsGiant Specialist
    Q:
    What are the steps and precautions for replacing the timing chain and Timing Cover on Jeep Patriot? Posted by Customer
    A:
    The timing system is intricate, and any error is very costly, as it results in binders to the crankshaft, piston damage and other severe engine damage. endeavor this process only if very experienced in such kind of repair; seek professional if in doubt. Check each job twice and make every tuning okay before you operate the engine. While doing it with the timing chains removed, do not rotate the crankshaft or camshafts individually as this can damage the valves. The process starts when you remove the fuel system pressure and when that is done you should also remover the cable connected to the negative terminal of the car battery. Take out the engine hood, free the right-front wheel lug nuts, lift the front-end of the car, and secure it on inplace jacks. Remove the engine front splash shield, and the drive belt splash shield and right-front wheel Remove the cooling and engine oil. Take off the drivebelt, the drivebelt tensioner and the idler pulleys. Install the number one piston at the top by turning the crankshaft until the piston is at TDC of the compression stroke, unbolt the power steering reservoir but leave the hoses on and move it aside. Loosen and completely remove the bolt at the power steering hose bracket then remove all the power steering pump mounting bolts but do not separate the hoses from the pump. Take off the crankshaft pulley, ignition coils, valve cover safely in a way that the magnetic timing wheels will not touch the magnets. Take off the belt pulley for the water pump, the air conditioning compressor and the bracket or use wire or rope to suspend the compressor. Prohibit the engine from rotating by using a door jack and a wooden block; now unscrew the right engine mount and its bracket from the timing cover. Take out the oil pan-to-timing cover bolts and the timing cover mounting bolts; home in on the different kinds of bolts. Slowly lift the cover a little more and pull it out from the vehicle, in this process remove RTV gasket material from the cylinder head, engine block and the back of the timing cover. If the engine is off TDC, use the crank shaft bolt to set the crank shaft to TDC number 1 as shown other faces of the pulley for the timing marks. The timing marks on the camshaft phaser should be placed correctly on the timing chain plated links to ensure the phaser has the right marks properly in position of the plated links. Check for cracks and wear on the timing chain dampener, Make sure timing chain and sprockets are clean, and the check the components and damage. If worn out then remove the timing chain sprockets. It should be rotated at least two full turns before cranking the engine and any resistance should be avoided. Scrub off all remains of the gasket material and sealant from the cover, all the faces of the engine block and cylinder heads and wash the same with rubbing alcohol for cleaning. These splines are used when the crankshaft sprocket and its oil pump/balance shaft module chain are installed when the keyway is in the TDC position. Get some clean engine oil and wash the sprockets and the chain, fit the chain onto the crankshaft sprockets and align the marks. Place a negligible pressure on the timing chain tensioner against the plunger, and raise the plunger ratchet; fit the timing chain guide and tensioner and tighten the nut to the recommended torque. Reinstall the crankshaft pulley and turn the engine clockwise with 2 full turns and make sure to match each mark. After the timing marks are properly aligned, use RTV sealant on the sealing surfaces of the cylinder block and head, as well as the oil pan, and install the pan starting at the bottom going to the top . When reassembling the timing cover bolts should be placed evenly, half of them should be tightened to some degree while the other half should be left a little loose, finally they should be fully tightened in a criss cross pattern, and the process should be reversed to that of disassembly. Last of all, pour oil and coolant, switch on the engine and look for sign of leakage.
    Posted by MoparPartsGiant Specialist
    Q:
    What are the steps and precautions for replacing the timing chain and Timing Cover on Jeep Compass? Posted by Customer
    A:
    The timing system is intricate, and any error is very costly, as it results in binders to the crankshaft, piston damage and other severe engine damage. endeavor this process only if very experienced in such kind of repair; seek professional if in doubt. Check each job twice and make every tuning okay before you operate the engine. While doing it with the timing chains removed, do not rotate the crankshaft or camshafts individually as this can damage the valves. The process starts when you remove the fuel system pressure and when that is done you should also remover the cable connected to the negative terminal of the car battery. Take out the engine hood, free the right-front wheel lug nuts, lift the front-end of the car, and secure it on inplace jacks. Remove the engine front splash shield, and the drive belt splash shield and right-front wheel Remove the cooling and engine oil. Take off the drivebelt, the drivebelt tensioner and the idler pulleys. Install the number one piston at the top by turning the crankshaft until the piston is at TDC of the compression stroke, unbolt the power steering reservoir but leave the hoses on and move it aside. Loosen and completely remove the bolt at the power steering hose bracket then remove all the power steering pump mounting bolts but do not separate the hoses from the pump. Take off the crankshaft pulley, ignition coils, valve cover safely in a way that the magnetic timing wheels will not touch the magnets. Take off the belt pulley for the water pump, the air conditioning compressor and the bracket or use wire or rope to suspend the compressor. Prohibit the engine from rotating by using a door jack and a wooden block; now unscrew the right engine mount and its bracket from the timing cover. Take out the oil pan-to-timing cover bolts and the timing cover mounting bolts; home in on the different kinds of bolts. Slowly lift the cover a little more and pull it out from the vehicle, in this process remove RTV gasket material from the cylinder head, engine block and the back of the timing cover. If the engine is off TDC, use the crank shaft bolt to set the crank shaft to TDC number 1 as shown other faces of the pulley for the timing marks. The timing marks on the camshaft phaser should be placed correctly on the timing chain plated links to ensure the phaser has the right marks properly in position of the plated links. Check for cracks and wear on the timing chain dampener, Make sure timing chain and sprockets are clean, and the check the components and damage. If worn out then remove the timing chain sprockets. It should be rotated at least two full turns before cranking the engine and any resistance should be avoided. Scrub off all remains of the gasket material and sealant from the cover, all the faces of the engine block and cylinder heads and wash the same with rubbing alcohol for cleaning. These splines are used when the crankshaft sprocket and its oil pump/balance shaft module chain are installed when the keyway is in the TDC position. Get some clean engine oil and wash the sprockets and the chain, fit the chain onto the crankshaft sprockets and align the marks. Place a negligible pressure on the timing chain tensioner against the plunger, and raise the plunger ratchet; fit the timing chain guide and tensioner and tighten the nut to the recommended torque. Reinstall the crankshaft pulley and turn the engine clockwise with 2 full turns and make sure to match each mark. After the timing marks are properly aligned, use RTV sealant on the sealing surfaces of the cylinder block and head, as well as the oil pan, and install the pan starting at the bottom going to the top . When reassembling the timing cover bolts should be placed evenly, half of them should be tightened to some degree while the other half should be left a little loose, finally they should be fully tightened in a criss cross pattern, and the process should be reversed to that of disassembly. Last of all, pour oil and coolant, switch on the engine and look for sign of leakage.
    Posted by MoparPartsGiant Specialist
    Q:
    What should be done with the oil pump/BSM tensioner piston and Timing Chain for the 2013 Chrysler 200? Posted by Customer
    A:
    Press the oil pump/BSM tensioner piston back into the tensioner body, retaining it in the locked position with a special tool or a 3 mm drill bit. Do not remove the oil pump/BSM drive sprocket.
    Posted by MoparPartsGiant Specialist
    See Complete Installation and Repair Tips

Genuine Mopar Part 4884870AB, the Right Choice

To ensure reliability, purchase Mopar part # 4884870AB Chain-Balance Shaft. It is sometimes referred to as Timing Chain, Balance Shaft Chain. The OEM parts should be used when the Mopar owners want to maximize their driving experience. The high-tech factories that produce these parts utilize sophisticated technology specifically designed to meet stringent factory requirements. Additionally, they are thoroughly tested and can thus be used with reliability by Mopar owners. This part fits specific Chrysler 200 and Sebring models. It fits Dodge Avenger, Caliber, Journey. It also fits Jeep Compass and Patriot.

MoparPartsGiant.com is a leading supplier of genuine Mopar parts and accessories such as 4884870AB Chain-Balance Shaft. Wondering where to find exceptional quality and affordable OEM Mopar parts? You have already come to the right place. Our website boasts a huge selection of genuine Mopar parts at attractive prices. Further, all parts come with a manufacturer's warranty. For detailed Jeep parts information, click here.

Why choose Mopar Parts Giant

  • Dedicated Service

    Your complete satisfaction is our #1 goal

  • Lowest Prices

    Best deals on genuine OE parts from dealerships

  • Fast Delivery

    Orders are processed and delivered promptly