My Garage
My Account
Cart
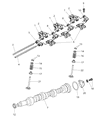
Genuine 2010 Dodge Challenger Camshaft
Cam- Select Vehicle by Model
- Select Vehicle by VIN
Select Vehicle by Model
orMake
Model
Year
Select Vehicle by VIN
For the most accurate results, select vehicle by your VIN (Vehicle Identification Number).
5 Camshafts found


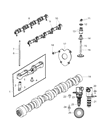
2010 Dodge Challenger Engine Camshaft
Part Number: 53022372AA$371.01 MSRP: $592.00You Save: $220.99 (38%)Product Specifications- Other Name: Camshaft-Engine; Camshaft
- Item Weight: 12.60 Pounds
- Item Dimensions: 6.1 x 4.1 x 22.0 inches
- Condition: New
- Fitment Type: Direct Replacement
- SKU: 53022372AA
- Warranty: This genuine part is guaranteed by Mopar's factory warranty.


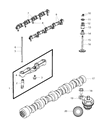
2010 Dodge Challenger Engine Camshaft
Part Number: 5037379AD$382.70 MSRP: $582.00You Save: $199.30 (35%)Product Specifications- Other Name: Camshaft-Engine; Camshaft
- Replaces: 5037379AB, 5037379AC
- Item Weight: 13.30 Pounds
- Item Dimensions: 22.2 x 4.1 x 6.1 inches
- Condition: New
- Fitment Type: Direct Replacement
- SKU: 5037379AD
- Warranty: This genuine part is guaranteed by Mopar's factory warranty.


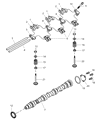
2010 Dodge Challenger Engine Camshaft
Part Number: 4792743AB$700.70 MSRP: $1075.00You Save: $374.30 (35%)Product Specifications- Other Name: CAMSHAFT
- Item Weight: 6.00 Pounds
- Item Dimensions: 19.4 x 2.0 x 2.0 inches
- Condition: New
- Fitment Type: Direct Replacement
- SKU: 4792743AB
- Warranty: This genuine part is guaranteed by Mopar's factory warranty.


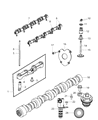
2010 Dodge Challenger Engine Camshaft
Part Number: 53022064BD$408.12 MSRP: $597.00You Save: $188.88 (32%)Product Specifications- Other Name: Camshaft-Engine; Camshaft
- Item Weight: 12.40 Pounds
- Item Dimensions: 22.4 x 4.0 x 6.0 inches
- Condition: New
- Fitment Type: Direct Replacement
- SKU: 53022064BD
- Warranty: This genuine part is guaranteed by Mopar's factory warranty.


 Product Specifications
- Other Name: CAMSHAFT
- Position: Passenger Side
- Item Weight: 5.80 Pounds
- Item Dimensions: 26.5 x 5.2 x 2.1 inches
- Condition: New
- Fitment Type: Direct Replacement
- SKU: 4792744AA
- Warranty: This genuine part is guaranteed by Mopar's factory warranty.
2010 Dodge Challenger Camshaft
On our website, we proudly offer genuine 2010 Dodge Challenger Camshaft at the market's great competitive prices. We are confident that choosing brand new OEM 2010 Dodge Challenger Camshaft from our site will save you both trouble and money.
2010 Dodge Challenger Camshaft Parts Questions & Experts Answers
- Q: How to remove and reinstall Camshaft in 2.7L V6 engine on 2010 Dodge Challenger?A: To get rid of these components, first of all, disconnect the wire from the negative terminal of the battery in addition to this also, valve cover need to be removed. After that, first, remove the primary timing chain and the primary camshaft sprockets and then undo the bolts located on the secondary timing chain tensioner. Check the shape of the caps at the camshaft bearings and make sure that they are numbered in the way from 1 through 5 alotted to intake or exhaust, and also check for the arrow marks showing the front of the engine. Turn the camshaft bearing caps for 180 degrees counter clockwise in stages, but remember to label the caps so that you can fix them back in the right order. Bolt the bearing caps and take off the camshafts, secondary timing chain and the secondary tensioner as a unit from the top of the cylinder head but remember that an intake and exhaust camshaft differ. Lose the secondary tensioner and timing chain from the camshafts and check the Camshaft secondary sprockets, its chains and tensioners for signs of wear. Following cleaning of camshaft, examine bearing journals for signs of wear, use micrometer to determine the extent of wear. Take the true overall height of every cam lobe of the intake camshaft and write down the dimensions; the difference must not be more than 0.010 inch. The camshaft lobes have to be checked whether vertical to the crank or not so as to determine if they are badly damaged or worn out, should they be in good shape, then they can be reused. To install secondary timing chain(s) position them over the camshaft sprockets such that the colored part matches the mark on the sprockets. Produce a U shaped hook from the paper clip to lock the secondary tensioner in position, and the place it back in between the two camshafts and the second timing chain. Use moly based engine assembly lubricant to the camshaft lobes and journals and the rocker arms should sit well. Reassemble the camshafts with the secondary tensioner and timing chain as a single unit and in their original position with the marks and corresponding coloured links at the top. Screw the bearing caps and their respective bolts into position; only tighten them by hands first and then turn them successively to the correct pattern. Lastly, bring the tensioner mounting bolts to a final tightened position, then remove the tensioner locking pin and put back the primary timing chain and camshaft sprockets, To end it, just reverse steps, which were followed before during the removal process.
Related 2010 Dodge Challenger Parts
 2010 Dodge Challenger Cylinder Head Gasket
 2010 Dodge Challenger Rocker Arm
 2010 Dodge Challenger Timing Cover
 2010 Dodge Challenger Crankshaft Pulley
 2010 Dodge Challenger Cylinder Head
 2010 Dodge Challenger Crankshaft
 2010 Dodge Challenger Cam Gear
 2010 Dodge Challenger Rocker Arm Pivot
 2010 Dodge Challenger Spool Valve