My Garage
My Account
Cart
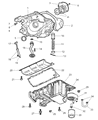
Genuine Chrysler 300 Oil Pump
Oil Fluid Pump- Select Vehicle by Model
- Select Vehicle by VIN
Select Vehicle by Model
orMake
Model
Year
Select Vehicle by VIN
For the most accurate results, select vehicle by your VIN (Vehicle Identification Number).
26 Oil Pumps found


| Page 1 of 2 |Next >
1-20 of 26 Results
Chrysler 300 Oil Pump
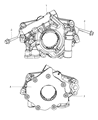
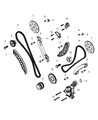
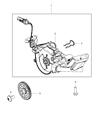
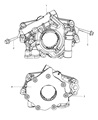
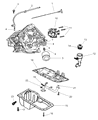
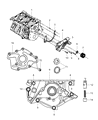
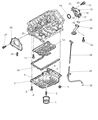
Chrysler 300 automobile carry the Oil Pump which has the function of circulating oil under pressure to maintain and control the operations of the Internal Combustion Engines. It provides lubrication and cooling to such important parts of a car such as bearings and pistons and also serves as a hydraulic fluid for small actuators. The Chrysler 300 dates normally come outfitted with mechanical oil pumps that are driven by either the crankshaft or the camshaft. Gear, trochoid and vane pumps could be utilized in the course of model changes of this car and therefore would be useful in selecting an ideal oil pump for different Chrysler 300 cars over the years. The oiling system works on the basis of pumping oil from the sump, filtering it and then circulating it all over the engine with an appropriate oil pressure of about 10 psi per 1000 RPM. A recommended regimes of the Chrysler 300's Oil Pump include timely changes of the oil and filter since debris hampers the durability and capacity of the Oil Pump.
Looking for affordable and high-quality auto parts? Then you have already arrived at the proper online shop. We offer all Chrysler 300 Oil Pump at great affordable prices. Moreover, all genuine Chrysler 300 Oil Pump come with a manufacturer's warranty. In the long run, you would realize you have saved a lot of trouble and money with OEM parts from here.
Chrysler 300 Oil Pump Parts Questions & Experts Answers
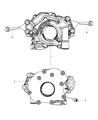
- Q: How to remove, inspect, and install an oil pump in 3.5L V6 engine on Chrysler 300?A:It is necessary that one should not at all remove the relief valve for oil pressure, spring and plunger from oil pump. Replace the entire oil pump as a unit in case its pressure relief valve is damaged. REMOVAL: Remove Timing Belt and crankshaft sprocket. Take out the oil pan. Remove the pick-up tube of the oil pump. Then, pull off the block bolts for the oil-pump-to-block and take out the pump from there. INSPECTION: Unbolt back cover of oil pump housing. Remove inner and outer rotors from body of the oil pump observing their installed directions so that they can be rearranged correctly. In solvent clean all parts thoroughly carefully inspecting rotors, pump cover, and oil pump housing for nicks, scratches or burrs.Replacement is required if any part of it is broken.Measure warpage of an oil pump cover using feeler gauge.If it exceeds limit then you have to replace a turbine.Measure thickness and diameter of outer rotor.If either value is less than this value then change turbine can be done.Find thickness of an inner rotor.If measurement is less than this value then turbine can be replaced.Then put external rotor into housing right after examine clearance between housing and rotor's opposite side with your finger.If this gap exceeds maximum allowed clearances then it could be replaced.Turn on crankshaft until flats align with flats on rotor.Continue installation by placing gasket onto engine block mating surface followed by putting those flats in position where they face each other.The torque applied on these blocks should make sure that they are tight enough.The rest part consists in reversing what has been removed previously.

Related Chrysler 300 Parts
 Chrysler 300 Oil Filter
 Chrysler 300 Rod Bearing
 Chrysler 300 Dipstick
 Chrysler 300 Oil Pan
 Chrysler 300 Oil Pressure Switch
 Chrysler 300 Drain Plug
 Chrysler 300 Crankshaft Pulley
 Chrysler 300 Oil Cooler
 Chrysler 300 Dipstick Tube
 Chrysler 300 Piston Ring Set
 Chrysler 300 Crankshaft Thrust Washer Set
 Chrysler 300 Drain Plug Washer