My Garage
My Account
Cart
Genuine Chrysler Cirrus Bumper
Bumper Fascia- Select Vehicle by Model
- Select Vehicle by VIN
Select Vehicle by Model
orMake
Model
Year
Select Vehicle by VIN
For the most accurate results, select vehicle by your VIN (Vehicle Identification Number).
9 Bumpers found

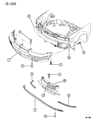
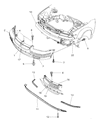
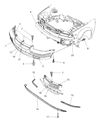
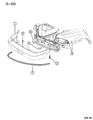
Chrysler Cirrus Front Upper Bumper Cover
Part Number: 4778377$534.66 MSRP: $782.00You Save: $247.34 (32%)


Chrysler Cirrus Bumper
The Chrysler Cirrus Bumper ensures the first level of protection for this sedan. By absorbing low-speed impacts, it helps keep sheet metal and people safer. Chrysler's original units utilized strong steel beams for their car Bumpers. However, with the Chrysler Cirrus, the Bumper was plastic clad with foam or honeycomb inserts hidden within the assembly. These crumple up in a controlled manner and lessen the jolts or repair bills. Chrysler engineering specially designed long-lasting materials. The Bumper is fitted at the nose and tail to absorb parking taps or a typical fender-bender. Its giving nature is cleverly engineered to dissipate energy before it reaches the cabin. The flexible zones bend, crush, then rebound. Built-in sensors in the Bumper tell the airbag system to fire when an even stronger crash occurs for added protection. The Bumper is exposed to several years of vibration, winter salt, and sunshine. This causes rust or loosened brackets which make the Chrysler Cirrus look tired and also expose its structure. A replacement unit will restore clean styling, full impact absorption, and confident Cirrus safety.
Looking for affordable and high-quality auto parts? Then you have already arrived at the proper online shop. We offer all Chrysler Cirrus Bumper at great affordable prices. Moreover, all genuine Chrysler Cirrus Bumper come with a manufacturer's warranty. In the long run, you would realize you have saved a lot of trouble and money with OEM parts from here.
Chrysler Cirrus Bumper Parts Questions & Experts Answers
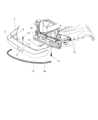
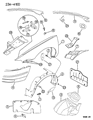
- Q: How to remove the front and rear bumpers on Chrysler Cirrus?A:To take off the front bumper, raise the Hood, stabilize it, then unplug the battery's power lead from the shock tower on the left-hand side.Undo and remove the fasteners that keep the fender inner shielding below the bumper attached. Unscrew any bolts holding the bumper to the front fender, then reach through the fender well and pull out the push-in fasteners attaching the bottom of the bumper to the radiator lower support. Unplug the fog light wiring and remove both the bumper and Grille from the radiator upper support by pushing on the middle anchor stud first. Begin by taking the bumper off from the front fender clips, very carefully, and put it down in a safe place on top of protective materials to guard your vehicle's paint. To access the row, start by unplugging the battery temperature sensor from its electrical connection. Remove three bolts that are attaching the reinforcement bar at each end. Uninstall the parts in the opposite order you removed them. To get the back bumper off, first pop your trunk lid open, then take the left bulb on the rear taillight, and disconnect the license plate wiring. When working on Cirrus cars, take out both right and left rear tail lights first. Then from inside the tail light cavities, press in and free the fasteners holding the bumper to each rear side panel. First, unhook and take off the push-in fasteners that link four different parts: the trunk lid slam pads and rear bumper at the back, also the bumper to the rear quarter panel connectors in each rear wheel well. Push the edge of the bumper toward the back until the hooks come loose from underneath the two car doors, then carefully take it out, placing something soft below to prevent any damage. The bumper reinforcement bar has a removable design, and you can mark where its nuts sit before uninstalling and reinstalling. Put back the parts the reverse way you took them off.

Related Chrysler Cirrus Parts
 Chrysler Cirrus Headlight
 Chrysler Cirrus HVAC Pressure Switch
 Chrysler Cirrus License Plate
 Chrysler Cirrus A/C Accumulator
 Chrysler Cirrus Air Deflector
 Chrysler Cirrus Grille
 Chrysler Cirrus Spare Wheel