My Garage
My Account
Cart
Genuine Chrysler Imperial Crankshaft
Crank Shaft- Select Vehicle by Model
- Select Vehicle by VIN
Select Vehicle by Model
orMake
Model
Year
Select Vehicle by VIN
For the most accurate results, select vehicle by your VIN (Vehicle Identification Number).
1 Crankshaft found

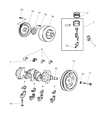
Chrysler Imperial Crankshaft
The Chrysler Imperial Crankshaft is the component that makes Chrysler's kingly luxury models possible. It turns piston thrust into smooth spinning power. The spinning power feeds the transmission and ultimately the wheels. Thus, it is the ultimate component of every luxury model. Inside the cylinder block, the Crankshaft rides on precision journals, while offset throws enable connecting rods to swing, thus converting linear strokes to rotation without wasted motion. The Chrysler Imperial has depended on a Crankshaft matched to its output since the early V8. Cast iron units are called on for lower stress duties while forged steel versions take over as the horsepower climbs, giving superior strength against twisting loads. The Crankshaft is a stout component made to last as long as a Chrysler motor. However, if oil flow drops or abrasive debris reaches the bearings, the Crankshaft can suffer scoring, excess clearance, or knock. These problems show up first by harsh vibration. Changing oil regularly and keeping the filter clean is perhaps a simple way to protect this mission-critical component. Further neglect allows a Crankshaft failure to silence a proud Chrysler Imperial forever and keep the smooth, dignified drive long associated with the Imperial name.
Looking for affordable and high-quality auto parts? Then you have already arrived at the proper online shop. We offer all Chrysler Imperial Crankshaft at great affordable prices. Moreover, all genuine Chrysler Imperial Crankshaft come with a manufacturer's warranty. In the long run, you would realize you have saved a lot of trouble and money with OEM parts from here.
Chrysler Imperial Crankshaft Parts Questions & Experts Answers
- Q: How to install a crankshaft during engine reassembly on Chrysler Imperial?A:One of the early processes of reassembling the engine is the installation of the crankshaft, supposing the engine block and crankshaft have been washed, checked or mended. Rotate the engine so that bottom is up, then unscrew the main bearing cap bolts and take off the caps; store the caps in the order that they were removed, as a reference for reassembly, the thrust bearings of the 3.0L V6 engine are situated at the no. 3 journal. In the case that the original bearing inserts are still installed, it is necessary to remove the bearing inserts from the blocks and caps and to ensure that the bearing surfaces are absolutely clean and free of lint. Do not apply fingers on the face of the new bearing inserts when installing since oil and acids can easily carve the bearings. Degrease or clean the back sides of the new main bearing inserts and install one in each main bearing saddle in the block with the groove in the direction as indicated on the housing, or in the block; the tab should be located in the recess if equipped with one. The oil holes must match in the block and the bearing inserts and no form of lubrication should be applied at this point. For number 2.5L four cylinder, number 3.0V six cylinder, thrust bearing is installed in number 3 cap and saddle; for number 3.3L and number 3.8L engines it is installed in number 2 cap and saddle. Pressure wash or manually remove any debris in the bearing faces in the block and crankshaft main bearing journals, check and clean or pressure wash oil hole in the crankshaft, if the hole is confirmed to be clear, carefully dropped the crankshaft into the main bearings. Before the housing is finally mounted, one should measure the main bearing oil clearance with the Plastigage and place a piece of it parallel to the axis of the crankshaft main bearing journal on the journals. Scrape off all the bearing faces in the caps and reinstall it where it belongs with the arrow facing front of the engine When tightening the main bearing cap bolt, do it in sequence without turning the crank. When all the bolts have been removed and the main bearing caps lifted off, read off the width of the crushed Plastigage and relate it to the envelop bearing and main bearing oil clearance the reading should be made at the widest part. If the clearance is not as specified, than look between the bearing inserts and caps or block for dirt or oil before going to the next step of ordering different inserts. Clean all the main bearing journals and bearing faces by scraping off very carefully any trace of the Plastigage material. Remove the crankshaft from the engine, and then clean both flat faces of the bearings located in the block and lubricate each bearing and thrust faces with molibase grease or engine assembly lube in a thin layer on each bearings surfaces. It is wise for the crankshaft journals to be free from contaminants before laying down the crankshaft; then clean the faces of bearings in the caps and apply a layer of lubridant. Place the caps back in the same positions with the arrows facing forward, put the bolts on and tighten all the bolts up to the final torque, in a star pattern, starting from the middle and tightening in a star pattern and then tighten the thrust bearing cap bolts to only 10-12 ft-lbs. Knock the ends of the crankshaft with lead or brass hammer to bring into line the main bearing and the crankshaft thrust surfaces, and torque all the main bearing cap screws in a progressive manner starting from the center proceeding outwards in a star pattern, and physically rotate the crankshaft clockwise and anticlockwise to check for binding. Last of all, verify the crankshaft end play with feeler gauges or a dial indicator and it should be correct if the crankshaft thrust faces are not worn or damaged and the bearings are new and the new rear main oil seal has been fitted.

Related Chrysler Imperial Parts
 Chrysler Imperial Oil Pan
 Chrysler Imperial Piston Ring Set
 Chrysler Imperial Oil Pump Gasket
 Chrysler Imperial Cam Gear
 Chrysler Imperial Camshaft
 Chrysler Imperial Crankshaft Pulley
 Chrysler Imperial Crankshaft Thrust Washer Set
 Chrysler Imperial Oil Pan Gasket
 Chrysler Imperial Rod Bearing