My Garage
My Account
Cart
Genuine Chrysler PT Cruiser Engine Mount
Engine Motor Mount- Select Vehicle by Model
- Select Vehicle by VIN
Select Vehicle by Model
orMake
Model
Year
Select Vehicle by VIN
For the most accurate results, select vehicle by your VIN (Vehicle Identification Number).
17 Engine Mounts found


Chrysler PT Cruiser Engine Mount Bracket
Part Number: 5274500AB$200.25 MSRP: $301.00You Save: $100.75 (34%)


Chrysler PT Cruiser Engine Mount Support
Part Number: 4668902AD$91.13 MSRP: $135.00You Save: $43.87 (33%)


Chrysler PT Cruiser Engine Mount Support
Part Number: 4668462AC$91.13 MSRP: $135.00You Save: $43.87 (33%)

Chrysler PT Cruiser Engine Mount Support
Part Number: 4668628AB$108.34 MSRP: $162.00You Save: $53.66 (34%)
Chrysler PT Cruiser Engine Mount Support
Part Number: 5273550AC$91.13 MSRP: $135.00You Save: $43.87 (33%)
Chrysler PT Cruiser Engine Mount Support
Part Number: 4668902AB$91.13 MSRP: $135.00You Save: $43.87 (33%)
Chrysler PT Cruiser Engine Mount Support
Part Number: 4668718AD$327.12 MSRP: $487.00You Save: $159.88 (33%)


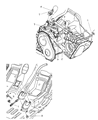


Chrysler PT Cruiser Engine Mount
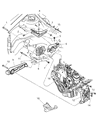
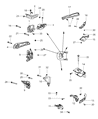
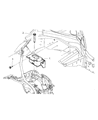
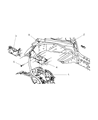
The Engine Mount in Chrysler PT Cruiser vehicles serves two primary functions: it insulates the interior of the car against noise and vibrations produced by the engine and it also locates the position of the engine and transaxle as well as holding them in place in relation to the car chassis. This is useful in achieving comfort and seclusion and while the positioning of the engine should be adequate for maneuvering as well as protecting other parts of the vehicle from damage. There are a number of PT Cruiser models that use different types of Engine Mounts such as the following, rubber Engine Mounts, hydraulic Engine Mounts, as well as active electronic Engine Mounts. Traditional mounts include metallic parts with rubber spacers in between while hydraulic mounts perform the role of absorbing more vibrations. Active electrical control units of the electronic active mounts constantly adapt to the stiffness and improve the performance depending on the engine RPM. These Engine Mounts become worn out over time, because of age, heat or presence of fluids on them and the signs are strange noises and vibrations, and therefore will require inspection and change if necessary.
Looking for affordable and high-quality auto parts? Then you have already arrived at the proper online shop. We offer all Chrysler PT Cruiser Engine Mount at great affordable prices. Moreover, all genuine Chrysler PT Cruiser Engine Mount come with a manufacturer's warranty. In the long run, you would realize you have saved a lot of trouble and money with OEM parts from here.
Chrysler PT Cruiser Engine Mount Parts Questions & Experts Answers
- Q: How to check and replace Engine Mount on Chrysler PT Cruiser?A:These vehicles employ two load-carrying engine mounting arms at the right and left ends, and two torque struts, upper and lower, and so adjustment is necessary when any part is replaced, or if a torque strut bolt is loosened. Engine mounts are considered service-free parts as a rule, though any damaged or worn ones should be replaced at once to avoid harm to the driveline. During the check the engine has to be lifted a little off the mounts, while the mounts themselves have to be inspected for such things as cracks, hardening, or separation from metal backing; if there is even a hint of relative movement, then the fasteners of the mount are to be tightened. That is the reason why rubber preservative can be applied in order to prolong its life expectancy because of the possibility of fast deterioration. For replacement, unclasp the negative battery terminal, jack up the vehicle safely and unscrew the air filter housing. The left engine mount means that bolts which fix the Power Distribution Center and the battery tray have to be taken off; besides, it is high time to lift the transaxle in order to shift its weight before leaving the mount. The right engine mount is harder to get at requiring the removal of the engine/transaxle assembly or if that is not possible, supporting it from beneath. The position of the right engine mount should also be marked prior to being removed and it should be properly fitted featuring an application of thread locking compound. For the upper torque strut you have to remove bolts from the shock tower bracket and engine mount bracket and in the case of the lower torque strut the splash shield and pencil strut has to be removed in addition to the detachment of the crossmember. Subsequent to its installation, the engine torque strut adjustment can be done by removing the attachment bolts, placing a floor jack on the mounted engine and when a upward force is applied to it should ensure that the engine is well sited before tightening the bolts.

Related Chrysler PT Cruiser Parts
 Chrysler PT Cruiser Engine Cooling Fan
 Chrysler PT Cruiser Exhaust Manifold Gasket
 Chrysler PT Cruiser Engine Mount Bracket
 Chrysler PT Cruiser Exhaust Clamp
 Chrysler PT Cruiser Exhaust Hanger
 Chrysler PT Cruiser Exhaust Heat Shield
 Chrysler PT Cruiser Exhaust Nut
 Chrysler PT Cruiser Engine Cover
 Chrysler PT Cruiser Exhaust Manifold