My Garage
My Account
Cart
Genuine Chrysler PT Cruiser Exhaust Manifold
Engine Exhaust Manifold- Select Vehicle by Model
- Select Vehicle by VIN
Select Vehicle by Model
orMake
Model
Year
Select Vehicle by VIN
For the most accurate results, select vehicle by your VIN (Vehicle Identification Number).
7 Exhaust Manifolds found


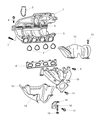


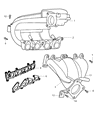
Chrysler PT Cruiser Exhaust Manifold
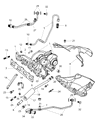
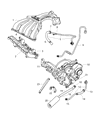
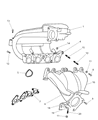
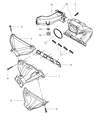
The Exhaust Manifold of Chrysler PT Cruiser vehicles is a very vital component since it helps to channel hot exhaust gases from the engine on to the exhaust system so as to achieve optimum performance of the engine with less polluting the environment. Located at the top of the exhaust system the manifold gathers the exhaust gases of multiple cylinders and directs them through the catalytic converter and the muffler. This design also reduces the issue of intake reversion which is bad for any engines efficiency levels. The exhaust manifolds used in Chrysler PT Cruiser automobiles are normally of cast iron/stainless steel and the headers which are products improve performance by reducing flow restriction. These headers do increase the velocity of the exhaust gas hence enhanced engine efficiency. There may be certain differences in the concept, but a basic purpose remains the same and assists in fulfilling the concept of the Chrysler PT Cruiser so that it can perform efficiency and at the same time protect people from the deadly effects of exhaust fumes.
Looking for affordable and high-quality auto parts? Then you have already arrived at the proper online shop. We offer all Chrysler PT Cruiser Exhaust Manifold at great affordable prices. Moreover, all genuine Chrysler PT Cruiser Exhaust Manifold come with a manufacturer's warranty. In the long run, you would realize you have saved a lot of trouble and money with OEM parts from here.
Chrysler PT Cruiser Exhaust Manifold Parts Questions & Experts Answers
- Q: What steps are involved in replacing a damaged exhaust manifold on Chrysler PT Cruiser?A:Turbocharged models are equipped with an exhaust manifold and turbocharger assembly. If the exhaust manifold is damaged, it must be replaced as a complete unit. Begin by disconnecting the cable from the negative battery terminal, setting the parking brake, and blocking the rear wheels. Raise the vehicle and support it securely on jackstands. Remove the air filter housing and the coolant reservoir. Disconnect the MAP sensor and remove the power steering fluid reservoir from the Cylinder Head, positioning it off to the side without disconnecting the fluid lines. Remove the accelerator cable and the cruise control cable if equipped. Next, remove the upper heat shield bolts and the upper heat shield from the exhaust manifold, followed by the exhaust manifold support bracket. From under the vehicle, apply penetrating oil to the threads of the exhaust manifold-to-exhaust pipe studs and allow it to soak in before removing the exhaust pipe-to-exhaust manifold flange nuts. Remove the lower heat shield mounting nuts and the lower heat shield from the exhaust manifold, then remove the oxygen sensor. Proceed to remove the exhaust manifold bolts and nuts, followed by the exhaust manifold and gasket. Inspect the exhaust manifold for cracks and other obvious damage; if any damage is found, replace it. Clean the threads of the exhaust manifold bolts with a wire brush and inspect for damage, replacing any that are damaged. Use a scraper to remove all traces of gasket material from the mating surfaces and inspect them for wear and cracks, taking care not to scratch or gouge the surfaces. Inspect the exhaust manifold mating surface for warpage using a straightedge and feeler gauge, checking the cylinder head surface as well. If warpage exceeds specified limits, the exhaust manifold or cylinder head must be replaced or resurfaced. For installation, coat the threads of the exhaust manifold bolts and studs with an anti-seize compound, install a new gasket, and then the manifold, tightening the fasteners in several stages from the center out to the specified torque. Complete the installation in reverse order of removal, and after finishing, run the engine to check for exhaust leaks.

Related Chrysler PT Cruiser Parts
 Chrysler PT Cruiser Headlight
 Chrysler PT Cruiser Door Lock Actuator
 Chrysler PT Cruiser Window Regulator
 Chrysler PT Cruiser Oxygen Sensor
 Chrysler PT Cruiser Bumper
 Chrysler PT Cruiser Lift Support
 Chrysler PT Cruiser Catalytic Converter
 Chrysler PT Cruiser EGR Valve
 Chrysler PT Cruiser Clock Spring
 Chrysler PT Cruiser Door Check
 Chrysler PT Cruiser Fuel Door
 Chrysler PT Cruiser Spare Wheel