My Garage
My Account
Cart
Genuine Chrysler PT Cruiser Piston
Engine Pistons- Select Vehicle by Model
- Select Vehicle by VIN
Select Vehicle by Model
orMake
Model
Year
Select Vehicle by VIN
For the most accurate results, select vehicle by your VIN (Vehicle Identification Number).
13 Pistons found


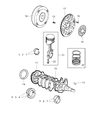

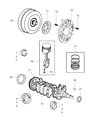

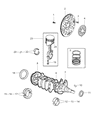

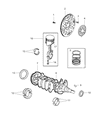


Chrysler PT Cruiser Piston
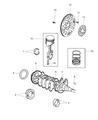
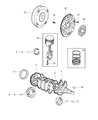
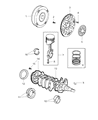
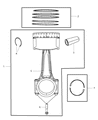
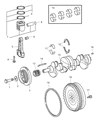
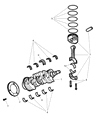
Piston in Chrysler PT Cruiser automobiles has the function of converting power resulting from combustion into the energy required in the motion of vehicles. This component is inherent to internal combustion engine as it translate forces exerted by expanding gasses to the crankshaft. Standard Chrysler PT Cruiser pistons are made out of aluminum alloy in an attempt to provide both strength as well as a low weight, and more focused performance versions of the car may be using forged or billet pistons. With regard to pistons, various types have been used in Chrysler PT Cruiser vehicles, trunk pistons, which absorb side loads and have provided oil rings. The basic design is thus most often kept constant, although there can be variations with regards to the conditions of operation. The manufacturing of Chrysler PT Cruiser piston is highly engineered so as to withstand the higher pressure and high temperature thus helping in increasing efficiency and life of the vehicle.
Looking for affordable and high-quality auto parts? Then you have already arrived at the proper online shop. We offer all Chrysler PT Cruiser Piston at great affordable prices. Moreover, all genuine Chrysler PT Cruiser Piston come with a manufacturer's warranty. In the long run, you would realize you have saved a lot of trouble and money with OEM parts from here.
Chrysler PT Cruiser Piston Parts Questions & Experts Answers
- Q: What steps must be taken before removing the piston and connecting rod assemblies on Chrysler PT Cruiser?A:Before the removal of the piston and connecting rod assemblies, the cylinder head, oil pan and the balancer shafts and carrier assembly, for the 2.4 L engines, need to be removed. First, look for any ridges on the top of ring travel in any cylinder head as these must be cut out with a ridge reamer so as not to contribute to the breakage of the piston. After level block and unbolt each hanger so that the engine is free of the bed, and place the engine crank shaft on the upper side and using the feeler gauge, measure the connecting rod end play and if it is outside thegiven limits, true it. Identify the connecting rods and caps and remove the connecting rod cap along with the bearing insert; the connecting rod pistons will then be pushed up through the top of the engine. Do the same thing for all the cylinders and replace the caps and inserts in order to guard the bearing surfaces. In the case of installing piston rings, check the end gaps with reference to the standard sizes and optimizing on the gaps when necessary. Start with the O.C.R next the center and the final one was the top ring and make certain that they are positioned correctly. Piston/connecting rod assemblies shall be fitted after some processes like: Cylinder wall cleaning and chamfering of edges. New bearing inserts should be fitted into the connecting rod and cap dry then place them in such a manner that adjacent piston ring gaps are opposite each other, while lubricating the piston and rings. Place the piston/connecting rod assembly into the cylinder so that the connecting rods big-end pin fits on the Crankshaft journal. Insert the Plastigage under the connecting rod bearing to check the oil clearance and compare it to the standard options available. If clearance is not as it should be then check sizes for bearings and journal diameter. When ready, wipe off any Plastigage remnants, and coat the bearing surfaces with assembly lube evenly before putting back the rod cap and do the same thing for the others. Last of all, turn the crankshaft to search for binding and again check the connecting rod end float to see that it is still within standard range.

Related Chrysler PT Cruiser Parts
 Chrysler PT Cruiser Drive Belt
 Chrysler PT Cruiser Drain Plug
 Chrysler PT Cruiser Drain Plug Washer
 Chrysler PT Cruiser EGR Valve Gasket
 Chrysler PT Cruiser Engine Mount
 Chrysler PT Cruiser Harmonic Balancer
 Chrysler PT Cruiser EGR Tube
 Chrysler PT Cruiser Engine Cover
 Chrysler PT Cruiser Exhaust Seal Ring
 Chrysler PT Cruiser Flywheel