My Garage
My Account
Cart
Genuine Chrysler PT Cruiser Timing Belt
Engine Timing Belt- Select Vehicle by Model
- Select Vehicle by VIN
Select Vehicle by Model
orMake
Model
Year
Select Vehicle by VIN
For the most accurate results, select vehicle by your VIN (Vehicle Identification Number).
3 Timing Belts found


Chrysler PT Cruiser Timing Belt
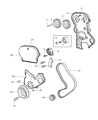
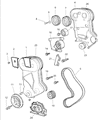
Timing Belt in Chrysler PT Cruiser vehicles is responsible for the coordination of the crankshaft and camshaft so as to ensure that the engine valves open and close in time with piston movement to enhance the performance of the vehicle. This synchronization is done by a a rubber belt that has fibers embedded in it and it is located in such a way that it is being connected to the crankshaft As for the adjustment of the belt is done by a tensioner as well as other idler pulleys. Chrysler PT Cruiser years have adopted most of their models to the timing belts due to its several benefits than the outdated gear systems bringing along features like cheap price, least noisy, and least friction. Such designs include, Design with curved teeth that increase sturdiness and low noise features. The importance cannot be overemphasized since failure results in a serious damage to the engine famously known as an interference engine when the pistons penetrate through the open valves.
Looking for affordable and high-quality auto parts? Then you have already arrived at the proper online shop. We offer all Chrysler PT Cruiser Timing Belt at great affordable prices. Moreover, all genuine Chrysler PT Cruiser Timing Belt come with a manufacturer's warranty. In the long run, you would realize you have saved a lot of trouble and money with OEM parts from here.
Chrysler PT Cruiser Timing Belt Parts Questions & Experts Answers
- Q: What steps should be taken if the timing belt fails while the engine is running on Chrysler PT Cruiser?A:If the timing belt breaks while the engine is operating the valves can be bent and as a result an engine compression test must be performed to detect any such problems. Never engage the crankshaft with a camshaft sprocket bolt or rotate it with one in place, and never rotate the crankshaft in an anti-clockwise direction. First, arrange that an air conditioning technician evacuates the refrigerant and then recharge it, then place the #1 piston at the TDC and bat off the negative terminal. Pull the accessory drive belts, engage the parking brake, apply block to the rear wheels and then use jack stands to secure the front part of the vehicle. If installed, If equipped, Remove right inner fender splash shield, loosen Crankshaft Damper Pulley bolt Position pulley on a 3-Jaw Puller and remove it. Specifically for the 2.0L models it is required to remove the exhaust pipe from the manifold, and air conditioning lines, the coolant should be drained out and the upper radiator support cross member. Disconnect the ground strap, the power steering pump, as well as the torque strut and the engine has to be lifted with the help of a floor jack supporting the Oil Pan. Loosen the right Engine Mount and timing belt cover screws with camshaft sprocket timing marks in position before to releasing the tension of the timing belt. For 2001 and 2002 models, you should take the tensioner out but for 2003 models the tensioner can be slacken using a 6 mm Allen wrench. Slide the timing belt off the sprockets and gauge the wear that it has, also, ensure the crankshaft front oil seal is leaking or not. When installing, squeeze the tensioner pin that is for the models 2001 and 2002, make sure that the camshaft sprocket marks are lined correctly and that the crankshaft timing sprocket is in the correct position. Replace the timing belt and adjust the tension of the timing belt and then reset the position of the timing belt tensioner. Turn the crankshaft clockwise to ensure that the timing marks align and then replace the components in the reverse sequence, topping up the cooling system and bleeding the air before cranking the engine and assessing road-worthiness of the vehicle. As for 2.4 L the procedure is to some extent similar to explained above, make sure that all the marks are properly aligned, the tension being set right before tightening all the bolts on last stage.

Related Chrysler PT Cruiser Parts
 Chrysler PT Cruiser Cylinder Head Gasket
 Chrysler PT Cruiser Cam Gear
 Chrysler PT Cruiser Camshaft
 Chrysler PT Cruiser Cylinder Head
 Chrysler PT Cruiser Lash Adjuster
 Chrysler PT Cruiser Crankshaft
 Chrysler PT Cruiser Camshaft Seal
 Chrysler PT Cruiser Crankshaft Thrust Washer Set
 Chrysler PT Cruiser Cylinder Head Bolts
 Chrysler PT Cruiser Timing Chain
 Chrysler PT Cruiser Timing Cover Gasket