My Garage
My Account
Cart
Genuine Chrysler Sebring Cylinder Head
Head- Select Vehicle by Model
- Select Vehicle by VIN
Select Vehicle by Model
orMake
Model
Year
Select Vehicle by VIN
For the most accurate results, select vehicle by your VIN (Vehicle Identification Number).
39 Cylinder Heads found


Chrysler Sebring Head Pkg-Engine Cylinder
Part Number: 68004168AB$922.75 MSRP: $1130.00You Save: $207.25 (19%)
Chrysler Sebring Head Pkg-Engine Cylinder
Part Number: 68004168AA$922.75 MSRP: $1130.00You Save: $207.25 (19%)


Chrysler Sebring Head Pkg-Engine Cylinder
Part Number: R8004168AA$657.51 MSRP: $766.00You Save: $108.49 (15%)


Chrysler Sebring Head Engine Cylinder
Part Number: MD307675$58.90 MSRP: $74.95You Save: $16.05 (22%)


Chrysler Sebring Head Pkg-Engine Cylinder
Part Number: 68034276AC$1840.15 MSRP: $2240.00You Save: $399.85 (18%)

Chrysler Sebring Head Pkg-Engine Cylinder
Part Number: 68034276AB$1840.15 MSRP: $2240.00You Save: $399.85 (18%)


| Page 1 of 2 |Next >
1-20 of 39 Results
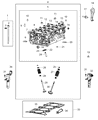
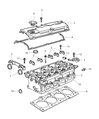
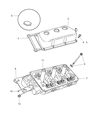
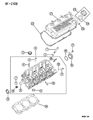
Chrysler Sebring Cylinder Head
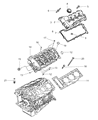
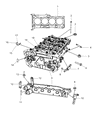
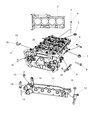
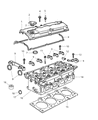
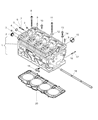
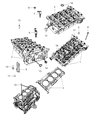
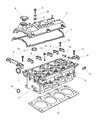
Chrysler Sebring Cylinder Head enables the engine to produce reliable power through smooth breathing and tight combustion chambers. The Cylinder Head occupies the top of the cylinders. It contains spark plug mounting locations, intake and exhaust passages, plus coolant channels so every Sebring engine can suck in the right air fuel mix and expel hot gases. When there is wear on guides, valves, seats, or springs, misfires or a dead cylinder can make for a poor Chrysler driving experience. Moreover, cracks or warpage in the Cylinder Head could cause leaking oil, coolant, or compression. When replacing the gasket, it is important to inspect the Cylinder Head surface. A breach of the head gasket between chambers robs Sebring of compression while a breach into the coolant passages could cause overheating or a mix of fluids. For all locking applications, Chrysler uses a bolt that stretches to its yield point. They are called Torque to Yield bolts. Over time, the Sebring switched from heavy cast iron to lighter aluminum Cylinder Head designs, which are lighter, shed heat faster, and allow for port shapes that boost airflow and potential horsepower. These refinements please the owners of modern Chrysler.
Looking for affordable and high-quality auto parts? Then you have already arrived at the proper online shop. We offer all Chrysler Sebring Cylinder Head at great affordable prices. Moreover, all genuine Chrysler Sebring Cylinder Head come with a manufacturer's warranty. In the long run, you would realize you have saved a lot of trouble and money with OEM parts from here.
Chrysler Sebring Cylinder Head Parts Questions & Experts Answers
- Q: How to remove and install Cylinder Head in four cylinder engine on Chrysler Sebring?A:Before lifting the car, first loosen and remove the lug nuts and wheels from the right front side, raise the front of the car, then put it on secure jackstands. Take off the right front wheel, and afterward remove the splash shields and inner fender liner. Pull the number one piston to top position. Break your car's power battery connection by detaching it from the ground terminal. Hold the engine cover, lift it up straight from the ball posts, and take it off. Get rid of old coolant first. Then pull the spark plugs out. Remove the air filter housing. Remove the coolant reservoir. Pull out your power steering reservoir while keeping the lines connected, then set it somewhere where it won't get in your way. Remove the drivebelts. Before beginning work, cover the engine's intake ports with duct tape to keep dust and particles from entering. Detach the bolt holding down the power steering hose bracket, then unscrew the pump bolts from its front mount and save it aside without letting the hoses disconnect. Remove the Exhaust Manifold. Remove the ignition coils and spark plugs. Remove the valve cover. Take off three parts of your car - remove the water pump pulley, the air conditioner compressor, and the bracket that holds both of these in place. Remove the Timing Chain cover and timing chain. Raise the hand of the cylinder head and take off the rotor valve from its base before removing and putting aside the lifters on the cambores. When removing the cylinder head's bolts, turn them 1/4 turn counterclockwise, following the opposite order from installation. You can then remove them easily by hand. Write down where each bolt goes so you reinstall them correctly. Except for two lower bolts on the timing chain side, the cylinder head bolt washers stay in place permanently. Gently lift and put the cylinder head on wood supports so it won't scrape the sealing pieces when removed. When the head won't move away from the block, break it free by hitting the casting with a wooden block or prying it loose with a crowbar. Carefully handle the seals, and test the head for possible misshapen patterns before working further. After lifting off the cylinder head, grab the WT filter using needle nose pliers and remove it from its spot on the engine block. Clear all old gasket material from both block and head, using special cleaning chemicals if needed. Take your time to avoid losing anything inside the engine while carefully looking at and cleaning all the threaded connections. Place your new filtering device or carefully cleaned one into the port at the right front corner of your engine block. Put just two tiny drops of RTV sealant where the timing chain meets the block face. Carefully set the freshly installed gasket and the engine head onto the engine block. Stop using any head bolt when you notice thread gaps while measuring with a straightedge or ruler. Rub clean engine oil on the threads of the cylinder head bolt before putting it in place. Set the washers on the first two head bolts with their wider flat side facing up. Carefully tighten the head bolts by a specific method, working through each sequence in order, until you reach the required force. To properly torque the cylinder head bolts, check which type your engine uses because two different styles have been employed. When tightening, you must do it by a certain number of degrees, and an angle-torque gauge will help you get it right. If you don't have an angle-torque gauge, draw marks on head bolt heads and tighten each bolt, one at a time, until the mark shows the required number of degrees from its starting position. Reinstall the timing chain and cover. Afterwards, you simply do the opposite of what you did to take it apart. Add fuel and changed the engine oil with filter installation. Turn the crankshaft forward by hand in small circle motions. Do this action six times, then go back to check the camshaft timing lines. Turn the engine on and have it reach usual running temperature. Keep watch for drips and verify everything functions correctly.


