My Garage
My Account
Cart
Genuine Dodge Avenger Shock Absorber
Suspension Shock Absorber- Select Vehicle by Model
- Select Vehicle by VIN
Select Vehicle by Model
orMake
Model
Year
Select Vehicle by VIN
For the most accurate results, select vehicle by your VIN (Vehicle Identification Number).
31 Shock Absorbers found


Dodge Avenger Bracket-Shock ABSORBER
Part Number: 5151303AA$45.34 MSRP: $66.70You Save: $21.36 (33%)


Dodge Avenger Bracket-Shock ABSORBER
Part Number: 5085495AC$44.91 MSRP: $64.55You Save: $19.64 (31%)


Dodge Avenger Suspension Absorber
Part Number: 4766053AE$241.96 MSRP: $365.00You Save: $123.04 (34%)Dodge Avenger Suspension Absorber
Part Number: 4766053AD$241.96 MSRP: $365.00You Save: $123.04 (34%)


Dodge Avenger Suspension Absorber
Part Number: 68164722AC$174.38 MSRP: $261.00You Save: $86.62 (34%)
| Page 1 of 2 |Next >
1-20 of 31 Results
Dodge Avenger Shock Absorber
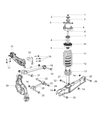
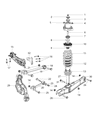
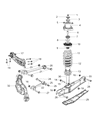
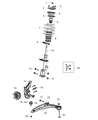
The Shock Absorber featured in Dodge Avenger car models is part of the suspension system that is aimed at reducing harsh bouncing and giving a smooth ride. In this way, the kinetic movement is transformed into heat through hydraulic means while, at the same time, the Shock Absorber increases its ability to interfere with shock impulses thereby providing better handling on most terrains. Shock Absorbers used in Dodge Avenger models vary with twin-tube and mono-tube types being used successively. A Twin-tube shock is typical and its design is rather basic and the shock can, if needed, be gas filled for greater longevity. Conversely, mono-tube shocks provide enhanced heat management and performance more than the twin-tube, for multi-angular mountings. Other features that add versatility to Shock Absorber are the Position Sensitive Damping (PSD) and Acceleration Sensitive Damping (ASD) that provide optimal damping of road inputs to offer the finest dynamic control in the Dodge Avenger.
Looking for affordable and high-quality auto parts? Then you have already arrived at the proper online shop. We offer all Dodge Avenger Shock Absorber at great affordable prices. Moreover, all genuine Dodge Avenger Shock Absorber come with a manufacturer's warranty. In the long run, you would realize you have saved a lot of trouble and money with OEM parts from here.
Dodge Avenger Shock Absorber Parts Questions & Experts Answers
- Q: How to remove and install the rear coil springs and shock absorber on a Dodge Avenger?A:To work on 2014 and earlier vehicles, start by taking off the trim pieces from the trunk ends. Take off the rear lug nuts, lift the vehicle with jackstands, raise it again, and place the jackstands securely in place before removing the back wheels. Start by getting rid of the trunk side trim panels. Then loosen two nuts at the trunk that hold the shock absorber to the vehicle body. Finally, if there are any lower Control Arm trim panels, remove them. Free the shock absorber by undoing the mounting nut and bolt at its lower end, and then remove the shock unit itself. Follow these same steps for installation but also lubricate the lower mount with white lubricating grease before putting it back. The lubricant helps you set things right and keeps the bushing of the lower shock from getting worn out. Before putting it on, make sure the upper mount side that sticks out more faces forward during installation. Raise the rear of the car with a floor jack under the wheel housing until the car sits at its normal height, then bolt the lower frame. Close the installation by putting on the tire and tightening the wheel nuts, drop the car back down, secure the top bolt of the shock absorber, and put back the trunk's plastic covers.


