My Garage
My Account
Cart
Genuine Dodge Caravan Oil Pan
Oil Drain Pan- Select Vehicle by Model
- Select Vehicle by VIN
Select Vehicle by Model
orMake
Model
Year
Select Vehicle by VIN
For the most accurate results, select vehicle by your VIN (Vehicle Identification Number).
13 Oil Pans found


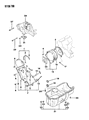


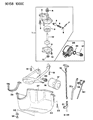

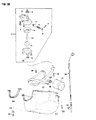
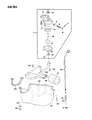
Dodge Caravan Oil Pan
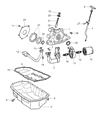
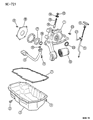
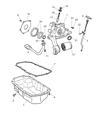
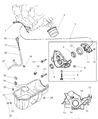
The Oil Pan used in Dodge Caravan cars is that it is a storage compartment for the engine oil that helps in maintaining temperatures of the mechanical parts within the engine. A wet sump system is employed in Dodge Caravan and its Oil Pan takes oil drawn through a pickup tube by the oil pump and circulates it through the engine before it falls to the Pan. This design is very vital in ensuring that there is sufficient amount of oil depending on the required operating state. Before, Dodge Caravan Oil Pans were constructed using stamped steel but the recent versions offer more complex cast aluminum. These variations improve on durability and efficiency as a result contributing to the enhancement of the refrigeration systems. In this case though the basic function stays common to all different models, the shift from using steel to aluminum marks superior engineering in a bid to enhance efficiency and durability in the Dodge Caravan.
Looking for affordable and high-quality auto parts? Then you have already arrived at the proper online shop. We offer all Dodge Caravan Oil Pan at great affordable prices. Moreover, all genuine Dodge Caravan Oil Pan come with a manufacturer's warranty. In the long run, you would realize you have saved a lot of trouble and money with OEM parts from here.
Dodge Caravan Oil Pan Parts Questions & Experts Answers
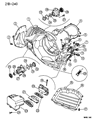
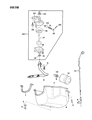
- Q: How to remove and reinstall the oil pan in four cylinder engine on Dodge Caravan?A:To remove the oil pan, the first thing to do is to disconnect the negative terminal of the battery; and then lift the car, placing it on jackstands. Inclined to be the accessory drivebelt splash shield and expel the engine oil. After that, remove the front engine mount bracket and undoing the nuts which secures the structural collar to the engine, oil pan, and transaxle. For the model with air-conditioning, then remove the compressor bracket to oil pan bolt. To free and unbolt, a criss-cross pattern should be the pattern of choice, after which the oil pan should be disengaged from the vehicle and if sticky should be coaxed down gently with a soft-faced hammer. Do not mar the gasket surfaces in any way. Retain the oil pump pick-up tube and screen assembly: clean them and throw the O-ring seal away. Machine or scrape the sealing surfaces on the oil pan and block free of old gasket and examine for warpage. During assembling a new O-ring should be fitted onto the oil pick-up tube and then screwed into the housing of the oil pump and tightened with the recommended torque. Run a line of RTV sealant at the cylinder block-to-oil pump assembly joint and fit a new oil pan gasket. Alight the oil pan and loosely install the bolts, tighten the bolts with the side by side motion beginning from the center. For a/c models, fit the compressor bracket bolt. Fix the structural collar into place by sliding into the space where it is required and tightening the bolts by hand only before using the wrench to change the torque to the required standard. Put back the front engine mount bracket; undo the rest of the procedures stated above; put the right oil in the crankcase; start the car and check for any signs of leakage; for the last procedure, take the car for a test drive with all external features in check.

Related Dodge Caravan Parts
 Dodge Caravan Oil Filter
 Dodge Caravan Rod Bearing
 Dodge Caravan Crankshaft Pulley
 Dodge Caravan Piston Ring Set
 Dodge Caravan Dipstick Tube
 Dodge Caravan Oil Cooler
 Dodge Caravan Oil Pressure Switch
 Dodge Caravan Crankshaft Thrust Washer Set
 Dodge Caravan Dipstick
 Dodge Caravan Drain Plug
 Dodge Caravan Drain Plug Washer
 Dodge Caravan Oil Pump