My Garage
My Account
Cart
Genuine Dodge Caravan Timing Belt
Engine Timing Belt- Select Vehicle by Model
- Select Vehicle by VIN
Select Vehicle by Model
orMake
Model
Year
Select Vehicle by VIN
For the most accurate results, select vehicle by your VIN (Vehicle Identification Number).
9 Timing Belts found


Dodge Caravan Timing Belt
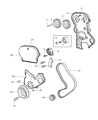
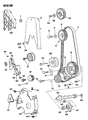
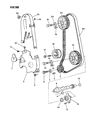
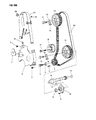
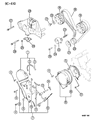
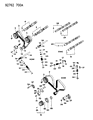
Timing Belt in the Dodge Caravan basically ensures that the crankshaft and camshaft rotate at equal speeds and the engine valves open and close in perfect coral with the pistons for effectiveness. This synchronization is made by a rubber belt which has fibers inside it, and which is operated by the crankshaft while driving the camshaft(s) with the assistance of a tensioner and idler pulleys. Many Dodge caravan models have incorporated the use of timing belts as this is preferred over chains and gears because it is cheaper, noisless and flexible to install. In the previous designs, coarser systems may have been employed, however, new timing belts are equipped with better materials and curved transverse with improved durability and less noise production. In non-interference engines, the formation of the belt is recommended as it is recommended for the consumer for regular inspection and timely replacement of the belt and other parts in the engine.
Looking for affordable and high-quality auto parts? Then you have already arrived at the proper online shop. We offer all Dodge Caravan Timing Belt at great affordable prices. Moreover, all genuine Dodge Caravan Timing Belt come with a manufacturer's warranty. In the long run, you would realize you have saved a lot of trouble and money with OEM parts from here.
Dodge Caravan Timing Belt Parts Questions & Experts Answers
- Q: How to Remove and Install Timing Belt and Timing Cover in four cylinder engine on Dodge Caravan?A:If the timing belt failed while the engine was running the chance of valve damage is probable, therefore an engine compression test should be carried out after the belt has been replaced. In the removal process, do not revimplify the crankshaft or camshafts once the timing belt is removed so as not to cause valve damage from impact by the piston. First, remove the negative battery terminal, properly jack up the vehicle placing jack stands and then remove the right inner splash shield and the accessory drive belts. You remove the crank shaft pulley by slackening the center bolt of the crank shaft pulley, if it cannot be held still by hand you could use a large screwdriver or bar to do this, use a three jaw puller to remove the pulley with the correct insert to protect the crank shaft threads. Retranslate the lower and upper timing belt covers, replace the crankshaft bolt with spacer and take out the right Engine Mount by using floor jack. I will make sure that the camshaft sprocket and the crankshaft are aligned in the right manner before the timing belt is removed and if one is to reuse it, the direction of the belt has to be marked. Relax the tensioner pulley in order make some space then remove the timing belt, and check the crankshaft front oil seal, the water pump, the tentioner, idler wheel and the timing belt for any signs of abrasion or wear. Ensure that the timing notches on the camshaft sprockets are properly aligned, turn the exhaust camshaft sprocket in the anticlockwise direction and fit in the timing belt by creating tension. Allen wrench should be used to turn the tensioner and tighten the lock bolt; then rotate the crankshaft two full rotations clockwise, if it is tight this may mean incorrect valve timing. If required rearrange the timing marks and replace the belt and other parts in the reverse sequence making sure that the crankshaft pulley bolt is tightened to the right torque before starting the car for road test.

Related Dodge Caravan Parts
 Dodge Caravan Cylinder Head Gasket
 Dodge Caravan Camshaft
 Dodge Caravan Lash Adjuster
 Dodge Caravan Cylinder Head
 Dodge Caravan Crankshaft
 Dodge Caravan Cam Gear
 Dodge Caravan Camshaft Seal
 Dodge Caravan Crankshaft Thrust Washer Set
 Dodge Caravan Cylinder Head Bolts
 Dodge Caravan Timing Chain
 Dodge Caravan Timing Cover Gasket
Browse by Year
2007 Timing Belt 2006 Timing Belt 2005 Timing Belt 2004 Timing Belt 2003 Timing Belt 2002 Timing Belt 2001 Timing Belt 2000 Timing Belt 1999 Timing Belt 1998 Timing Belt 1997 Timing Belt 1996 Timing Belt 1995 Timing Belt 1994 Timing Belt 1993 Timing Belt 1992 Timing Belt 1991 Timing Belt 1990 Timing Belt 1989 Timing Belt 1988 Timing Belt 1987 Timing Belt 1986 Timing Belt